Running Synology Diskstation in an Alpine Linux chroot container
- 256 MB RAM
- CPU Marvell Armada-370 @800Mhz
- USB 2.0 only
However, it is a neat little device which consumes not too much power.
Unfortunately, the operating system which comes with it, the Linux based DSM 6.2, feels always a little too sluggish. As per default DSM runs several services, among them Nginx and PostgreSQL.
As a Unix/Linux professional I don't really need the web interface or other fancy stuff. I want only exactly one reliable file service and shell access through ssh – nothing more.
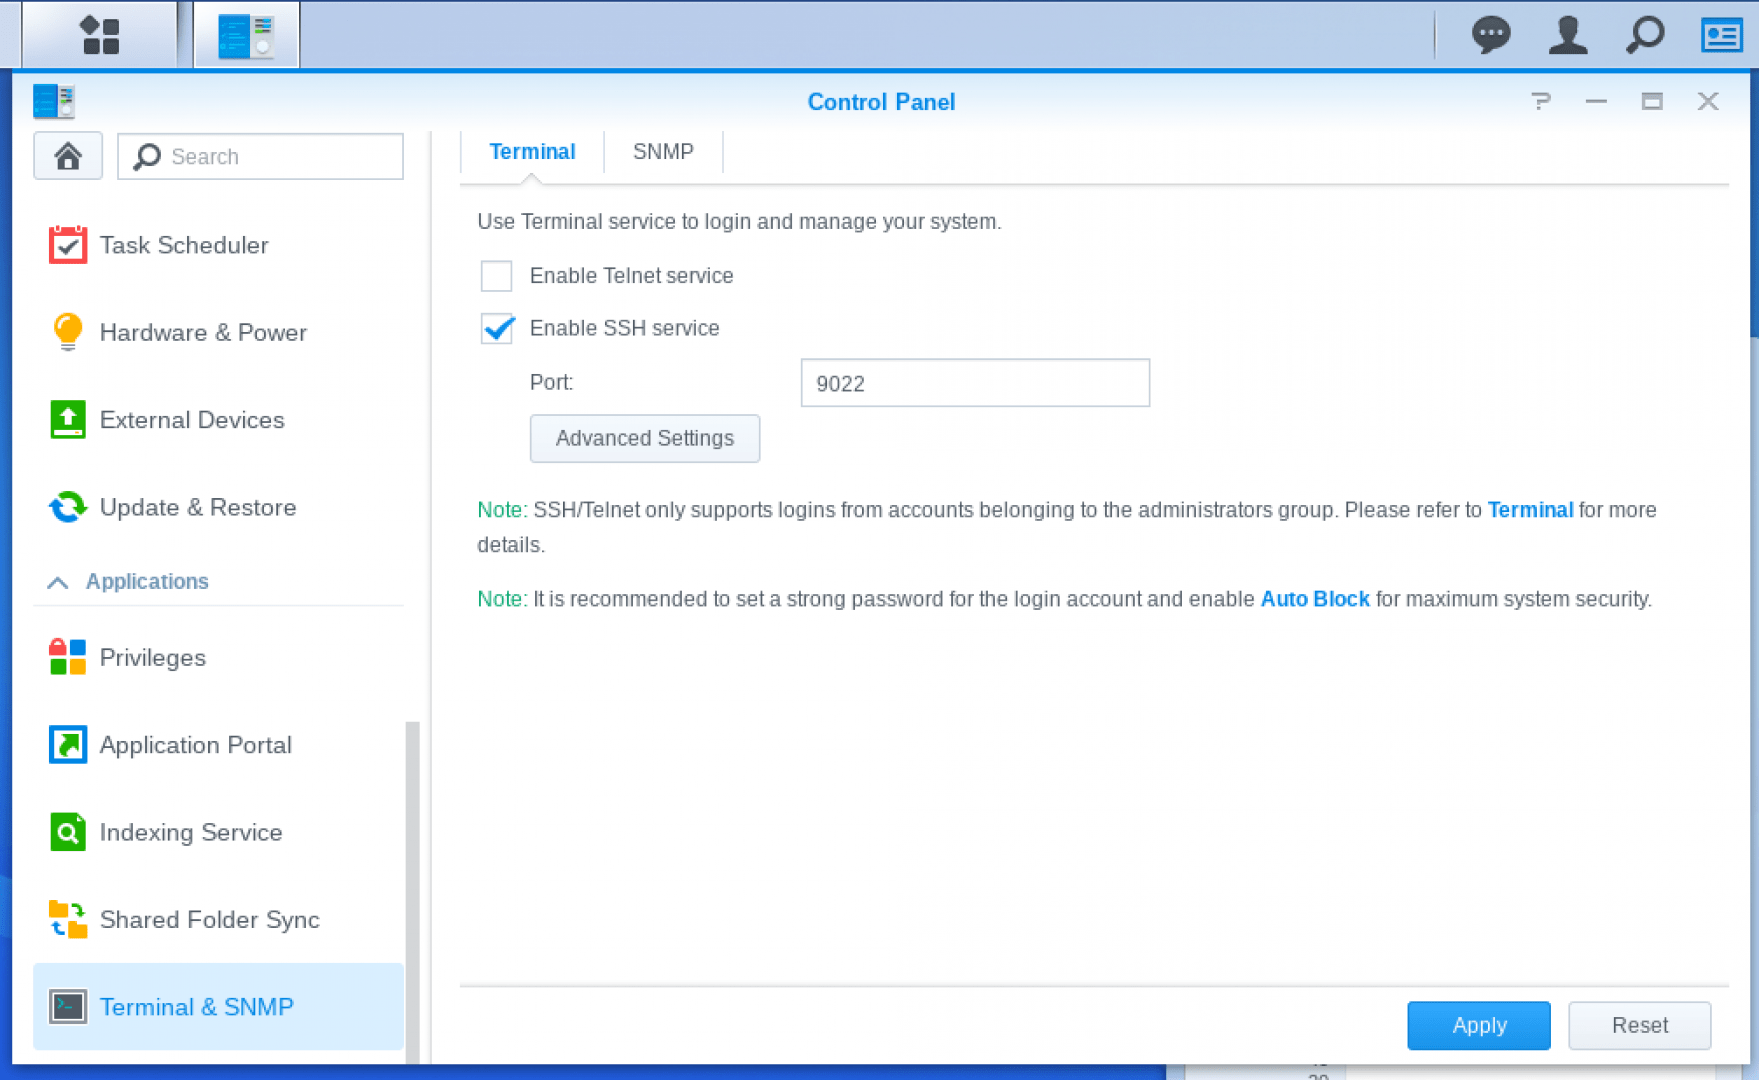
Step one: settings in the web interface
- Go to “Control Panel” –> “File Services”
- Disable all File Services (SMB/AFP/NFS, TFP, rsync)
- Scroll down to “Terminal & SNMP”
- Check “Enable SSH sevice” and use a non-standard port
Step two: Prepare the Alpine chroot
Now, that we setup ssh we will not return to the webinterface. Login to you diskstation over ssh.
user@desktop:~$ ssh diskstation -p 9022
user@192.168.178.7's password:
Could not chdir to home directory /var/services/homes/user: No such file or directory
user@diskstation:/$ sudo -i
Password:
root@diskstation:~#
Then we prepare our Alpine chroot. Go to https://alpinelinux.org/downloads/ and download the “Mini Root Filesystem” for armv7.
At your Diskstation root shell prepare the chroot directory.
root@diskstation:~# mkdir -p /volume1/chroots/alpine/
root@diskstation:~# cd /volume1/chroots/alpine/
Copy the Alpine rootfs to the diskstation: scp -P 9022 alpine-minirootfs-3.11.2-armv7.tar.gz user@diskstation:/tmp
At the diskstation, extract it: root@diskstation:/volume1/chroots/alpine# tar xvzf /tmp/alpine-minirootfs-3.11.2-armv7.tar.gz
Create a directory for the data volume: # mkdir /volume1/chroots/alpine/volume1
Now, we must copy over the kernel modules from the DSM system to the alpine chroot. This is important or kernel related tasks we want to do later in the chroot.
# mkdir /volume1/chroots/alpine/lib/modules/`uname -r`
# cp -a /lib/modules/*  /volume1/chroots/alpine/lib/modules/`uname -r`/
Now it is time to make some bind mounts end enter the chroot:
# CR=/volume1/chroots/alpine
# mount --bind /proc $CR/proc
# mount --bind /sys $CR/sys
# mount --bind /dev $CR/dev
# mount --bind /dev/pts $CR/dev/pts
# chroot $CR /bin/ash -l
We are now inside the Alpine chroot and can do further configuration. At first, we want to setup a user: diskstation:/# adduser user
Then we update the system and add openssh
# apk update
# apk upgrade
# apk add openssh
# vi /etc/ssh/sshd_config
In the SSH config choose a non-standard port
Port 7022
Add sudo and add the user:
#  apk add sudo
# visudo
user ALL=(ALL) ALL
Add openrc: apk add openrc
For file services I chose samba:
# apk add samba-server
#  vi /etc/samba/smb.conf

# .... Add following lines at the bottom
[media]
        writeable=yes
        guest ok=yes
        path=/volume1/media
        skip smb perm=yes
        comment="media"
Add the user to samba: # smbpasswd -a user
Step three: Disable DSM services and start chroot
Now that our Alpine chroot is ready to go we wand to disable the unnecessary DSM services.
Exit the Alpine chroot and return to the DSM command line envvironment .
At first we want to disable the thumbd service
cd  /var/packages/FileStation/target/etc/conf
mv thumbd.conf thumbd.conf.orig
Now it depends heavily on what services are running at your diskstation. You can find out what services are enabled with the command synoservicecfg --status
In order to disable the services we have to utilize the script /etc/rc.local. Because DSM is very picky about the services and may even refuse to start, it is important that we disable the services only temporarily every time the device is booted. The synoservicectl command makes disabling services permanent. Since DSM uses the Upstart system, like earlier versions of Ubuntu, it does so by creating override files. In order to revert this, we have to delete these files.
So, my /etc/rc.local script looks like this:
#!/bin/sh
synoservice --disable pkgctl-SynoFinder
synoservicecfg -stop pgsql
synoservicectl --stop synosnmpcd
synoservicectl --stop snmpd
synoservicectl --stop syslog-ng
rm /usr/share/init/syslog-ng.override

synoservicectl --stop synobackupd
synoservicectl --stop synocgid
synoservicectl --stop hotplugd
synoservicectl --stop nginx
synoservicectl --stop pgsql
synoservicectl --stop synologaccd
synoservicectl --stop synoconfd
synoservicectl --stop synonetd
synoservicectl --stop synologrotated
synoservicectl --stop synologand
synoservicectl --stop synocrond
synoservicectl --stop synostoraged
synoservicectl --stop findhostd
synoservicectl --stop synoscgi
synoservicectl --stop syslog-acc
synoservicectl --stop s2s_daemon

rm /usr/share/init/synobackupd.override
rm /usr/share/init/synocgid.override
rm /usr/share/init/hotplugd.override
rm /usr/share/init/nginx.override
rm /usr/share/init/pgsql.override
rm /usr/share/init/synologaccd.override
rm /usr/share/init/synoconfd.override
rm /usr/share/init/synonetd.override
rm /usr/share/init/synologrotated.override
rm /usr/share/init/synologand.override
rm /usr/share/init/synocrond.override
rm /usr/share/init/synostoraged.override
rm /usr/share/init/findhostd.override
rm /usr/share/init/synoscgi.override
rm /usr/share/init/syslog-acc.override
rm /usr/share/init/s2s_daemon.override
Create this file, but do not reboot just yet. We must prepare the autostart of out Alpine chroot. Create a second file with name /etc/rc.alpine
#!/bin/sh
# Package
PACKAGE="alpine"
DNAME="Alpine Chroot"
# Others
CHROOTTARGET="/volume1/chroots/alpine"

start_daemon ()
{
        # Make sure we don't mount twice
        grep -q "${CHROOTTARGET}/proc " /proc/mounts || mount -t proc proc ${CHROOTTARGET}/proc
        grep -q "${CHROOTTARGET}/sys " /proc/mounts || mount -t sysfs sys ${CHROOTTARGET}/sys
        grep -q "${CHROOTTARGET}/dev " /proc/mounts || mount -o bind /dev ${CHROOTTARGET}/dev
        grep -q "${CHROOTTARGET}/dev/pts " /proc/mounts || mount -o bind /dev/pts ${CHROOTTARGET}/dev/pts
        grep -q "${CHROOTTARGET}/media " /proc/mounts || mount -o bind /volume1/media ${CHROOTTARGET}/media
        grep -q "${CHROOTTARGET}/volume1 " /proc/mounts || mount -o bind /volume1 ${CHROOTTARGET}/volume1
        chroot ${CHROOTTARGET}/ /sbin/openrc
        chroot ${CHROOTTARGET}/ touch /run/openrc/softlevel
# start SSH
        chroot ${CHROOTTARGET}/ /etc/init.d/sshd start
# start Samba
        chroot ${CHROOTTARGET}/ /etc/init.d/samba start
# Start syslog
        chroot ${CHROOTTARGET}/ /sbin/syslogd
# Start cron
        chroot ${CHROOTTARGET}/ /usr/sbin/crond -b
}

stop_daemon ()
{

    # Unmount
    umount ${CHROOTTARGET}/dev/pts
    umount ${CHROOTTARGET}/dev
    umount ${CHROOTTARGET}/sys
    umount ${CHROOTTARGET}/proc
}

daemon_status ()
{
    `grep -q "${CHROOTTARGET}/proc " /proc/mounts` && `grep -q "${CHROOTTARGET}/sys " /proc/mounts` && `grep -q "${CHROOTTARGET}/dev " /proc/mounts` && `grep -q "${CHROOT
TARGET}/dev/pts " /proc/mounts`
}

case $1 in
    start)
        if daemon_status; then
            echo ${DNAME} is already running
            exit 0
        else
            echo Starting ${DNAME} ...
            start_daemon
            exit $?
        fi
        ;;
    stop)
        if daemon_status; then
            echo Stopping ${DNAME} ...
            stop_daemon
            exit 0
        else
            echo ${DNAME} is not running
            exit 0
        fi
        ;;
    status)
        if daemon_status; then
            echo ${DNAME} is running
            exit 0
        else
            echo ${DNAME} is not running
            exit 1
        fi
        ;;
    chroot)
        chroot ${CHROOTTARGET}/ /bin/ash -l
        ;;
    *)
        exit 1
        ;;
esac
Now, at the bottom of /etc/rc.local add the line
[ -x /etc/rc.alpine ] && /etc/rc.alpine start
Now we are ready. The rc.alpine script mout the necessery directories and starts 4 Services inside the chroot “container”: SSH, Samba, Syslog and cron.
Cross your fingers and type reboot.
It may take a while and longer than ususal (remember: all services must be started and hut down again). But then you should hear the well-known beep from your Diskstation.
Then try to login to your diskstation th the port of your Alpine chroot: ssh user@diskstation -p 7022
Check what processes are running, excluding kernel processes. The output should look like this.
diskstation:~$ ps ax|grep -v \\[
  PID TTY      STAT   TIME COMMAND
    1 ?        Ss     0:13 /sbin/init
 1362 ?        Ss     0:00 udevd --daemon
 2661 ?        Ssl    0:00 /usr/sbin/ntpd -p /var/run/ntpd.pid -g -u ntp:ntp
 2666 ?        Ss     0:00 /usr/bin/sshd
 3614 ?        S      0:00 /usr/sbin/sshd
 3695 ?        Ss     0:00 /usr/sbin/smbd -D
 3701 ?        S      0:00 /usr/sbin/smbd -D
 3702 ?        S      0:00 /usr/sbin/smbd -D
 3708 ?        S      0:00 /usr/sbin/smbd -D
 3728 ?        Ss     0:00 /sbin/syslogd
 3730 ?        Ss     0:00 /usr/sbin/crond -b
 3748 ttyS0    Ss+    0:00 /sbin/getty 115200 console
 4662 ?        Ss     0:00 /usr/sbin/crond
 4691 ?        Ssl    0:01 /usr/syno/bin/scemd
 5153 ?        Ss     0:01 /usr/bin/nmbd -F
You will notice that the Synology service scemd is still running. This is the “Synology Command Execution Management Daemon”. It is necessary to run it in order to be able to switch off the Diskstation with a long press on the hardware button. Otherwise the Diskstation will fail to switch off. The alternative is to log on via SSH in the DSM environment and type poweroff. If you can live with that (or if you don't ever want to switch off your NAS anyway) you can disable scemd as well.
Conclusion
I showed you how to run your diskstation almost entirely in a minimal Alpine Linux chroot container. On my box this saves almost 30 MB of RAM. My Diskstation is now fast and snappy again. It should also be possible to run almost any service on the box, thanks to the vast Alpine Linux repository.
Browsers and privacy
Web browsers are the most common tool nowadays. Therefore, they are most popular target for any kind of bad people: malware authors, attackers and others.
Further, there is also a huge interest from companies to get data from users. They want to get all kinds of data. And since web browsers are the most common tools, the most obvious way is to cooperate with browser manufacturers to get data.
So far, this are the facts which are known to most privacy concerned people. But since no one can avoid using a browser, most are willing to do a compromise. But which browser does leak the fewest data of all?
Method
The premise was, that the browser is free software (open source). Although some proprietary browsers do a good job from a pure technical perspective, most security and privacy experts do agree, that using free and open source software is essential for secure and privacy-aware networking.
The testing was done on Debian 10 on amd64 with some packages from MX Linux.
The following browsers were tested:
- Firefox 70.0.1 (Mozilla Binaries from MX Linux)
- Firefox ESR 68.2.0 (Debian package)
- Chromium 78.0.3904.97 (Debian Package)
- Brave Browser 1.0.0 (Package from Brave web site)
- Epiphany 3.32.1.2 (Debian package)
- Midori 7.0 (Debian package)
The method itself was relatively simple. I created a new user with an empty home directory, so there were no cache or plugins. Every browser was started without any pre-configuration or cache.
At the same time tcpdump was running. I disabled IPv6 for simpleness. I made sure no other network capable program was active and made tcpdump listen to the outgoing network interface.
I started the browser, kept it open for about 10 seconds without any interaction or usage and then closed it. After that I filtered out the http and https traffic from the results
Results
Firefox
Firefox is a free web browser developed by the Mozilla Foundation. Mozilla provides two branches. The official branch gets updated every 6 weeks (every 4 weeks in the future), following a “rapid development cycle”. After this amount of time, the browser must be updated to the next version in order to receive security updates. Only the current version is supported.
For organizations and people who don't want to get the newest features every few weeks, there is a so-called ESR branch, in which a given version is maintained roughly one year. In this time the browser gets security updates. Besides that, it remains unchanged.
The Debian GNU/Linux distribution provides a package for Firefox ESR only. The distribution MX Linux provides a package for current Firefox, which is not built from source, but is in essence a re-packaged version from the binaries provided from Mozilla.
Firefox 70.0.1
Firefox 70.0.1 contacted in total 17 different hosts
104.16.142.228.https
36.75.98.34.bc.googleusercontent.com.https
93.184.220.29.http
a2-16-106-152.deploy.static.akamaitechnologies.com.http
ec2-34-223-159-30.us-west-2.compute.amazonaws.com.https
ec2-35-166-89-106.us-west-2.compute.amazonaws.com.https
ec2-50-112-59-215.us-west-2.compute.amazonaws.com.https
ec2-52-33-55-70.us-west-2.compute.amazonaws.com.https
ec2-52-35-182-58.us-west-2.compute.amazonaws.com.https
ec2-54-191-170-25.us-west-2.compute.amazonaws.com.https
ec2-54-72-168-141.eu-west-1.compute.amazonaws.com.https
mozilla-org.public.mdc1.mozilla.com.https
server-13-224-196-33.fra2.r.cloudfront.net.https
server-143-204-101-114.fra50.r.cloudfront.net.https
server-143-204-101-115.fra50.r.cloudfront.net.https
server-143-204-101-38.fra50.r.cloudfront.net.https
server-143-204-101-56.fra50.r.cloudfront.net.https
Additionally DNS queries for the A records for the following 22 domains were maid:
accounts.firefox.com.
classify-client.services.mozilla.com.
content-signature-2.cdn.mozilla.net.
detectportal.firefox.com.
firefox.settings.services.mozilla.com.
incoming.telemetry.mozilla.org.
location.services.mozilla.com.
mozilla.org.
normandy.cdn.mozilla.net.
ocsp.digicert.com.
push.services.mozilla.com.
search.services.mozilla.com.
shavar.services.mozilla.com.
snippets.cdn.mozilla.net.
tiles.services.mozilla.com.
tracking-protection.cdn.mozilla.net.
www.ebay.de.
www.facebook.com.
www.mozilla.org.
www.reddit.com.
www.wikipedia.org.
www.youtube.com.
Firefox ESR 68.2.0
Firefox ESR 68.2.0 contacted in total 13 different hosts
 104.16.142.228.https
 93.184.220.29.http
 a2-16-106-209.deploy.static.akamaitechnologies.com.http
 a92-122-254-195.deploy.static.akamaitechnologies.com.https
 ec2-34-223-159-30.us-west-2.compute.amazonaws.com.https
 ec2-34-253-23-107.eu-west-1.compute.amazonaws.com.https
 ec2-35-167-176-126.us-west-2.compute.amazonaws.com.https
 ec2-52-89-218-39.us-west-2.compute.amazonaws.com.https
 mozilla-org.public.mdc1.mozilla.com.https
 server-13-224-196-11.fra2.r.cloudfront.net.https
 server-13-225-78-51.fra2.r.cloudfront.net.https
 server-143-204-101-24.fra50.r.cloudfront.net.https
 server-143-204-101-60.fra50.r.cloudfront.net.https
Additionally DNS queries for the A records for the following 23 domains were maid:
accounts.firefox.com.
content-signature-2.cdn.mozilla.net.
detectportal.firefox.com.
firefox.settings.services.mozilla.com.
getpocket.cdn.mozilla.net.
getpocket.com.
img-getpocket.cdn.mozilla.net.
location.services.mozilla.com.
mozilla.org.
ocsp.digicert.com.
search.services.mozilla.com.
shavar.services.mozilla.com.
snippets.cdn.mozilla.net.
tirol.orf.at.
tracking-protection.cdn.mozilla.net.
www.ebay.de.
www.facebook.com.
www.mozilla.org.
www.reddit.com.
www.welt.de.
www.wikipedia.org.
www.youtube.com.
www.zeit.de.
Chromium 78.0.3904.97
Chromium is a free web browser developed by Google. While Chromium is open source, many browsers which are based on it are not. The most popular is Chrome, also developed by Google. Further, future versions of Microsoft Edge, the default web browser in Windows 10, will be based on Chromium.
Chromium contacted in total 6 different hosts
 172.217.130.9.https
 fra15s24-in-f238.1e100.net.https
 fra15s46-in-f3.1e100.net.https
 fra16s12-in-f13.1e100.net.https
 fra16s13-in-f227.1e100.net.https
 fra16s20-in-f4.1e100.net.https
Additionally DNS queries for the A records for the following 9 domains were maid:
accounts.google.com.
fonts.gstatic.com.
hsdmpfy.
huuqjdqtnjj.
r4---sn-h0jeened.gvt1.com.
redirector.gvt1.com.
vypmecteapc.
www.google.com.
www.gstatic.com.
Brave 1.0.0
Brave is a free web browser based on Chromium, developed by Brave Software. Brave includes an ad and tracker blocker. Brave advertises itself as a browser for privacy minded people.
Brave contacted in total 3 different hosts
104.28.23.242.https
151.101.113.7.https
151.101.114.217.https
Additionally DNS queries for the A records for the following 11 domains were maid:
aqkslhfmwv.
brave-core-ext.s3.brave.com.
componentupdater.brave.com.
crlsets.brave.com.
go-updater.brave.com.
laptop-updates.brave.com.
mkidosnkaqqulg.
no-thanks.invalid.
static1.brave.com.
static.brave.com.
vgjrddw.
Epiphany / GNOME Web 3.32.1.2
GNOME Web is a free web browser based on WebkitGTK. Webkit is a browser engine developed by Apple and primarily used in Apple's proprietary Safari web browser. WebkitGTK is the GTK port of Webkit.
GNOME Web is the default web browser for the GNOME desktop environment and formerly known as Epiphany. The package name and the name of the binary on Debian is still “epiphany”.
Epiphany contacted in total 2 different hosts
104.31.91.96.https
fra16s08-in-f202.1e100.net.https
Additionally DNS queries for the A records for the following 2 domains were maid:
easylist.to.
safebrowsing.googleapis.com.
Midori 7.0
Midori is a free web browser based on WebkitGTK, like Epiphany. Midori is part of the “Goodies” component of the XFCE desktop environment. It is meant as a lightweight web browser with only basic features.
During the test, Midori contacted no hosts and made no DNS queries.
Summary
| Browser | http(s) Req. | DNS A queries |
|---|---|---|
| FF | 17 | 22 |
| FF ESR | 13 | 23 |
| Chromium | 6 | 9 |
| Brave | 3 | 11 |
| Epiphany | 2 | 2 |
| Midori | 0 | 0 |
Conclusion
From the results it can be said, that Midori should be the first choice for people which are concerned about built-in data leakage to companies. Since Midori uses WebkitGTK it receives also security updates in a reasonable time frame. (The WebkitGTK project claims, that it sometimes integrate security fixes even before Apple).
However, since built-in data leakage is only part of privacy and security, one must take also other aspects into account. Midori has basic support for ad blocking, but to my knowledge no way to block trackers.
Chromium is closely connected to Google and exists primary for reasons of money making. Therefore one can not expect too much support from Google in regards to blocking ads and trackers.
Brave seems to be a good choice for having a privacy conscious browser at first sight. However, since Brave Software wants to establish an ad network of its own and is dependent of what Google releases as open source, it is possibly best to remain skeptical.
The Firefox browsers did perform worst regarding data leakage. However, it is also a browser where you can configure almost every aspect. From simple settings and privacy add-ons to complex configuration of user.js is almost everything possible. But make no mistake: it is a lot of work to make Firefox silent and really privacy-aware. The ghack-user.js site is a good start if you want to get into it.
How to choose a distro
Disclaimer: The term “distro” means a GNU/Linux system in the narrower sense. Despite that, *BSD systems are also meant.
There are hundreds of GNU/Linux distros to choose from, plus a growing number of *BSD variants. Many of them are for desktop use, many for general use, some are for more specialized use cases.
Many people who switch from Windows are overwhelmed with the amount of different Linux distros. Over the years I have developed certain criteria for choosing a distro, according to it's use case. These are working for me, they may not work for other people, or for you. However, maybe some people find these criteria useful:
Stability
Of course, everyone wants a stable system. But what does this mean? To me, it doesn't mean that it (almost) never fails – but this can be a result of stability.
Stability means tha there is a stable base (at least) which I can rely on. What I don't want is an ever-changing system. Progress is good and part of life, but when I spent more time to adapt to new circumstances than getting work done, or changes prevent me more than necessary from getting work done, then something is wrong.
There is an old saying in IT: “Never change a running system”. This saying is somewhat obsolete by now. However, another variant of that saying is still true: “Never run a changing system”.
That means to me:
Don't run a system which introduces new bleeding-edge technologies all the time. Prefer careful “evolution” over a “revolution”. Fedora has a reputation of being a testbed for new tech stuff, which will end up in RHEL eventually. And Ubuntu, at least the non-LTS versions, are a playground for Canonical. Which is fine, but this does make those distros not my first choice as a daily driver.
This doesn't speak against rolling release distros in general. But if you go for rolling release, make sure, that the community has a sane release policy. Arch, Manjaro and relatives have – despite being rolling release distros – a testing branch, where new packages are tested before they got released to all users.
Works out-of-the-Box and not getting in your way
To me an operating system is a tool I want to work with. With the tool, not on the tool. That means, that I don't want to tinker a lot, just to get a working console. Tinkering can be fun and is nice – if you want to learn how the system works (or why it isn't working), but that is a special use case.
But thie doesn't mean that I don't want to configure anything and all should be setup automatically. On the contrary, I do want to implement my favorite settings, such as locale, shell prompt, my WiFi network and so on. But the system should allow me to do that in a sane way, where I would expect it to be configured. It shouldn't have a special configuration tool, which interferes with my hand-made config, or change the method how the settings are configured (see “Stability”). But the operating system should also have sane defaults, so that I can start right away.
A negative example are the infamous systemd a start job is running or a stop job is runnning messages, with a running countdown and you have to wait half an eternity, until eventually time is up. Happens to me all the time when I use a Linux distro with systemd. It is configurable how long you have to wait. But I haven't seen a distro yet, where this time frame is set to a sane value.
Timely updates
Security is important. When your machine is connected to the internet, security is the most important aspect you should consider.
The most important thing an operating system can do in this regard is, to deliver security updates in a timely manner. Operating systems, which are serious about this, even publish security advisories about their updates. Distros which do this are, for example, Debian, Ubuntu, RedHat/CentOS, SUSE, Slackware, Arch, Manjaro and all major *BSD variants.
Don't use distros which have no clear and timely update policy and leave you with a vulnerable web browser. In contrast to the other points here, this is not an opinion which can be discussed. Don't use them, or you are putting yourself in great risk.
Free software
The majority of the more serious security experts (I don't talk about marketing people, who give advice to buy NextGen2 firewall boxes or other snakeoil) agree, that using only free software (open source software, FLOSS) is an important step in achieving security and privacy.
Proprietary software can have hidden functions the user is not aware of. For example, it can have backdors, so that third parties can take control of the computer. Or it can spy on you.
Not every distro has a clear policy to include only free software. Some of them do include non-free software, and some even advertise to use it.
Very strict about the exclusive inclusion of free software are the FSF-endorsed free distros. But not all of them offer timely security updates.
Debian/Devuan, Fedora and Mageia Core have also a clear policy about including free software only. In regards to the BSD-systems, only OpenBSD follows a policy to include free software exclusively.
tl;dr
When choosing a distro, one should consider several aspects.
- Most important is security, therefore the distro should provide timely security updates
- In order for your data to be kept safe and private, the distro should have a policy to include free software (open source) only
- The distro should have a sane release policy. It should stick to a stable base system and shouldn't introduce new bleeding-edge stuff in a revolutionary way
- It should work out-of-the-box with sane defaults. Configuration should be possible without the system interfering or changing the way of configuration
Simple basic principles of IT security
Preface
IT security nowadays is a huge area of operation. People working in ITSec are swamped with terms. The Market has also a large amount of security products.
While the admin thinks about how to integrate the new NetxGen2-SIEM-Firewall according to ITIL and must take the GDPR into account and also must urgently bother with APT, attackers are breaking into the web server by exploiting a long forgotten Wordpress plug-in.
It is time to liberate from the confusion of terms and the product glut of the ITSec industry. Time to take a step back and think about which basic principles form the essence of IT security.
1. Know your system
Get to know your system as good as possible. When you don't know your system you can't defend it. Understand which components and services your system is using. If you notice an unnecessary service, disable it (see also point 2. Keep your system small and simple). Identify which risks emerge by running those services.
Don't rely solely on external support (e.g. by the manufacturer). This will make you dependent on this support and can lead to catastrophic results, if the support doesn't answer or can't fix the problem. Using open source software can help because open source software is usually well-documented and therefore it's functionality can be learned easily.
Document your systems and components. A good overview is important to see where weak spots could arise.
Prevent that attackers know your systems better than you do. Use encryption in communication and on storage, if appropriate.
Watch system messages and system logs. Often they contain valuable hints. Even about where measures are still necessary.
2. Keep your system small and simple
Systems and applications should be as small and simple as possible. Complexity is the enemy of security. Always use the simplest system possible. On the one hand, this avoids complexity and, on the other, this saves resources.
Do not add more components or features to a system than absolutely necessary. Do not run more services run than absolutely necessary. Avoid all unnecessary software. This way the attack surface is reduced, as well as the probability that something can go wrong. If the system is too complex already at delivery, adjust it. It is helpful in this regard to use open source software.
Example: Refrain from using as web interfaces for the administration of a firewall. The web interface requires an HTTP server and implements an interface to translate the entries in the web interface in command line commands for the firewall. These are two additional but unnecessary attack vectors. Instead, learn to use the command line directly.
(Excursus: OpenBSD is considered the safest operating system in the world, not least because it is very slim compared to other operating systems. The Linux kernel consists of nearly 30 million lines of code, the OpenBSD kernel has just 2.9 million lines, thus 10% of the magnitude of the Linux kernel.)
Almost the same applies to data: delete sensitive data when it is no longer needed. Do not store data when it is not needed.
When granting permissions minimalism should prevail as well. Give each person and each process only the permissions that are absolutely necessary.
3. Use well-documented, open and common systems
This is a prerequisite for knowing what you are using. Avoid the use of “black boxes” whose contents you do not know. Again, it is an advantage to use open source software. Common and widely used open source software is well documented and the source code is open. However, avoid exotic software that hardly anyone uses and is poorly documented. Use robust and stable systems that are well tested.
4. Use information and communication
All too easily one isolates into a filter bubble and gets barely any information from the world out there, while attackers are constantly learning about new opportunities.
Interconnect with the “community”, i.e. with people who are facing similar problems. Communicate with them, e.g. via mailing lists. Go to community events focusing on security (but not on pure product promotional events from manufacturers). Good local addresses are often Linux User Groups and “LinuxFest” events.
Find out about new security vulnerabilities using CERTs and security mailing lists. This is a prerequisite for knowing your system (point 1.).
5. Check your systems
In order to know if your systems are running correctly and safe they need to be checked. Use monitoring to check your systems. Define parameters within which your systems should run. If a system is running outside these parameters, there should be alarm messages.
Observe system logs (see also point 2). Keep logs simple (in text format) and centralize logging. Use filters for log messages, so you will not be overwhelmed by the flood of messages.
Use information (see point 4.) to check if your systems have security vulnerabilities. Patch the systems fast, because attackers know the vulnerability at latest the same time as the patch is published.
6. Isolate your systems
Large all-in-one systems are often comfortable and convenient to use. Unfortunately, they are also very complex and therefore offer a large attack surface.
Systems and functions should therefore be separated as much as possible. This way, in case of problems, only one component is affected. Separate systems from each other on different levels. Use different network segments where appropriate. Use different hosts for individual services. Use virtualization, not containerization.
(Excursus: Although everyone is talking about Docker, Docker and other container systems should not be used for productive systems. Containers do run in the same kernelspace as the container host and other containers on it, meaning that if one container is successfully attacked, other containers running on the same physical machine are also affected. Containers do not provide sufficient isolation).
Use interfaces to establish communication between the isolated system and inspect them.
Each component should always do exactly one job, and this one well. Do not use universalists, but specialists. But do not forget that these should be simple and small.
7. Make your systems fault-tolerant
Ask for each system: “What if it fails? Is the entire structure affected, or can it continue to function without the system? “Create an emergency plan that tells you what to do when failures do occur. Because sooner or later every system will be disrupted or fail.
For critical systems, make sure that a backup system is promptly available (for example, design it as a highly available system). Current data needs up-to-date backups and should be able to be restored in a timely manner.
The smaller and simpler the systems are (point 2.) the easier they are to be made fault-tolerant. The isolation (point 6.) also helps to easily set up fault-tolerant systems.
Security measures can fail also. When an account or certificate is compromised, there must be measures to counteract the risks involved.
8. Pay attention to proportionality
Security costs time, money and effort. At each previous point one should ask oneself: Is that still proportionate?
You do not buy a 1000 $ safe to store 100 $ in it. It is therefore important to consider what the security measure is intended to protect and what effect the measure will have on operation. The database with the results of the company football team certainly needs less protection than the database containing the company patents (both are on the same server? Then you have disregarded point 6.)
A good way to determine the proportionality are the following questions:
- Does the system need to be protected and how far should protection measures go?
- Which safeguard has the least impact on ongoing operations?
- Which is the simplest and most cost-effective solution for the security measure? (Hint: often the answer is “open source software”).
Conclusion
Each of these basic principles is an important module. However, they are all more effective when they work together. If you memorize these basic principles, they can help you bring order into the flood of buzzwords from the itsec industry and to keep an overview of your network.
Knowing the systems, separating them, keeping them small and simple, and checking them can make the NextGen2 SIEM firewall obsolete. If you know the principles, you do not necessarily have to know ITIL and ISO 27001 in detail – much of what is in those standards are simply the outcome from the principles.
Further reading: The Information Security Practice Principles, Craig Jackson, Scott Russell, and Susan Sons, University Center for Applied Cybersecurity Research
© Henry Jensen 2019, licensed under CC-BY-SA 4.0
Minimal Installation of Devuan 2
With Devuan being a Debian fork without systemd a lot will be similar to the Minimal Installation of Debian 9
We will do the installation form Devuan's netinstall iso, grab it from https://files.roundr.devuan.org/devuan_ascii/installer-iso/devuan_ascii_2.0.0_amd64_netinst.iso
- Boot from the CD, choose “Install”
- Select your language, country, locale
- Enter a hostname
- Enter a root password, a user and user password
- Partitioning method: select “Guided – use entire disk” and confirm
- The installer will now install the base system
- Select mirror country
- In Software selection select nothing, de-select all pre-selected items, continue
- Install grub to the MBR
- Reboot
After your new installation comes up login as root
- Optional:
apt install openssh-server, ssh into your box - Edit /etc/network/interfaces
# The primary network interface
allow-hotplug eth0
iface eth0 inet static
        address 10.0.2.16/24
        gateway 10.0.2.2
        dns-nameservers 1.1.1.1
replace the interface name , address, gateway with your values. Note that Devuan still uses the old network interface names (e.g. eth0 instead of enp0s3)
Now clean up unnecessary stuff
apt remove --purge elogind
Reboot
That's it. As you see Devuan as a non-systemd distro already does a very minimal install per default – we only needed to remove elogind which is only needed by X.
On my system it uses 704 MB hard disk space and uses 46 MB RAM.
Of course, if you now start to install software it is very likely that some of the packages we removed will be pulled in back.
Minimal installation of Xorg with Fluxbox
apt install fluxbox
apt install xinit
apt install xterm
Note: This will pull elogind, which we removed earlier, back into the system
As a user edit ~/.xinitrc
exec startfluxbox
Save the file and then type startx.
Save the file and then type startx. The fluxbox window manager will appear, you should be able to right-click and launch xterm by Applications –> Shells –> Bash

So, if you intend to install a minimal Devuan system with X you only need to do a base install and execute apt install xinit plus your favorite window manager, that's all.
One note about boot time Debian vs Devuan: With both systems installed nearly identical Debian with systemd needs 0.5 seconds more too boot up as Devuan with sysvinit (Debian 7.0 seconds, Devuan 6.5 second). Of course, this half maybe within the fault tolerance of my measurements, but it is safe to say that sysvinit is not slower at boot than systemd.
Minimal Installation of Debian 9
We will do the installation form Debian's netinstall iso, grab it from https://cdimage.debian.org/debian-cd/current/amd64/iso-cd/debian-9.9.0-amd64-netinst.iso
- Boot from the CD, choose “Install”
- Select your language, country, locale
- Enter a hostname
- Enter a root password, a user and user password
- Partitioning method: select “Guided – use entire disk” and confirm
- The installer will now install the base system
- Select mirror country
- In Software selection select nothing, de-select all pre-selected items, continue
- Install grub to the MBR
- Reboot
After your new installation comes up login as root
- Optional:
apt install openssh-server, ssh into your box - Edit /etc/network/interfaces
# The primary network interface
allow-hotplug enp0s3
iface enp0s3 inet static
        address 10.0.2.16/24
        gateway 10.0.2.2
        dns-nameservers 1.1.1.1
replace the interface name , address, gateway with your values
Now clean up some unnecessary stuff
systemctl mask systemd-journald
systemctl disable systemd-timesyncd
Reboot
That's it. If your did read the the article about Minimal Installation of Ubuntu 19.04 you will note, that Debian needs far less steps to get a minimal installation. That's mainly because Debian installs less stuff in the base system from the beginning. Additionally some of the modern systemd components, like systemd-networkd, haven't been integrated in Debian (yet).
On my system it uses 690 MB hard disk space (Ubuntu: 2,0 GB, Fedora 1,2 GB) and uses 50 MB (Ubuntu: 68 MB, Fedora 114 MB) RAM.
Of course, if you now start to install software it is very likely that some of the packages we removed will be pulled in back.
Minimal installation of Xorg with Fluxbox
apt install fluxbox
apt install xinit
apt install xterm
As a user edit ~/.xinitrc
exec startfluxbox
Save the file and then type startx. The fluxbox window manager will appear, you should be able to right-click and launch xterm by Applications –> Shells –> Bash

Minimal Installation of Ubuntu 19.04
We will do the installation from Ubuntu's mini.iso. The installer is pretty straightforward and similar to the installer of Debian.
- Grab the mini installation CD from https://wiki.ubuntuusers.de/Downloads/Netzwerkinstallation/#Mini-CD-Image
- Boot from CD, choose “Install”
- Selecct your language, country, locale
- Detect keyboard layout
- Enter a hostname
- choose a mirror country
- create a user
- confirm the time zone
- When partitioning disk choose “Guided – use entire disk” and confirm
- The installer will now install the base system.
- choose “No automatic updates”
- In Software selection select nothing, continue
- Install grub to the MBR
- choose the appropriate time setting and reboot
After your new installation comes up login as user
- Optional:
sudo apt install openssh-server, ssh into your box sudo apt install ifupdown- Edit /etc/network/interfaces
auto lo
iface lo inet loopback

# The primary network interface
allow-hotplug enp0s3
iface enp0s3 inet static
        address 10.0.2.16/24
        gateway 10.0.2.2
        # dns-* options are implemented by the resolvconf package, if installed
        dns-nameservers 1.1.1.1
replace the interface name , address, gateway with your values
Now clean up some unnecessary stuff
sudo systemctl mask systemd-networkd
sudo  systemctl mask systemd-networkd-wait-onlin
sudo  systemctl disable systemd-resolved
sudo  systemctl disable networkd-dispatcher
sudo  systemctl disable systemd-timesncd
sudo  apt remove accountsservice
sudo rm /etc/resolv.conf
Now edit /etc/resolv.conf
nameserver 1.1.1.1
That's it. Your Ubuntu system runs now with the smallest but still reasonable config possible. On my system it uses 2.0 GB hard disk space and uses 68 MB RAM. Of course, if you now start to install software it is very likely that some of the packages we removed will be pulled in back.
It is also possible to disable systemd-journald with sudo systemctl mask systemd-journald, saving additional RAM, but it will lead to several FAILED messages at boot. But your system will still be functional-
Minimal installation of Xorg with Fluxbox
sudo apt install fluxbox
sudo apt install xinit
sudo apt install xterm
As a user edit ~/.xinitrc
exec startfluxbox
Save the file and then type startx. The fluxbox window manager will appear, you should be able to right-click and launch xterm by Applications –> Shells –> Bash

Minimal Installation of Fedora 30
This is how to do a minimal installation of Fedora 30. Obviously Fedora is not the best distro to do a minimal install. However, it can be done.
- Grab the netinstall iso from https://alt.fedoraproject.org/
- Boot the CD, choose “Install Fedora 30”
- Choose your language, click continue
- Choose “Installation Destination”, choose “Storage Configuration” –> “Custom”, click “Done”


After the installation boot your system and login as root, then we will configure it to be even more minimal
Remove unnecessary components
dnf remove firewalld
dnf remove sssd-*
dnf remove audit
dnf remove NetworkManager
dnf remove chrony
Since we removed NetworkManager we must install other means to configure network
dnf install network-scripts
Edit /etc/sysconfig/network-scripts/ifcfg-[name-of-your-network-interface] and set a fixed ip address
TYPE=Ethernet
PROXY_METHOD=none
BROWSER_ONLY=no
BOOTPROTO=none
DEFROUTE=yes
IPV4_FAILURE_FATAL=no
IPV6INIT=no
NAME=[name-of-your-network-interface]
UUID=[your-uuid]
DEVICE=[name-of-your-network-interface]

ONBOOT=yes
AUTOCONNECT_PRIORITY=-999

IPADDR=[YOUR IP]
NETMASK=[YOUR NETMASK]
GATEWAY=[YOUR GATEWAY]
DNS1=1.1.1.1
Enable the network service
chmod a+x /etc/sysconfig/network-scripts/ifcfg-[name-of-your-network-interface]
systemctl enable network
Reboot
That's it. Your Fedora system runs now with the smallest but still reasonable config possible. On my system it uses 1.2 GB hard disk space and uses 114 MB RAM. Of course, if you now start to install software it is very likely that some of the packages we removed will be pulled in back.
Minimal installation of Xorg with Fluxbox
If you want to use this system with a GUI, this are the commands to install a minimal Xorg installation with the fluxbox window manager:
dnf install fluxbox
dnf install xterm
dnf install xorg-x11-server-Xorg
dnf install xorg-x11-xinit
dnf install xorg-x11-drv-*
dnf install mesa-dri-drivers
Now login as a user and edit ~/.xinitrc
exec startfluxbox
Save the file and then type startx. The fluxbox window manager will appear, you should be able to right-click and launch xterm