Love.Law.Robots. by Ang Hou Fu

Python

Feature image

Introduction

In January 2022, the 2020 Revised Edition of over 500 Acts of Parliament (the primary legislation in Singapore) was released. It’s a herculean effort to update so many laws in one go. A significant part of that effort is to “ensure Singapore’s laws are understandable and accessible to the public” and came out of an initiative named Plain Laws Understandable by Singaporeans (or Plus).

Keeping Singapore laws accessible to all – AGC, together with the Law Revision Committee, has completed a universal revision of Singapore’s Acts of Parliament! pic.twitter.com/76TnrNCMUq

— Attorney-General's Chambers Singapore (@agcsingapore) December 21, 2021

After reviewing the list of changes they made, such as replacing “notwithstanding” with “despite”, I frankly felt underwhelmed by the changes. An earlier draft of this article was titled “PLUS is LAME”. The revolution is not forthcoming.

I was bemused by my strong reaction to a harmless effort with noble intentions. It led me to wonder how to evaluate a claim, such as whether and how much changing a bunch of words would lead to a more readable statute. Did PLUS achieve its goals of creating plain laws that Singaporeans understand?

In this article, you will be introduced to well-known readability statistics such as Flesch Reading Ease and apply them to laws in Singapore. If you like to code, you will also be treated to some Streamlit, Altair-viz and Python Kung Fu, and all the code involved can be found in my Github Repository.

GitHub – houfu/plus-explorer: A streamlit app to explore changes made by PLUSA streamlit app to explore changes made by PLUS. Contribute to houfu/plus-explorer development by creating an account on GitHub.GitHubhoufuThe code used in this project is accessible in this public repository.

How would we evaluate the readability of legislation?

Photo by Jamie Street / Unsplash

When we say a piece of legislation is “readable”, we are saying that a certain class of people will be able to understand it when they read it. It also means that a person encountering the text will be able to read it with little pain. Thus, “Plain Laws Understandable by Singaporeans” suggests that most Singaporeans, not just lawyers, should be able to understand our laws.

In this light, I am not aware of any tool in Singapore or elsewhere which evaluates or computes how “understandable” or readable laws are. Most people, especially in the common law world, seem to believe in their gut that laws are hard and out of reach for most people except for lawyers.

In the meantime, we would have to rely on readability formulas such as Flesch Reading Ease to evaluate the text. These formulas rely on semantic and syntactic features to calculate a score or index, which shows how readable a text is. Like Gunning FOG and Chall Dale, some of these formulas map their scores to US Grade levels. Very approximately, these translate to years of formal education. A US Grade 10 student would, for example, be equivalent to a Secondary four student in Singapore.

After months of mulling about, I decided to write a pair of blog posts about readability: one that's more facts oriented: (https://t.co/xbgoDFKXXt) and one that's more personal observations (https://t.co/U4ENJO5pMs)

— brycew (@wowitisbryce) February 21, 2022

I found these articles to be a good summary and valuable evaluation of how readability scores work.

These formulas were created a long time ago and for different fields. For example, Flesch Reading Ease was developed under contract to the US Navy in 1975 for educational purposes. In particular, using a readability statistic like FRE, you can tell whether a book is suitable for your kid.

I first considered using these formulas when writing interview questions for docassemble. Sometimes, some feedback can help me avoid writing rubbish when working for too long in the playground. An interview question is entirely different from a piece of legislation, but hopefully, the scores will still act as a good proxy for readability.

Selecting the Sample

Browsing vinyl music at a fairPhoto by Artificial Photography / Unsplash

To evaluate the claim, two pieces of information regarding any particular section of legislation are needed – the section before the 2020 Edition and the section in the 2020 Edition. This would allow me to compare them and compute differences in scores when various formulas are applied.

I reckon it’s possible to scrape the entire website of statues online, create a list of sections, select a random sample and then delve into their legislative history to pick out the sections I need to compare. However, since there is no API to access statutes in Singapore, it would be a humongous and risky task to parse HTML programmatically and hope it is created consistently throughout the website.

Mining PDFs to obtain better text from DecisionsAfter several attempts at wrangling with PDFs, I managed to extract more text information from complicated documents using PDFMiner.Love.Law.Robots.HoufuIn one of my favourite programming posts, I extracted information from PDFs, even though the PDPC used at least three different formats to publish their decisions. Isn’t Microsoft Word fantastic?

I decided on an alternative method which I shall now present with more majesty:

The author visited the subject website and surveyed various acts of Parliament. When a particular act is chosen by the author through his natural curiosity, he evaluates the list of sections presented for novelty, variety and fortuity. Upon recognising his desired section, the author collects the 2020 Edition of the section and compares it with the last version immediately preceding the 2020 Edition. All this is performed using a series of mouse clicks, track wheel scrolling, control-Cs and control-Vs, as well as visual evaluation and checking on a computer screen by the author. When the author grew tired, he called it a day.

I collected over 150 sections as a sample and calculated and compared the readability scores and some linguistic features for them. I organised them using a pandas data frame and saved them to a CSV file so you can download them yourself if you want to play with them too.

Datacsv Gzipped file containing the source data of 152 sections, their content in the 2020 Rev Edn etc data.csv.gz 76 KB download-circle

Exploring the Data with Streamlit

You can explore the data associated with each section yourself using my PLUS Explorer! If you don’t know which section to start with, you can always click the Random button a few times to survey the different changes made and how they affect the readability scores.

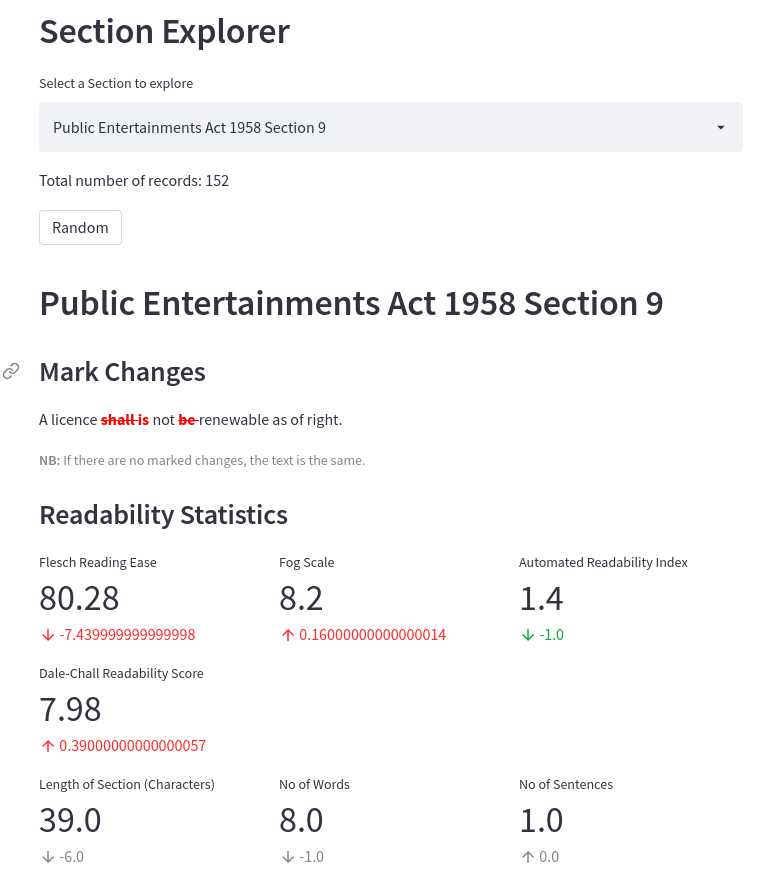
Screenshot of PLUS Section Explorer: https://share.streamlit.io/houfu/plus-explorer/main/explorer.py

You can use my graph explorer to get a macro view of the data. For the readability scores, you will find two graphs:

  1. A graph that shows the distribution of the value changes amongst the sample
  2. A graph that shows an ordered list of the readability scores (from most readable to least readable) and the change in score (if any) that the section underwent in the 2020 Edition.

You can even click on a data point to go directly to its page on the section explorer.

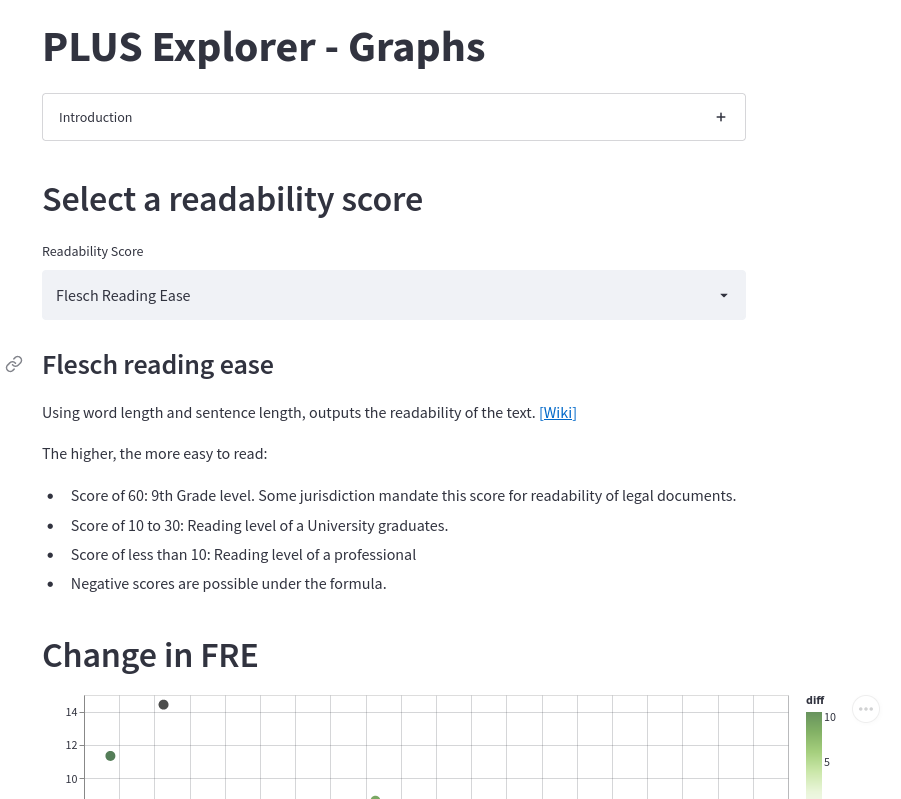
Screenshot of PLUS graph explorer: https://share.streamlit.io/houfu/plus-explorer/main/graphs.py

This project allowed me to revisit Streamlit, and I am proud to report that it’s still easy and fun to use. I still like it more than Jupyter Notebooks. I tried using ipywidgets to create the form to input data for this project, but I found it downright ugly and not user-friendly. If my organisation forced me to use Jupyter, I might reconsider it, but I wouldn’t be using it for myself.

Streamlit — works out of the box and is pretty too. Here are some features that were new to me since I last used Streamlit probably a year ago:

Pretty Metric Display

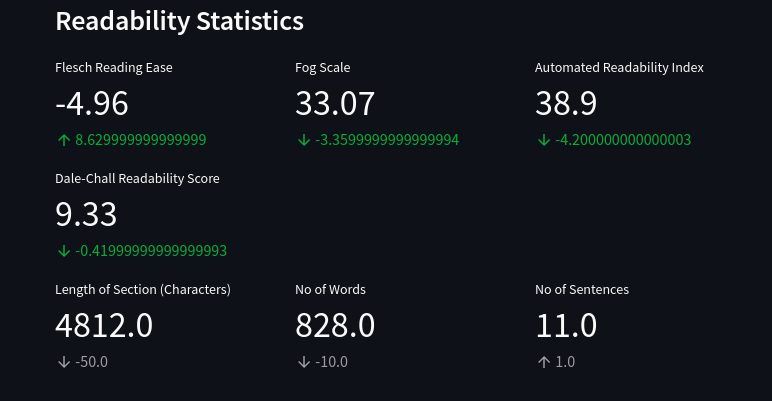
Metric display from Streamlit

My dear friends, this is why Streamlit is awesome. You might not be able to create a complicated web app or a game using Streamlit. However, Steamlit’s creators know what is essential or useful for a data scientist and provide it with a simple function.

The code to make the wall of stats (including their changes) is pretty straightforward:

st.subheader('Readability Statistics') # Create three columns flesch, fog, ari = st.columns(3)

# Create each column flesch.metric(“Flesch Reading Ease”, dataset[“currentfleschreadingease”][sectionexplorerselect], dataset[“currentfleschreadingease”][sectionexplorer_select] - dataset[“previousfleschreadingease”][sectionexplorerselect])

# For Fog and ARI, the lower the better, so delta colour is inverse

fog.metric(“Fog Scale”, dataset[“currentgunningfog”][sectionexplorerselect], dataset[“currentgunningfog”][sectionexplorerselect] - dataset[“previousgunningfog”][sectionexplorerselect], delta_color=“inverse”)

ari.metric(“Automated Readability Index”, dataset[“currentari”][sectionexplorerselect], dataset[“currentari”][sectionexplorer_select] - dataset[“previousari”][sectionexplorerselect], delta_color=“inverse”)

Don’t lawyers deserve their own tools?

Now Accepting Arguments

Streamlit apps are very interactive (I came close to creating a board game using Streamlit). Streamlit used to suffer from a significant limitation — except for the consumption of external data, you can’t interact with it from outside the app.

It’s at an experimental state now, but you can access arguments in its address just like an HTML encoded form. Streamlit has also made this simple, so you don’t have to bother too much about encoding your HTML correctly.

I used it to communicate between the graphs and the section explorer. Each section has its address, and the section explorer gets the name of the act from the arguments to direct the visitor to the right section.

# Get and parse HTTP request queryparams = st.experimentalgetqueryparams()

# If the keyword is in the address, use it! if “section” in queryparams: sectionexplorerselect = queryparams.get(“section”)[0] else: sectionexplorerselect = 'Civil Law Act 1909 Section 6'

You can also set the address within the Streamlit app to reduce the complexity of your app.

# Once this callback is triggered, update the address def onselect(): st.experimentalsetqueryparams(section=st.session_state.selectbox)

# Select box to choose section as an alternative. # Note that the key keyword is used to specify # the information or supplies stored in that base. st.selectbox(“Select a Section to explore”, dataset.index, onchange=onselect, key='selectbox')

So all you need is a properly formed address for the page, and you can link it using a URL on any webpage. Sweet!

Key Takeaways

Changes? Not so much.

From the list of changes, most of the revisions amount to swapping words for others. For word count, most sections experienced a slight increase or decrease of up to 5 words, and a significant number of sections had no change at all. The word count heatmap lays this out visually.

Unsurprisingly, this produced little to no effect on the readability of the section as computed by the formulas. For Flesch Reading Ease, a vast majority fell within a band of ten points of change, which is roughly a grade or a year of formal education. This is shown in the graph showing the distribution of changes. Many sections are centred around no change in the score, and most are bound within the band as delimited by the red horizontal rulers.

This was similar across all the readability formulas used in this survey (Automated Readability Index, Gunning FOG and Dale Chall).

On the face of it, the 2020 Revision Edition of the laws had little to no effect on the readability of the legislation, as calculated by the readability formulas.

Laws remain out of reach to most people

I was also interested in the raw readability score of each section. This would show how readable a section is.

Since the readability formulas we are considering use years of formal schooling as a gauge, we can use the same measure to locate our target audience. If we use secondary school education as the minimum level of education (In 2020, this would cover over 75% of the resident population) or US Grade 10 for simplicity, we can see which sections fall in or out of this threshold.

Most if not all of the sections in my survey are out of reach for a US Grade 10 student or a person who attained secondary school education. This, I guess, proves the gut feeling of most lawyers that our laws are not readable to the general public in Singapore, and PLUS doesn’t change this.

Take readability scores with a pinch of salt

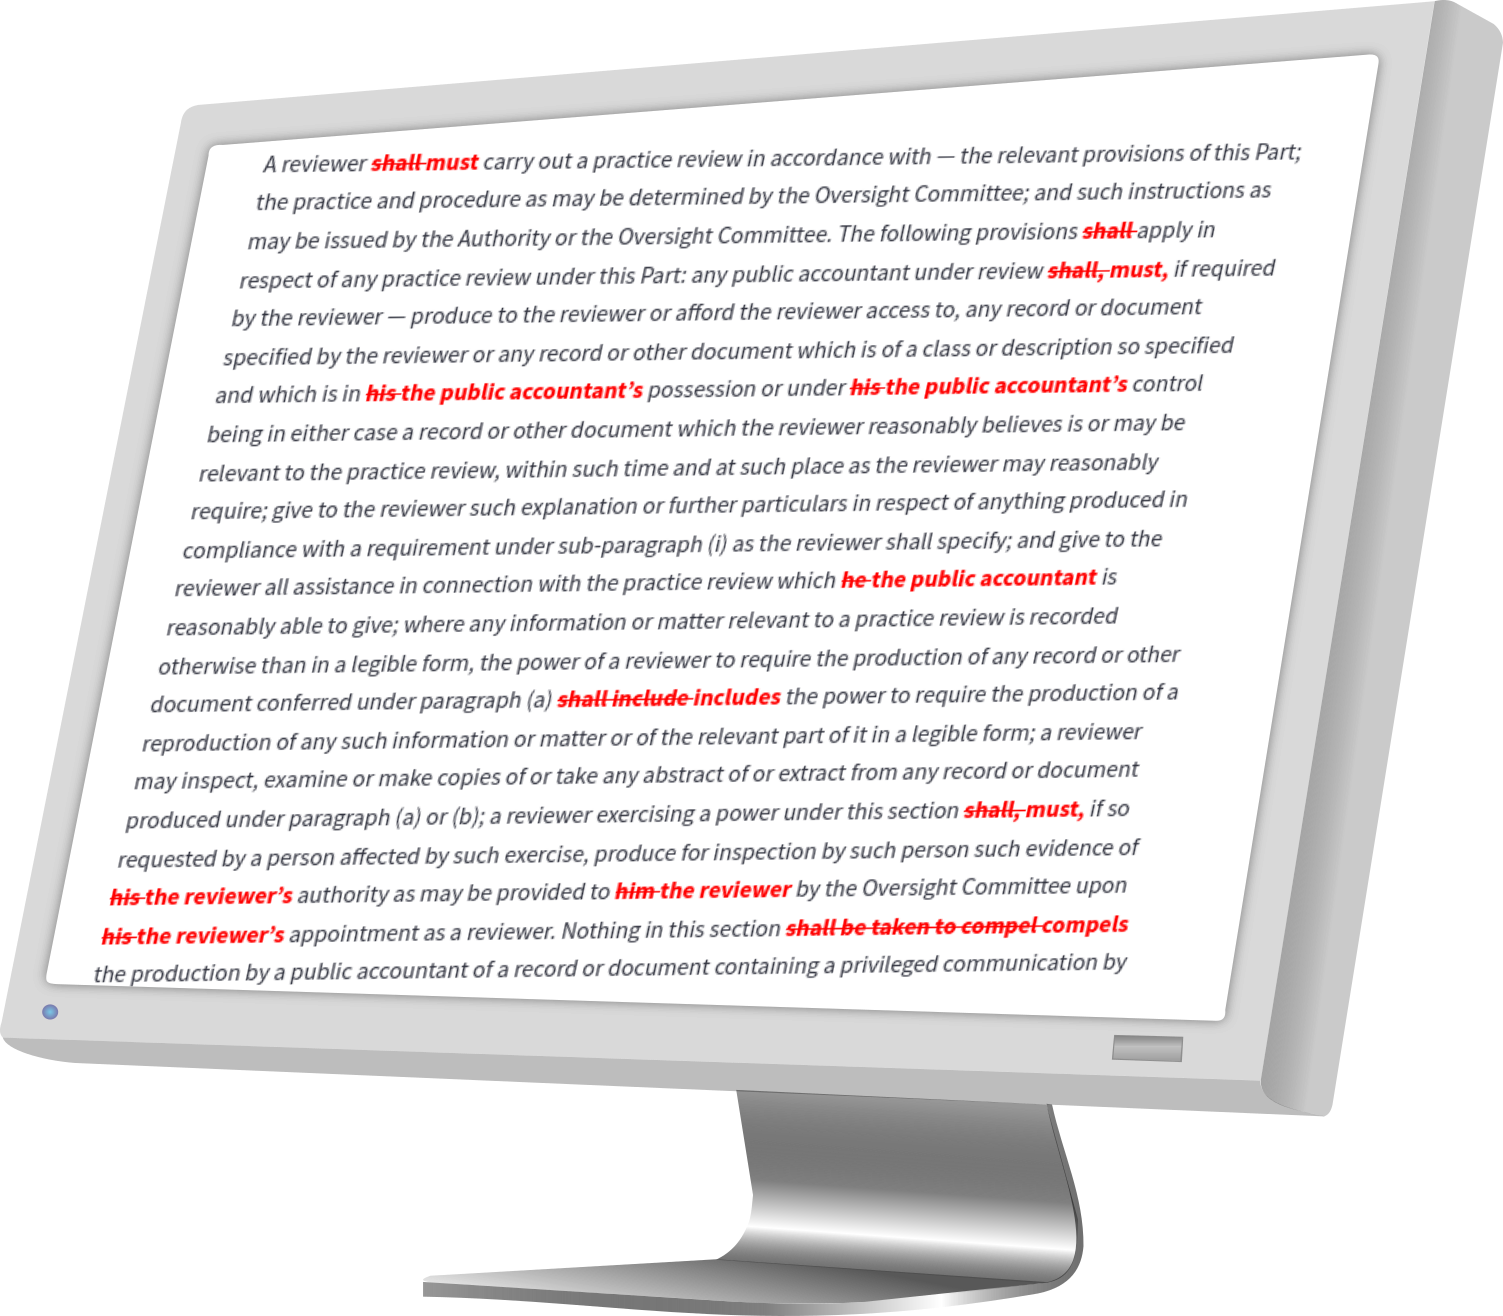
Suppose you are going to use the Automated Readability Index. In that case, you will need nearly 120 years of formal education to understand an interpretation section of the Point-to-Point Passenger Transport Industry Act.

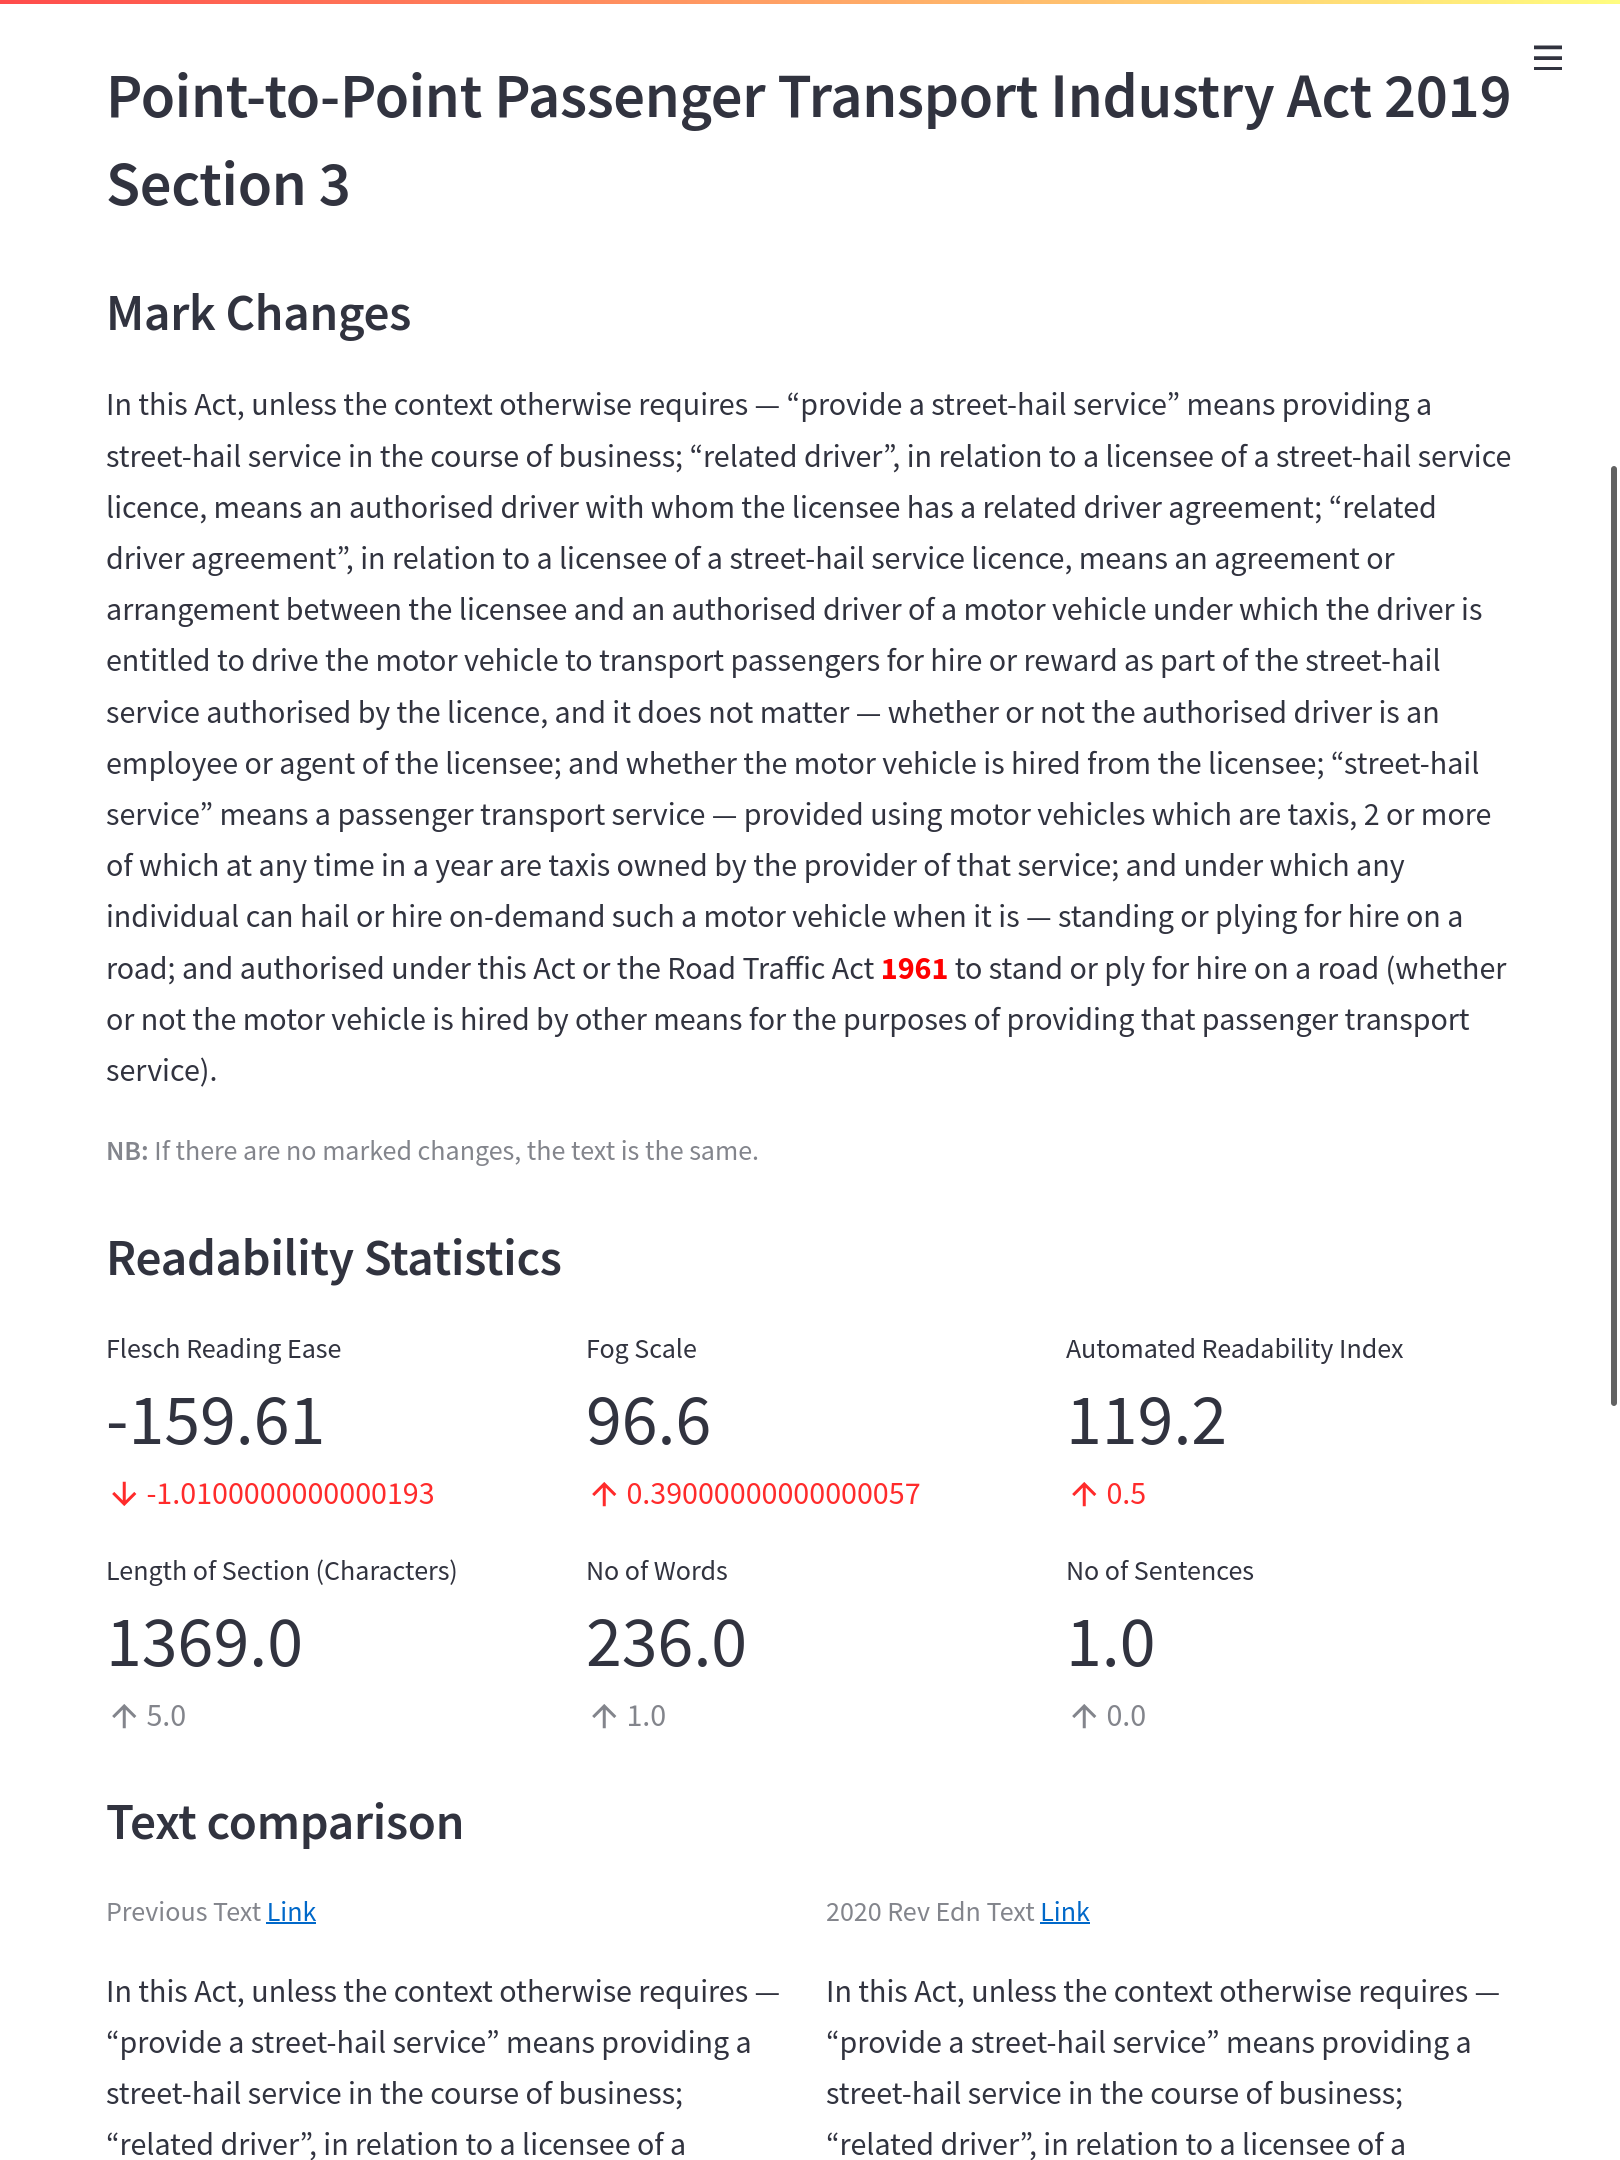
Section 3 of the Point-to-Point Passenger Transport Industry Act makes for ridiculous reading.

We are probably stretching the limits of a tool made for processing prose in the late 60s. It turns out that many formulas try to average the number of words per sentence — it is based on the not so absurd notion that long sentences are hard to read. Unfortunately, many sections are made up of several words in 1 interminable sentence. This skews the scores significantly and makes the mapping to particular audiences unreliable.

The fact that some scores don’t make sense when applied in the context of legislation doesn’t invalidate its point that legislation is hard to read. Whatever historical reasons legislation have for being expressed the way they are, it harms people who have to use them.

In my opinion, the scores are useful to tell whether a person with a secondary school education can understand a piece. This was after all, what the score was made for. However, I am more doubtful whether we can derive any meaning from a score of, for example, ARI 120 compared to a score of ARI 40.

Improving readability scores can be easy. Should it?

Singaporean students know that there is no point in studying hard; you have to study smart.

Having realised that the number of words per sentence features heavily in readability formulas, the easiest thing to do to improve a score is to break long sentences up into several sentences.

True enough, breaking up one long sentence into two seems to affect the score profoundly: see Section 32 of the Defence Science and Technology Agency Act 2000. The detailed mark changes section shows that when the final part of subsection three is broken off into subsection 4, the scores improved by nearly 1 grade.

It’s curious why more sections were not broken up this way in the 2020 Revised Edition.

However, breaking long sentences into several short ones doesn’t always improve reading. It’s important to note that such scores focus on linguistic features, not content or meaning. So in trying to game the score, you might be losing sight of what you are writing for in the first place.

Here’s another reason why readability scores should not be the ultimate goal. One of PLUS’s revisions is to remove gendered nouns — chairperson instead of chairman, his or her instead of his only. Trying to replace “his” with “his or her” harms readability by generally increasing the length of the sentence. See, for example, section 32 of the Weights and Measures Act 1975.

You can agree or disagree whether legislation should reflect our values such as a society that doesn't discriminate between genders. (It's interesting to note that in 2013, frequent legislation users were not enthusiastic about this change.) I wouldn't suggest though that readability scores should be prioritised over such goals.

Here’s another point which shouldn’t be missed. Readability scores focus on linguistic features. They don’t consider things like the layout or even graphs or pictures.

A striking example of this is the interpretation section found in legislation. They aren’t perfect, but most legislation users are okay with them. You would use the various indents to find the term you need.

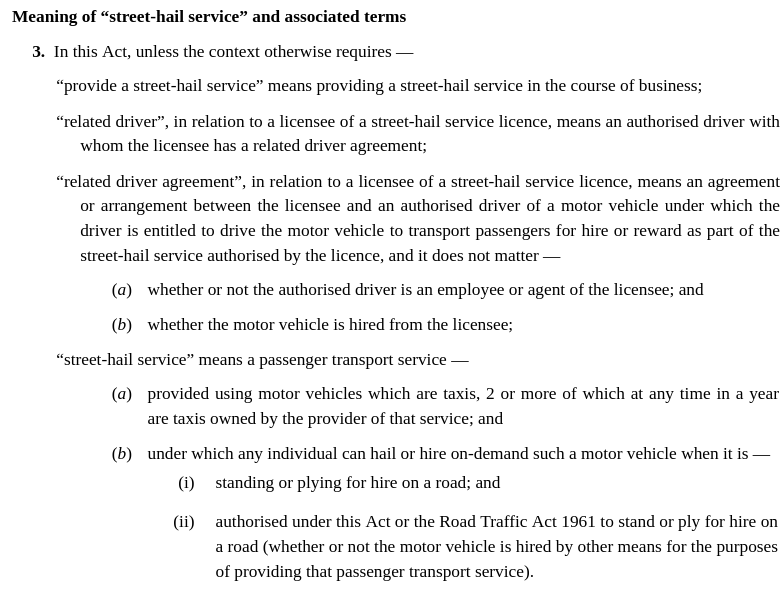
Example of an interpretation section and the use of indents to assist reading.

However, they are ignored because white space, including indents, are not visible to the formula. It appears to the computer like one long sentence, and readability is computed accordingly, read: terrible. This was the provision that required 120 years of formal education to read.

I am not satisfied that readability should be ignored in this context, though. Interpretation sections, despite the creative layout, remain very difficult to read. That’s because it is still text-heavy, and even when read alone, the definition is still a very long sentence.

A design that relies more on graphics and diagrams would probably use fewer words than this. Even though the scores might be meaningless in this context, they would still show up as an improvement.

Conclusion

PLUS might have a noble aim of making laws understandable to Singaporeans, but the survey of the clauses here shows that its effect is minimal. It would be great if drafters refer to readability scores in the future to get a good sense of whether the changes they are making will impact the text. Even if such scores have limitations, they still present a sound and objective proxy of the readability of the text.

I felt that the changes were too conservative this time. An opportunity to look back and revise old legislation will not return for a while (the last time such a project was undertaken was in 1985 ). Given the scarcity of opportunity, I am not convinced that we should (a) try to preserve historical nuances which very few people can appreciate, or (b) avoid superficial changes in meaning given the advances in statutory interpretation in the last few decades in Singapore.

Beyond using readability scores that focus heavily on text, it would be helpful to consider more legal design — I sincerely believe pictures and diagrams will help Singaporeans understand laws more than endlessly tweaking words and sentence structures.

This study also reveals that it might be helpful to have a readability score for legal documents. You will have to create a study group comprising people with varying education levels, test them on various texts or legislation, then create a machine model that predicts what level of difficulty a piece of legislation might be. A tool like that could probably use machine models that observe several linguistic features: see this, for example.

Finally, while this represents a lost opportunity for making laws more understandable to Singaporeans, the 2020 Revised Edition includes changes that improve the quality of life for frequent legislation users. This includes changing all the acts of parliaments to have a year rather than the historic and quaint chapter numbers and removing information that is no longer relevant today, such as provisions relating to the commencement of the legislation. As a frequent legislation user, I did look forward to these changes.

It’s just that I wouldn’t be showing them off to my mother any time soon.

#Features #DataScience #Law #Benchmarking #Government #LegalTech #NaturalLanguageProcessing #Python #Programming #Streamlit #JupyterNotebook #Visualisation #Legislation #AGC #Readability #AccesstoJustice #Singapore

Author Portrait Love.Law.Robots. – A blog by Ang Hou Fu

Feature image

Way back in December 2021, I caught wind of the 2020 Revised Edition of the statutes in Singapore law:

The AGC highlighted that the revised legislation now uses “simpler language”. I was curious about this claim and looked over their list of changes. I was not very impressed with them.

However, I did not want to rely only on my subjective intuition to make that conclusion. I wanted to test it using data science. This meant I had to compare text, calculate the changes' readability statistics, and see what changed.

Read more...

Feature image

As I continued with my project of dealing with 5 million Monopoly Junior games, I had a problem. Finding a way to play hundreds of games per second was one thing. How was I going to store all my findings?

Limitations of using a CSV File

Initially, I used a CSV (Comma Separated Values) file to store the results of every game. Using a CSV file is straightforward, as Python and pandas can load them quickly. I could even load them using Excel and edit them using a simple text editor.

However, every time my Streamlit app tried to load a 5GB CSV file as a pandas dataframe, the tiny computer started to gasp and pant. If you try to load a huge file, your application might suffer performance issues or failures. Using a CSV to store a single table seems fine. However, once I attempted anything more complicated, like the progress of several games, its limitations became painfully apparent.

Let’s use SQL instead!

The main alternative to using a CSV is to store data in a database. Of all the databases out there, SQL is the biggest dog of them all. Several applications, from web applications to games, use some flavour of SQL. Python, a “batteries included” programming language, even has a module for processing SQLite — basically a light SQL database you can store as a file.

SQL doesn’t require all its data to be loaded to start using the data. You can use indexes to search data. This means your searches are faster and less taxing on the computer. Doable for a little computer!

Most importantly, you use data in a SQL database by querying it. This means I can store all sorts of data in the database without worrying that it would bog me down. During data extraction, I can aim for the maximum amount of data I can find. Once I need a table from the database, I would ask the database to give me a table containing only the information I wanted. This makes preparing data quick. It also makes it possible to explore the data I have.

Why I procrastinated on learning SQL

To use a SQL database, you have to write operations in the SQL language, which looks like a sentence of gobbledygook to the untrained eye.

https://imgs.xkcd.com/comics/exploits_of_a_mom.pngI'll stick to symbols in my children's names please, thanks.

SQL is also in the top 10 on the TIOBE index of programming languages. Higher than Typescript, at the very least.

I have heard several things about SQL — it’s similar to Excel formulas. However, I dreaded learning a new language to dig a database. The landscape of SQL was also very daunting. There are several “flavours” of SQL, and I was not sure of the difference between PostgreSQL, MySQL or MariaDB.

There are ORM (Object-relational mapping) tools for SQL for people who want to stick to their programming languages. ORMs allow you to use SQL with your favourite programming language. For Python, the main ORM is SQLAlchemy. Seeing SQL operations in my everyday programming language was comforting at first, but I found the documentation difficult to follow.

Furthermore, I found other alternative databases easier to pick up and deploy. These included MongoDB, a NoSQL database. They rely on a different concept — data is stored in “documents” instead of tables, and came with a full-featured ORM. For many web applications, the “document” idiom applied well. It wouldn’t make sense, though, if I wanted a table.

Enter SQLModel!

A few months ago, an announcement from the author of FastAPI excited me — he was working on SQLModel. SQLModel would be a game-changer if it were anything like FastAPI. FastAPI featured excellent documentation. It was also so developer-friendly that I didn’t worry about the API aspects in my application. If SQLModel could reproduce such an experience for SQL as FastAPI did for APIs with Python, that would be great!

SQLModelSQLModel, SQL databases in Python, designed for simplicity, compatibility, and robustness.logo

As it turned out, SQLModel was a very gentle introduction to SQL. The following code creates a connection to an SQLite database you would create in your file system.

from sqlmodel import SQLModel, create_engine, Session from sqlalchemy.engine import Engine

engine: Optional[Engine] = None

def createDBengine(filename: str): global engine engine = createengine(f'sqlite:///{filename}') SQLModel.metadata.createall(engine) return engine

Before creating a connection to a database, you may want to make some “models”. These models get translated to a table in your SQL database. That way, you will be working with familiar Python objects in the rest of your code while the SQLModel library takes care of the SQL parts.

The following code defines a model for each game played.

from sqlmodel import SQLModel, Field

class Game(SQLModel, table=True): id: Optional[int] = Field(default=None, primarykey=True) name: str = Field() parent: Optional[str] = Field() numof_players: int = Field() rounds: Optional[int] = Field() turns: Optional[int] = Field() winner: Optional[int] = Field()

So, every time the computer finished a Monopoly Junior game, it would store the statistics as a Game. (It’s the line where the result is assigned.)

def playbasicgame(numofplayers: Literal[2, 3, 4], turns: bool) –> Tuple[Game, List[Turn]]: if numofplayers == 3: game = ThreePlayerGame() elif numofplayers == 4: game = FourPlayerGame() else: game = TwoPlayerGame() gameid = uuid.uuid4() logging.info(f'Game {gameid}: Started a new game.') endturn, gameturns = playrounds(game, gameid, turns) winner = decidewinner(endturn) result = Game(name=str(gameid), numofplayers=numofplayers, rounds=endturn.getvalue(GameData.ROUNDS), turns=endturn.getvalue(GameData.TURNS), winner=winner.value) logging.debug(f'Game {gameid}: {winner} is the winner.') return result, game_turns

After playing a bunch of games, these games get written to the database in an SQL session.

def write_games(games: List[Game]): with Session(engine) as session: for game in games: session.add(game) session.commit()

Reading your data from the SQLite file is relatively straightforward as well. If you were writing an API with FastAPI, you could pass the model as a response model, and you can get all the great features of FastAPI directly.

I had already stored some Game data in “games.db” in the following code. I created a backend server that would read these files and return all the Turns belonging to a Game. This required me to select all the turns in the game that matched a unique id. (As you might note in the previous section, this is a UUID.)

gamesengine = createengine('sqlite:///games.db')

@app.get(“/game/{gamename}“, responsemodel=List[Turn]) def getturns(gamename: str): “”” Get a list of turns from :param gamename. “”” with Session(gamesengine) as session: checkgameexists(session, gamename) return session.exec(select(Turn).where(Turn.game == gamename)).all()

Limitations of SQLModel

Of course, being marked as version “0.0.6”, this is still early days in the development of SQLModel. The documentation is also already helpful but still a work in progress. A key feature that I would be looking out for is migrating data, most notably for different software versions. This problem can get very complex quickly, so anything would be helpful.

I also found creating the initial tables very confusing. You create models by implementing descendants of the SQLModel class in the library, import these models into the main SQLModel class, and create the tables by calling SQLModel.metadata.create_all(engine). This doesn’t appear pretty pythonic to me.

Would I continue to use SQLModel?

There are use cases where SQLModel will now be applicable. My Monopoly Junior data project is one beneficiary. The library provided a quick, working solution to use a SQL database to store results and data without needing to get too deep and dirty into SQL. However, if your project is more complicated, such as a web application, you might seriously consider its current limitations.

Even if I might not have the opportunity to use SQLModel in the future, there were benefits from using it now:

  • I became more familiar with the SQL language after seeing it in action and also comparing an SQL statement with its SQLModel equivalent in the documentation. Now I can write simple SQL statements!
  • SQLModel is described as a combination of SQLAlchemy and Pydantic. Once I realised that many of the features of SQLModel are extensions of SQLAlchemy’s, I was able to read and digest SQLAlchemy’s documentation and library. If I can’t find what I want in SQLModel now, I could look into SQLAlchemy.

Conclusion

Storing my Monopoly Junior games’ game and turn data became straightforward with SQLModel. However, the most significant takeaway from playing with SQLModel is my increased experience using SQL and SQLAlchemy. If you ever had difficulty getting onto SQL, SQLModel can smoothen this road. How has your experience with SQLModel been? Feel free to share with me!

#Programming #DataScience #Monopoly #SQL #SQLModel #FastAPI #Python #Streamlit

Author Portrait Love.Law.Robots. – A blog by Ang Hou Fu

Feature image

This is the story of my lockdown during a global pandemic. [ Cue post-apocalypse 🎼]

Amid a global pandemic, schools and workplaces shut down, and families had to huddle together at home. There was no escape. Everyone was getting on each others' nerves. Running out of options, we played Monopoly Junior, which my daughter recently learned how to play. As we went over several games, we found the beginner winning every game. Was it beginner's luck? I seethed with rage. Intuitively, I knew the odds were against me. I wasn't terrible at Monopoly. I had to prove it with science.

How would I prove it with science? This sounds ridiculous at first, but you'd do it by playing 5 million Monopoly Junior games. Yes, once you play enough games, suddenly your anecdotal observations become INSIGHT. (Senior lawyers might also call it experience, but I am pretty sure that they never experienced 5 million cases.)

This is the story of how I tried different ways to play 5 million Monopoly JR games.

What is Monopoly Junior?

Front cover for the box of the board game, Monopoly JR.The cover for the Monopoly Junior board game.

Most people know what the board game called Monopoly is. You start with a bunch of money, and the goal is to bankrupt everyone else. To bankrupt everyone else, you go round the board and purchase properties, build hotels and take everyone else's money through rent-seeking behaviour (the literal kind). It's a game for eight and up. Mainly because you have to count with hundreds and thousands, and you would need the stamina to last an entire night to crush your opposition.

If you are, like my daughter, five years old, Monopoly JR is available. Many complicated features in Monopoly (for example, counting past 30, auctions and building houses and hotels) are removed for young players to join the game. You also get a smaller board and less money. Unless you receive the right chance card, you don't have a choice once you roll the dice. You buy, or you pay rent on the space you land on.

As it's a pretty deterministic game, it's not fun for adults. On the other hand, the game spares you the ignominy of mano-a-mano battles with your kids by ending the game once anyone becomes bankrupt. Count the cash, and the winner is the richest. It ends much quicker.

Hasbro Monopoly Junior Game,A69843480 : Amazon.sg: ToysHasbro Monopoly Junior Game,A69843480 : Amazon.sg: ToysInstead of letting computers have all the fun, now you can play the game yourself! (I earn a commission when you buy from this amazon affiliate link)

Determining the Approach, Realising the Scale

Ombre BalloonsPhoto by Amy Shamblen / Unsplash

There is a pretty straightforward way to write this program. Write the rules of the game in code and then play it five million times. No sweat!

However, if you wanted to prove my hypothesis that players who go first are more likely to win, you would need to do more:

  • We need data. At the minimum, you would want to know who won in the end. This way, you can find out the odds you'd win if you were the one who goes first (like my daughter) or the last player (like me).
  • As I explored the data more, interesting questions began to pop up. For example, given any position in the game, what are the odds of winning? What kind of events cause the chances of winning to be altered significantly?
  • The data needs to be stored in a manner that allows me to process and analyse efficiently. CSV?
  • It'd be nice if the program would finish as quickly as possible. I'm excited to do some analysis, and waiting for days can be burdensome and expensive! (I'm running this on a DigitalOcean Droplet.)

The last point becomes very troublesome once you realise the scale of the project. Here's an illustration: you can run many games (20,000 is a large enough sample, maybe) to get the odds of a player winning a game. Imagine you decide to do this after every turn for each game. If the average game had, say, 100 turns (a random but plausible number), you'd be playing 20,000 X 100 = 2 million additional games already! Oh, let's say you also want to play three-player and four-player games too...

It looks like I have got my work cut out for me!

Route One: Always the best way?

I decided to go for the most obvious way to program the game. In hindsight, what seemed obvious isn't obvious at all. Having started programming using object-orientated languages (like Java), I decided to create classes for all my data.

An example of how I used a class to store my data. Not rocket science.

The classes also came in handy when I wrote the program to move the game.

Object notation makes programming easy.

It was also pretty fast, too — 20,000 two-player games took less than a minute. 5 million two-player games would take about 4 hours. I used python's standard multiprocessing modules so that several CPUs can work on running games by themselves.

Yes, my computers are named after cartoon characters.

After working this out, I decided to experiment with being more “Pythonic”. Instead of using classes, I would use Python dictionaries to store data. This also had the side effect of flattening the data, so you would not need to access an object within an object. With a dictionary, I could easily use pandas to save a CSV.

This snippet shows how the basic data for a whole game is created.

Instead of using object notation to find data about a player, the data is accessed by using its key in a python dictionary.

The same code to move player is implemented for a dictionary.

I didn't think it would make a difference honestly. However, I found the speed up was remarkable: almost 10 times! 20,000 two-player games now took 4 seconds. The difference between 4 seconds and less than a minute is a trip to the toilet, but for 5 million games, it was reduced from 4 hours to 16 mins. That might save me 20 cents in Droplet costs!

Colour me impressed.

Here are some lessons I learnt in the first part of my journey:

  • Your first idea might not always be the best one. It's best to iterate, learn new stuff and experiment!
  • Don't underestimate standard libraries and utilities. With less overhead, they might be able to do a job really fast.
  • Scale matters. A difference of 1 second multiplied by a million is a lot. (More than 11.5 days, FYI.)

A Common-Sense Guide to Data Structures and Algorithms, Second EditionBig O notation can make your code faster by orders of magnitude. Get the hands-on info you need to master data structures and algorithms for your daily work.Jay WengrowLearn new stuff – this book was useful in helping me dive deeper into the underlying work that programmers do.

Route 3: Don't play games, send messages

After my life-changing experiment, I got really ambitious and wanted to try something even harder. I then got the idea that playing a game from start to finish isn't the only way for a computer to play Monopoly JR.

https://media.giphy.com/media/eOAYCCymR0OqSN4aiF/giphy.gif

As time progressed in lockdown, I explored the idea of using microservices (more specifically, I read this book). So instead of following the rules of the game, the program would send “messages” depicting what was going on in a game. The computer would pick up these messages, process them and hand them off. In other words, instead of a pool of workers each playing their own game, the workers would get their commands (or jobs) from a queue. It didn't matter what game they were playing. They just need to perform their commands.

A schematic of what messages or commands a worker might have to process to play a game of Monopoly JR.
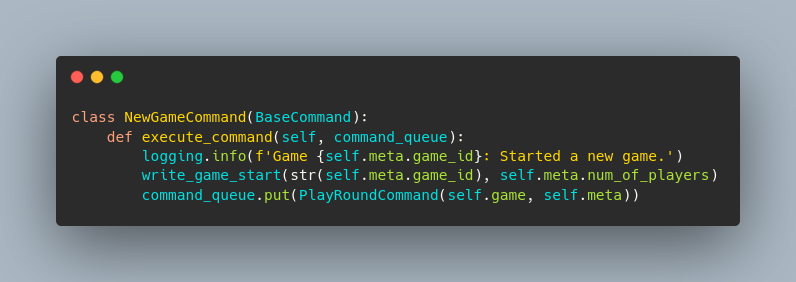
When the NewGameCommand is executed, it writes some information to a database and then puts a PlayRoundCommand in the queue for the next worker.

So, what I had basically done was chop the game into several independent parts. This was in response to certain drawbacks I observed in the original code. Some games took longer than others and this held back a worker as it furiously tried to finish it before it could move on to the next one. I hoped that it could finish more games quickly by making independent parts. Anyway, since they were all easy jobs, the workers would be able to handle them quickly in rapid succession, right?

It turns out I was completely wrong.

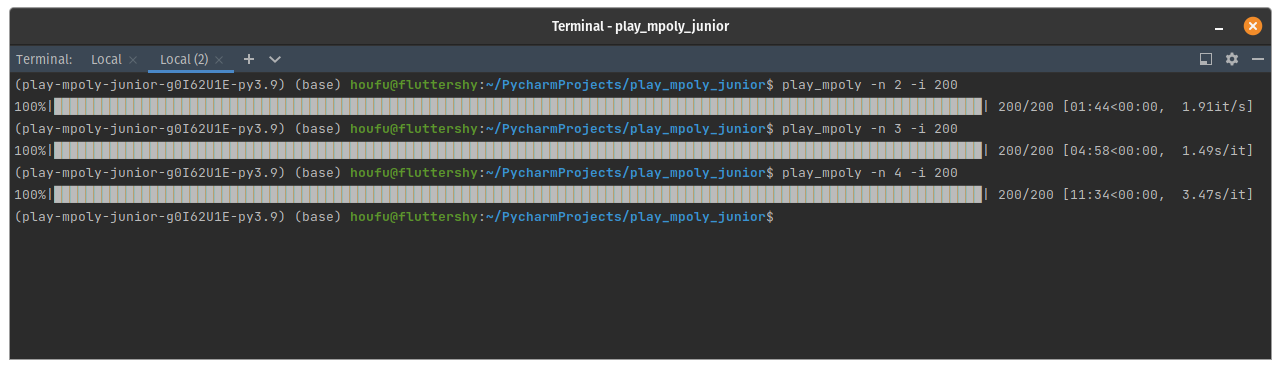
It was so traumatically slow that I had to reduce the number of games from 20000 to 200 just to take this screenshot.

Instead of completing hundreds or thousands of games in a second, it took almost 1 second to complete a game. You wouldn't be able to imagine how long 5 million seconds would now take. How much I would have to pay DigitalOcean again for their droplets? (Maybe $24.)

What slowed the program?

Tortoise 🐢 Photo by Craig Pattenaude / Unsplash

I haven't been able to drill down the cause, but this is my educated guess: The original command might be simple and straightforward, but I might have introduced a laborious overhead: operating a messaging system. As the jobs finished pretty quickly, the main thread repeatedly asked what to do next. If you are a manager, you might know why this is terrible and inefficient.

Experimenting again, I found the program to improve its times substantively once I allowed it to play several rounds in one command rather than a single round. I pushed it so hard that it was literally completing 1 game in 1 command. It never reached the heights of the original program using the python dictionaries though. At scale, the overhead does matter.

Best Practices — Dask documentationThinking about multiprocessing can be counterintuitive for a beginner. I found Dask's documentation helpful in starting out.

So, is sending messages a lousy solution? The experiment shows that when using one computer, its performance is markedly poor. However, there are circumstances when sending messages is better. If several clients and servers are involved in the program, and you are unsure how reliable they are, then a program with several independent parts is likely to be more robust. Anyway, I also think it makes the code a bit more readable as it focuses on the process.

I now think a better solution is to improve my original program.

Conclusion: Final lessons

Writing code, it turns out, isn't just a matter of style. There are serious effects when different methods are applied to a problem. Did it make the program faster? Is it easier to read? Would it be more conducive to multiprocessing or asynchronous operations? It turns out that there isn't a silver bullet. It depends on your current situation and resources. After all this, I wouldn't believe I became an expert, but it's definitely given me a better appreciation of the issues from an engineering perspective.

Now I only have to work on my previous code😭. The fun's over, isn't it?

#Programming #blog #Python #DigitalOcean #Monopoly #DataScience

Author Portrait Love.Law.Robots. – A blog by Ang Hou Fu

Feature image

Introduction

Over the course of 2019 and 2020, I embarked on a quest to apply the new things I was learning in data science to my field of work in law.

The dataset I chose was the enforcement decisions from the Personal Data Protection Commission in Singapore. The reason I chose it was quite simple. I wanted a simple dataset covering a limited number of issues and is pretty much independent (not affected by stare decisis or extensive references to legislation or other cases). Furthermore, during that period, the PDPC was furiously issuing several decisions.

This experiment proved to be largely successful, and I learned a lot from the experience. This post gathers all that I have written on the subject at the time. I felt more confident to move on to more complicated datasets like the Supreme Court Decisions, which feature several of the same problems faced in the PDPC dataset.

Since then, the dataset has changed a lot, such as the website has changed, so your extraction methods would be different. I haven't really maintained the code, so they are not intended to create your own dataset and analysis today. However, techniques are still relevant, and I hope they still point you in a good direction.

Extracting Judgement Data

Dog & Baltic SeaPhoto by Janusz Maniak / Unsplash

The first step in any data science journey is to extract data from a source. In Singapore, one can find judgements from courts on websites for free. You can use such websites as the source of your data. API access is usually unavailable, so you have to look at the webpage to get your data.

It's still possible to download everything by clicking on it. However, you wouldn't be able to do this for an extended period of time. Automate the process by scraping it!

Automate Boring Stuff: Get Python and your Web Browser to download your judgements]

I used Python and Selenium to access the website and download the data I want. This included the actual judgement. Metadata, such as the hearing date etc., are also available conveniently from the website, so you should try and grab them simultaneously. In Automate Boring Stuff, I discussed my ideas on how to obtain such data.

Processing Judgement Data in PDF

Photo by Pablo Lancaster Jones / Unsplash

Many judgements which are available online are usually in #PDF format. They look great on your screen but are very difficult for robots to process. You will have to transform this data into a format that you can use for natural language processing.

I took a lot of time on this as I wanted the judgements to read like a text. The raw text that most (free) PDF tools can provide you consists of joining up various text boxes the PDF tool can find. This worked all right for the most part, but if the text ran across the page, it would get mixed up with the headers and footers. Furthermore, the extraction revealed lines of text, not paragraphs. As such, additional work was required.

Firstly, I used regular expressions. This allowed me to detect unwanted data such as carriage returns, headers and footers in the raw text matched by the search term.

I then decided to use machine learning to train my computer to decide whether to keep a line or reject it. This required me to create a training dataset and tag which lines should be kept as the text. This was probably the fastest machine-learning exercise I ever came up with.

However, I didn't believe I was getting significant improvements from these methods. The final solution was actually fairly obvious. Using the formatting information of how the text boxes were laid out in the PDF , I could make reasonable conclusions about which text was a header or footer, a quote or a start of a paragraph. It was great!

Natural Language Processing + PDPC Decisions = 💕

Photo by Moritz Kindler / Unsplash

With a dataset ready to be processed, I decided that I could finally use some of the cutting-edge libraries I have been raring to use, such as #spaCy and #HuggingFace.

One of the first experiments was to use spaCy's RuleMatcher to extract enforcement information from the summary provided by the authorities. As the summary was fairly formulaic, it was possible to extract whether the authorities imposed a penalty or the authority took other enforcement actions.

I also wanted to undertake key NLP tasks using my prepared data. This included tasks like Named Entity Recognition (does the sentence contain any special entities), summarisation (extract key points in the decision) and question answering (if you ask the machine a question, can it find the answer in the source?). To experiment, I used the default pipelines from Hugging Face to evaluate the results. There are clearly limitations, but very exciting as well!

Visualisations

Photo by Annie Spratt / Unsplash

Visualisations are very often the result of the data science journey. Extracting and processing data can be very rewarding, but you would like to show others how your work is also useful.

One of my first aims in 2019 was to show how PDPC decisions have been different since they were issued in 2016. Decisions became greater in number, more frequent, and shorter in length. There was clearly a shift and an intensifying of effort in enforcement.

I also wanted to visualise how the PDPC was referring to its own decisions. Such visualisation would allow one to see which decisions the PDPC was relying on to explain its decisions. This would definitely help to narrow down which decisions are worth reading in a deluge of information. As such, I created a network graph and visualised it. I called the result my “Star Map”.

Data continued to be very useful in leading the conclusion I made about the enforcement situation in Singapore. For example, how great an impact would the increase in maximum penalties in the latest amendments to the law have? Short answer: Probably not much, but they still have a symbolic effect.

What's Next?

As mentioned, I have been focusing on other priorities, so I haven't been working on PDPC-Decisions for a while. However, my next steps were:

  • I wanted to train a machine to process judgements for named entity recognition and summarization. For the second task, one probably needs to use a transformer in a pipeline and experiment with what works best.
  • Instead of using Selenium and Beautiful Soup, I wanted to use scrapy to create a sustainable solution to extract information regularly.

Feel free to let me know if you have any comments!

#Features #PDPC-Decisions #PersonalDataProtectionAct #PersonalDataProtectionCommission #Decisions #Law #NaturalLanguageProcessing #PDFMiner #Programming #Python #spaCy #tech

Author Portrait Love.Law.Robots. – A blog by Ang Hou Fu

Feature image

This post is part of a series on my Data Science journey with PDPC Decisions. Check it out for more posts on visualisations, natural language processing, data extraction and processing!

This post is the latest one dealing with creating a corpus out of the decisions of the Personal Data Protection Commission of Singapore. However, this time I believe I got it right. If I don’t turn out to be an ardent perfectionist, I might have a working corpus.

Problem Statement

I must have written this a dozen of times here already. Law reports in Singapore unfortunately are generally available in PDF format. There is a web format accessible from LawNet, but it is neither free as in beer nor free as in libre. You have to work with PDFs to create a solution that is probably not burdened with copyrights.

However, text extracted from PDFs can look like crap. It’s not the PDF’s fault. PDFs are designed to look the same on any computer. Thus a PDF comprises of a bunch of text boxes and containers rather than paragraphs and headers. If the text extractor is merely reading the text boxes, the results will not look pretty. See an example below:

    The operator, in the mistaken belief that the three statements belonged
     to  the  same  individual,  removed  the  envelope  from  the  reject  bin  and
     moved it to the main bin. Further, the operator completed the QC form
     in  a  way  that  showed  that  the  number  of  “successful”  and  rejected
     Page 3 of 7
     
     B.
     (i)
     (ii)
     9.
     (iii)
     envelopes tallied with the expected total from the run. As the envelope
     was  no  longer  in  the  reject bin, the  second and  third  layers  of  checks
     were by-passed, and the envelope was sent out without anyone realising
     that it contained two extra statements. The manual completion of the QC
     form by the operator to show that the number of successful and rejected
     envelopes tallied allowed this to go undetected. 

Those lines are broken up with new lines by the way. So the computer reads the line in a way that showed that the number of “successful” and rejected, and then wonders “rejected” what?! The rest of the story continues about seven lines away. None of this makes sense to a human, let alone a computer.

Previous workarounds were... unimpressive

Most beginning data science books advise programmers to using regular expressions as a way to clean the text. This allowed me to choose what to keep and reject in the text. I then joined up the lines to form a paragraph. This was the subject of Get rid of the muff: pre-processing PDPC Decisions.

As mentioned in that post, I was very bothered with removing useful content such as paragraph numbers. Furthermore, it was very tiring playing whack a-mole figuring out which regular expression to use to remove a line. The results were not good enough for me, as several errors continued to persist in the text.

Not wanting to play whack-a-mole, I decided to train a model to read lines and make a guess as to what lines to keep or remove. This was the subject of First forays into natural language processing — get rid of a line or keep it? The model was surprisingly accurate and managed to capture most of what I thought should be removed.

However, the model was quite big, and the processing was also slow. While using natural language processing was certainly less manual, I was just getting results I would have obtained if I had worked harder at regular expressions. This method was still not satisfactory for me.

I needed a new approach.

A breakthrough — focus on the layout rather than the content

I was browsing Github issues on PDFMiner when it hit me like a brick. The issue author had asked how to get the font data of a text on PDFMiner.

I then realised that I had another option other than removing text more effectively or efficiently.

Readers don’t read documents by reading lines and deciding whether to ignore them or not. The layout — the way the text is arranged and the way it looks visually — informs the reader about the structure of the document.

Therefore, if I knew how the document was laid out, I could determine its structure based on observing its rules.

Useful layout information to analyse the structure of a PDF.

Rather than relying only on the content of the text to decide whether to keep or remove text, you now also have access to information about what it looks like to the reader. The document’s structure is now available to you!

Information on the structure also allows you to improve the meaning of the text. For example, I replaced the footnote of a text with its actual text so that the proximity of the footnote is closer to where it was supposed to be read rather than finding it at the bottom of page. This makes the text more meaningful to a computer.

Using PDFMiner to access layout information

To access the layout information of the text in a PDF, unfortunately, you need to understand the inner workings of a PDF document. Fortunately, PDFMiner simplifies this and provides it in a Python-friendly manner.

Your first port of call is to extract the page of the PDF as an LTPage. You can use the high level function extract_pages for this.

Once you extract the page, you will be able to access the text objects as a list of containers. That’s right — using list comprehension and generators will allow you to access the containers themselves.

Once you have access to each container in PDFMiner, the metadata can be found in its properties.

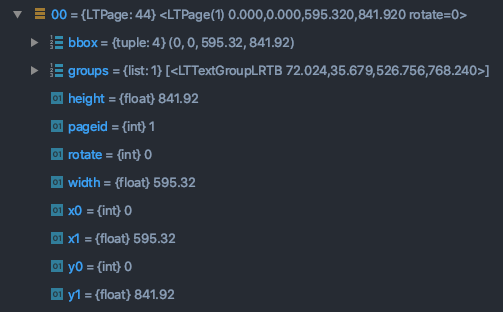
The properties of a LTPage reveal its layout information.

It is not apparent from the documentation, so studying the source code itself can be very useful.

Code Highlights

Here are some highlights and tips from my experience so far implementing this method using PDFMiner.

Consider adjusting LAParams first

Before trying to rummage through your text boxes in the PDF, pay attention to the layout parameters which PDFMiner uses to extract text. Parameters like line, word, and char margin determine how PDFMiner groups texts together. Effectively setting these parameters can help you to just extract the text.

Notwithstanding, I did not use LAParams as much for this project. This is because the PDFs in my collection can be very arbitrary in terms of layout. Asking PDFMiner to generalise in this situation did not lead to satisfactory results. For example, PDFMiner would try to join lines together in some instances and not be able to in others. As such, processing the text boxes line by line was safer.

Retrieving text margin information as a list

As mentioned in the diagram above, margin information can be used to separate the paragraph numbers from their text. The original method of using a regular expression to detect paragraph numbers had the risk of raising false positives.

The x0 property of an LTTextBoxContainer represents its left co-ordinate, which is its left margin. Assuming you had a list of LTTextBoxContainers (perhaps extracted from a page), a simple list comprehension will get you all the left margins of the text.

    from collections import Counter
    from pdfminer.high_level import extract_pages
    from pdfminer.layout import LTTextContainer, LAParams
    
    limit = 1 # Set a limit if you want to remove uncommon margins
    first_page = extract_pages(pdf, page_numbers=[0], laparams=LAParams(line_margin=0.1, char_margin=3.5))
    containers = [container for container in first_page if isinstance(container, LTTextContainer)]
    text_margins = [round(container.x0) for container in containers]
    c = Counter(text_margins)
    sorted_text_margins = sorted([margin for margin, count in c.most_common() if count &gt; limit])</code></pre>

Counting the number of times a text margin occurs is also useful to eliminate elements that do not belong to the main text, such as titles and sometimes headers and footers.

You also get a hierarchy by sorting the margins from left to right. This is useful for separating first-level text from the second-level, and so on.

Using the gaps between lines to determine if there is a paragraph break

As mentioned in the diagram above, the gap between lines can be used to determine if the next line is a new paragraph.

In PDFMiner as well as PDF, the x/y coordinate system of a page starts from its lower-left corner (0,0). The gap between the current container and the one immediately before it is between the current container’s y1 (the current container’s top) and the previous container’s y0 (the previous container’s base). Conversely, the gap between the current container and the one immediately after is the current container’s y0 (the current container’s base) and the next container’s y1 (the next container’s top)

Therefore, if we have a list of LTTextBoxContainers, we can write a function to determine if there is a bigger gap.

    def check_gap_before_after_container(containers: List[LTTextContainer], index: int) -> bool:
        index_before = index - 1
        index_after = index + 1
        gap_before = round(containers[index_before].y1 - containers[index].y0)
        gap_after = round(containers[index].y1 - containers[index_after].y0)
        return gap_after >= gap_before

Therefore if the function returns true, we know that the current container is the last line of the paragraph. As I would then save the paragraph and start a new one, keeping the paragraph content as close to the original as possible.

Retrieve footnotes with the help of the footnote separator

As mentioned in the diagram, footnotes are generally smaller than the main text, so you could get footnotes by comparing the height of the main text with that of the footnotes. However, this method is not so reliable because some small text may not be footnotes (figure captions?).

For this document, the footnotes are contained below a separator, which looks like a line. As such, our first task is to locate this line on the page. In my PDF file, another layout object, LTRect, describes lines. An LTRect with a height of less than 1 point appears not as a rectangle, but as a line!

    if footnote_line_container := [container for container in page if all([ 
        isinstance(container, LTRect),
        container.height < 1,
        container.y0 < 350,
        container.width < 150,
        round(container.x0) == text_margins[0]
    ])]:
        footnote_line_container = sorted(footnote_line_container, key=lambda container: container.y0)
        footnote_line = footnote_line_container[0].y0

Once we have obtained the y0 coordinate of the LTRect, we know that any text box under this line is a footnote. This accords with the intention of the maker of the document, which is sometimes Microsoft Word!

You might notice that I have placed several other conditions to determine whether a line is indeed a footnote marker. It turns out that LTRects are also used to mark underlined text. The extra conditions I added are the length of the line (container.width < 150), whether the line is at the top or bottom half of the page (container.y0 < 350), and that it is in line with the leftmost margin of the text (round(container.x0) == text_margins[0]).

For Python programming, I also found using the built-in all() and any() to be useful in improving the readability of the code if I have several conditions.

I also liked using a new feature in the latest 3.8 version of Python: the walrus operator! The code above might not work for you if you are on a different version.

Conclusion

Note that we are reverse-engineering the PDF document. This means that getting perfect results is very difficult, and you would probably need to try several times to deal with the side effects of your rules and conditions. The code which I developed for pdpc-decisions can look quite complicated and it is still under development!

Given a choice, I would prefer using documents where the document’s structure is apparent (like web pages). However, such an option may not be available depending on your sources. For complicated materials like court judgements, studying the structure of a PDF can pay dividends. Hopefully, some of the ideas in this post will get you thinking about how to exploit such information more effectively.

#PDPC-Decisions #NaturalLanguageProcessing #PDFMiner #Python #Programming

Author Portrait Love.Law.Robots. – A blog by Ang Hou Fu

Feature image

I’m always trying my best to be a good husband. Unfortunately, compared to knitting, cooking and painting, computer programming does not look essential. You sit in front of a computer, furiously punching on your keyboard. Something works, but most people can’t see it. Sure, your phone works, but how did your sitting around contribute to that? Geez. It’s time to contribute around the house by automating with Python!

The goal is to create a script that will download a sudoku puzzle from daily sudoku and print it in at home. My wife likes doing these puzzles, so I was sure that she would appreciate having one waiting for her to conquer in the printer tray.

You can check out the code in its repository and the docker hub for the image. An outline of the solution is provided below:

  1. Write a Python script that does the following things: (1) Set up a schedule to get the daily sudoku and download it, (2) sends an email to my HP Printer email address.
  2. HP ePrint prints the puzzle.
  3. Dockerize the container so that it can be run on my home server.
  4. Wait patiently around 9:25 am every day at the printer for my puzzle.

Coding highlights

This code is pretty short since I cobbled it together in about 1 night. You can read it on your own, but here are some highlights.

Download a file by constructing its path

As I mentioned before, you have to study your quarry carefully in order to use it. For the daily sudoku website, I found a few possibilities to automate the process of getting your daily sudoku.

  • Visit the main web page and “click” on the using an automated web browser.
  • Parse the RSS feed and get the puzzle you would like.
  • “Construct” the URL to the PDF of the puzzle of the day

I went with the last option because it was the easiest to implement without needing to download additional packages or pursue extra steps.

now = datetime.now()
r = requests.get( f”http://www.dailysudoku.com/sudoku//pdf/{now.year}/" f”{now.strftime('%m')}/{now.strftime('%Y-%m-%d')}S1N1.pdf”, timeout=5)

Notice that the python code using f-strings and strftime, which provides a text format for you to fill your URL.

This method ain’t exactly foolproof. If the structure of the website is changed, the whole code is useless.

Network printing — a real PITA

My original idea was to send a PDF directly to a network printer. However, it was far more complicated than I expected. You could send a file through the Internet Print Protocol, Line Printer Daemon or even HP’s apparently proprietary port 9100. First, though, you might need to convert the PDF file to a Postscript file. Then locate or open a socket… You could install CUPS in your container…

Errm never mind.

Sending an email to print

Luckily for me, HP can print PDF attachments sent by email. It turns out that sending a simple email using Python is quite straightforward.

msg = EmailMessage() msg['To'] = printemail msg['From'] = smtpuser msg['Subject'] = 'Daily sudoku' msg.addattachment(r.content, maintype='application', subtype='pdf', filename='sudoku.pdf') with SMTP(smtpserver, 587) as s: s.starttls() s.login(smtpuser, smtppassword) s.send_message(msg)

However, HP’s requirements for sending a valid email to their HP ePrint servers is kind of quirky. For example, your attachment will not print if:

  • There is no subject in the email.
  • The attachment has no filename (stating the MIME type of the file is not enough)
  • The person who emails the message must be a permitted user. You have to go to the HP Connected website to set these allowed senders manually.

Setting the local timezone for the docker container

The schedule package does not deal with time zones. To be fair, if you are not really serving an international audience, that’s not too bad. However, for a time-sensitive application like this, there’s a big difference between waiting for your puzzle at 9:30 am local time and 9:30 am UTC (that’s nearly time to knock off work in Singapore!).

Setting your time zone in a docker container depends on the base image of the Operating System you used. I used Debian for this container, so the code is as follows.

RUN ln -sf /usr/share/zoneinfo/Asia/Singapore /etc/localtime

Note that the script sleeps for 3 hours before executing pending jobs. This means that while the job is submitted at 9:30 am, it may be quite sometime later before it is executed.

Environment variables

The code does not make it very obvious, but you must set environment variables in order to use the script. (Oh read the README for crying out loud) This can be done in a cinch with a docker-compose file.

sudoku: image: “houfu/dailysudoku:latest” hostname: sudoku containername: dailysudoku environment: – PRINTEMAIL=ABCDEFG@hpeprint.com – SMTPSERVER=smtp.gmail.com – SMTPUSER=my_email@gmail.com – SMTP-PWD=blah blah blah

Update 17/6/2020: There was a typo in the address of Gmail’s SMTP server and this is now rectified.

Conclusion

I hastily put this together. It’s more important to have a puzzle in your hand that configuration variables and plausibly smaller containers. Since the project is personal, I don’t think I will be updating it much unless it stops working for me. I’ll be happy to hear if you’re using it and you may have some suggestions.

In the meantime, do visit www.dailysudoku.com for more puzzles, solutions, hints, books and other resources!

#Programming #docker #Python

Author Portrait Love.Law.Robots. – A blog by Ang Hou Fu

Feature image

I have always liked Jupyter Notebooks. They were my first contact with python and made the language fun and easy. It is even better when you want to explore a data set. You can just get the data and then plot it into a graph quickly. It’s even good enough to present them to other people.

However, if you want to run the same Jupyter Notebook server in different environments, it can be very challenging. Virtual environments can be useful but very difficult to sync. I own a MacOS, a Windows PC and a Linux server. Getting these parts to play with each other nicely has not been a happy experience. Repositories are inconsistent and I have spent time figuring out quirks in each operating environment.

Solution: Dockerize your Jupyter

Since being exposed to docker after setting up a docassemble server, I have been discovering all the wonders of virtual computers. The primary bugbear which is solved by docker is that it provides the means for you not to care about your computer’s background environment, instead of building “blocks” to create your application.

For this application, I wanted the following pieces of software to work together:

  • A python environment for data analysis
  • spaCy for natural language processing, given its prebuilt models and documentation
  • Jupyter notebooks to provide a web-based editor I can use anywhere
  • A MongoDB driver since the zeeker database is currently hosted in a MongoDB Atlas service.

Once all this is done, instead of writing jupyter notebook on a console and praying that I am in the right place, I will run docker run houfu/zeeker-notebooks and create a server from a build in the cloud.

The Magic: The Dockerfile

Shocking! All you need to create a docker image is a simple text file! To put it simply, it is like a recipe book that contains all the steps to build your docker image. Therefore, by working out all the ingredients in your recipe, you can create your very own docker image. The “ingredients” in this case, would be all the pieces of software I listed in the previous section.

Of course, there are several ways to slice an apple, and creating your own docker image is no different. Docker has been around for some time and has enjoyed huge support, so you can find a docker image for almost every type and kind of open-source software. For this project, I first tried docker-compose with a small Linux server and installing python and Linux.

However quite frankly, I didn’t need to reinvent the wheel. The jupyter project already has several builds for different flavours and types of projects. Since I knew that some of my notebooks needed matplotlib and pandas, I chose the scipy-notebook base image. This is the first line in my “recipe”:

FROM jupyter/scipy-notebook

The other RUN lines allow me to install dependencies and other software like spaCy and MongoDB. These are the familiar instructions you would normally use on your computers. I even managed to download the spaCy models into the docker image!

RUN conda install —quiet —yes -c conda-forge spacy && \ python -m spacy download encorewebsm && \ python -m spacy download encorewebmd && \ conda clean —all -f -y

RUN pip install —no-cache-dir pymongo dnspython

Once docker has all these instructions, it can build the image. Furthermore, since the base image already contains the functionality of the jupyter notebook, there’s no need to include any further instructions on EXEC or ENTRYPOINT.

Persistence: Get your work saved!

The Dockerfile was only 12 lines of code. At this point, you are saying — this is too good to be true! Maybe, you are right. Because what goes on in docker, stays in docker. Docker containers are not meant to be true computers. Just so that they are lightweight and secure, they can easily be destroyed. If you created a great piece of work in the docker container, you have to ensure that it gets saved somewhere.

The easiest way to deal with this is to bind a part of your computer’s filesystem to a part of your docker container’s filesystem. This way your jupyter server in the docker container “sees” your files. Then your computer gets to keep those files no matter what happens to the container. Furthermore, if you run this from a git repository, your changes can be reflected and merged in the origin server.

This is the command you call in your shell terminal:

$ docker run -p 8888:8888 —mount type=bind,source=“$(pwd)”,target=/home/jovyan/work houfu/zeeker-notebooks

Since user accounts in the base image are named jovyan (another way of saying Jupiter), this is where we bind them. The $(pwd) is an abbreviation that allows the “present working directory” to be filled in as a source, no matter where or how you saved the repository.

Screenshot of jupyter notebook page showing file directory.

There you have it! Let’s get working!

Bonus: Automate your docker image builds

It is great that you have got docker to create your standard environment for you. Now let’s take it one step further! Won’t it be great if docker would update the image on the repository whenever there are changes to the code? That way the “latest” tag actually means what it says,

You can do that in a cinch by setting up auto-build if you are publishing on Docker hub. Link your source repository on GitHub to your docker hub repository and configure automated builds. This way, every time there is a push to your repository, an image is automatically built, providing the latest image to all using the repository.

Webpage in Docker showing automated builds.

Conclusion

It’s fun to explore new technologies, but you must consider whether they will help your current workflow or not. In this case, docker will help you to take your environment with you to share with anyone and on any computer. You will save time figuring out how to make your tools work, focusing on how to make your tools work for you. Are you seeing any other uses for docker in your work?

#Programming #docker #Python

Author Portrait Love.Law.Robots. – A blog by Ang Hou Fu

Feature image

This post is part of a series on my Data Science journey with PDPC Decisions. Check it out for more posts on visualisations, natural languge processing, data extraction and processing!

The life of a budding data science enthusiast.

You need data to work on, so you look all around you for something that has meaning to you. Anyone who reads the latest 10 posts of this blog knows I have a keen interest in data protection in Singapore. So naturally, I wanted to process the PDPC’s enforcement cases. Fortunately for me, the listing of published cases are complete, and they are not exactly hindered by things like stare decisis. We begin by scraping the website.

The Problem

Using the scraping method I devised, you will now get a directory filled with PDFs of the cases. Half the battle done, right? If you thought so, then you have not looked hard enough at the product.

It’s right there. They are PDFs. Notwithstanding its name, PDFs do not actually represent text well. They do represent pages or documents, which means you what get what you see and not what you read.

I used PDFminer to extract the text from the PDF, and this is a sample output that I get:

The operator, in the mistaken belief that the three statements belonged to the same individual, removed the envelope from the reject bin and moved it to the main bin. Further, the operator completed the QC form in a way that showed that the number of “successful” and rejected Page 3 of 7 B. (i) (ii) 9. (iii) envelopes tallied with the expected total from the run. As the envelope was no longer in the reject bin, the second and third layers of checks were by-passed, and the envelope was sent out without anyone realising that it contained two extra statements. The manual completion of the QC form by the operator to show that the number of successful and rejected envelopes tallied allowed this to go undetected.

Notice the following:

  • There are line breaks in the middle of sentences. This was where the sentence broke apart for new lines in the document. The computer would read “The operator, in the mistaken belief that the three statements belonged” and then go “What? What happened?”
  • Page footers and headers appears in the document. They make sense when you are viewing a document, but are meaningless in a text.
  • Orphan bullet and paragraph numbers. They used to belong to some text, but now nobody knows. Table contents are also seriously borked.

If you had fed this to your computer or training, you are going to get rubbish. The next step, which is very common in data science but particularly troublesome in natural language processing is preprocessing. We have to fix the errors ourselves before letting your computer do more with it.

I used to think that I could manually edit the files and fix the issues one by one, but it turned out to be very time consuming. (Duh!) My computer had to do the work for me. Somehow!

The Preprocessing Solution

Although I decided I would let the computer do the correcting for me, I still had to do some work on my own. Instead of looking for errors, this time I was looking for patterns instead. This involved scanning through the output of the PDF to Text converter and the actual document. Once I figured out how these errors came about, I can get down to fixing it.

Deciding what to take out, what to leave behind

Not so fast. Unfortunately, correcting errors is not the only decision I had to make. Like many legal reports, PDPC decisions have paragraph numbers. These numbers are important. They are used for cross-referencing. In the raw output, the paragraph numbers are present as plain numbers in the text. They may be useful to a human reader who knows they are meta-information in the text, but to a computer it probably is just noise.

I decided to take it out. I don’t doubt that one day we can engineer a solution that makes it useful, but for now, they are just distractions.

Put Regular Expressions to work!

As mentioned earlier, we looked for patterns in the text to help the computer to look for them and correct them. I found regular expressions to be a very powerful way to express such patterns in a way that the computer can look for. A regular expression is sort of like a language to define a search pattern.

For example,. this code in bold looks for feed carriages in the text (a “carriage return” is what happens when you press ‘Enter’ on your keyboard, and is much cooler in a typewriter)

def removefeedcarriage(source): return [x for x in source if not re.search(r'\f', x)]

This python code tells the computer not to include any text which contains feed carriages in the text. This eliminates the multiple blank lines created by the PDF converter (usually blank space in the PDF).

A well crafted regular expression can find a lot of things. For example, the expression in bold looks for citations (“[2016] SGPDPC 15” and others) and removes them.

def remove_citations(source): return [x for x in source if not re.search(r'^[\d{4}]\s+(?:\d\s+)?[A-Z|()]+\s+\d+[\s.]?$', x)]

Figuring out the “language” in regular expressions does takes some time, but it pays dividends. To help the journey, I test my expressions using freely available websites for testing and providing a reference for regular expressions. For python, this is one of the sites I used.

Getting some results!

Besides removing citations, feed carriages and paragraph numbers, I also tried to join broken sentences together. In all, the code manages to remove around 90% of the extra line breaks. Most of the paragraphs in the text actually reads like sentences and I feel much more confident training a model based on these text.

It ain’t perfect of course. The text gets really mushed up once a table is involved, and the headers and footers are not exactly removed all the time. But as Voltaire said, “Perfect is the enemy of the good”. For now, this will do.

Concluding remarks

Hopefully this pretty quick rundown of how I pre-processed the pdpc-decisions will give you some idea as to what to do in your own projects. Now that I have the text, I have got to find something to use it for! :O Is there any other ways to improve the code to catch even more errors? Feel free to comment to let me know!

houfu/pdpc-decisionsData Protection Enforcement Cases in Singapore. Contribute to houfu/pdpc-decisions development by creating an account on GitHub.GitHubhoufu

#PDPC-Decisions #PDFMiner #Python #Programming

Author Portrait Love.Law.Robots. – A blog by Ang Hou Fu

Feature image

This post is part of a series on my Data Science journey with PDPC Decisions. Check it out for more posts on visualisations, natural languge processing, data extraction and processing!

Update 13 June 2020: “At least until the PDPC breaks its website.” How prescient… about three months after I wrote this post, the structure of the PDPC’s website was drastically altered. The concepts and the ideas in this post haven’t changed, but the examples are outdated. This gives me a chance to rewrite this post. If I ever get round to it, I’ll provide a link.

Regular readers would already know that I try to run a github repository which tries to compile all personal data protection decisions in Singapore. Decisions are useful resources teeming with lots of information. They have statistics, insights into what factors are relevant in decision making and show that data protection is effective in Singapore. Even basic statistics about decisions make newspaper stories here locally. It would be great if there was a way to mine all that information!

houfu/pdpc-decisionsData Protection Enforcement Cases in Singapore. Contribute to houfu/pdpc-decisions development by creating an account on GitHub.GitHubhoufu

Unfortunately, using the Personal Data Protection Commission in Singapore’s website to download judgements can be painful.

This is our target webpage today – Note the website has been transformed.

As you can see, you are only able to view no more than 5 decisions at one time. As the first decision dates back to 2016, you will have to go through several pages to grab everything! Actually just 23. I am sure you can do all that in 1 night, right? Right?

If you are not inclined to do it, then get your computer to do it. Using selenium, I wrote a python script to automate the whole process of finding all the decisions available on the website. What could have been a tedious night’s work was accomplished in 34 seconds.

Check out the script here.

What follows here is a step by step write up of how I did it. So hang on tight!

Section 1: Observe your quarry

Before setting your computer loose on a web page, it pays to understand the structure and inner workings of your web page. Open this up by using your favourite browser. For Chrome, this is Developer's Tools and in Firefox, this is Web Developer. You will be looking for a tab called Sources, which shows you the HTML code of the web page.

Play with the structure of the web page by hovering over various elements of the web page with your mouse. You can then look for the exact elements you need to perform your task:

  • In order to see a new page, you will have to click on the page number in the pagination. This is under a section (a CSS class) called group__pages. Each page-number is under a section (another CSS class) called page-number.
  • Each decision has its own section (a CSS class) named press-item. The link to the download, which is either to a text file or a PDF file, is located in a link in each press-item.
  • Notice too that each press-item also has other metadata regarding the decision. For now, we are curious about the date of the decision and the respondent.

Section 2: Decide on a strategy

Having figured out the website, you can decide on how to achieve your goal. In this case, it would be pretty similar to what you would have done manually.

  1. Start on a page
  2. Click on a link to download
  3. Go to the next link until there are no more links
  4. Move on to the next page
  5. Keep repeating steps 1 to 4 until there are no more pages
  6. Profit!

Since we did notice the metadata, let’s use it. If you don’t use what is already in front of you, you will have to read the decision to extract such information In fact, we are going to use the metadata to name our decision.

Section 3: Get your selenium on it!

Selenium drives a web browser. It mimics user interactions on the web browser, so our strategy in Step 2 is straightforward to implement. Instead of moving our mouse like we ordinarily would, we would tell the web driver what to do instead.

WebDriver :: Documentation for SeleniumDocumentation for SeleniumSelenium

Let’s translate our strategy to actual code.

Step 1: Start on a page

We are going to need to start our web driver and get it to run on our web page.

from selenium.webdriver import Chrome from selenium.webdriver.chrome.options import Options PDPCdecisionssite = “https://www.pdpc.gov.sg/Commissions-Decisions/Data-Protection-Enforcement-Cases" # Setup webdriver options = Options() # Uncomment the next two lines for a headless chrome # options.addargument('—headless') # options.addargument('—disable-gpu') # options.addargument('—window-size=1920,1080') driver = Chrome(options=options) driver.get(PDPCdecisions_site)

Steps 2: Download the file

Now that you have prepared your page, let’s drill down to the individual decisions itself. As we figured out earlier, each decision is found in a section named press-item. Get selenium to collect all the decisions on the page.

judgements = driver.findelementsbyclassname('press-item')

Recall that we were not just going to download the file, we will also be using the date of the decision and the respondent to name the file. For the date function, I found out that under each press-item there is a press-date which gives us the text of the decision date; we can easily convert this to a python datetime so we can format it anyway we like.

def getdate(item: WebElement): itemdate = datetime.strptime(item.findelementbyclassname('press_date').text, “%d %b %Y”) return itemdate.strftime(“%Y-%m-%d”)

For the respondent, the heading (which is written in a fixed format and also happens to be the link to the download – score!) already gives you the information. Use a regular expression on the text of the link to suss it out. (One of the decisions do not follow the format of “Breach … by respondent “, so the alternative is also laid out)

def get_respondent(item): text = item.text return re.split(r”\s+[bB]y|[Aa]gainst\s+“, text, re.I)[1]

You are now ready to download a file! Using the metadata and the link you just found, you can come up with meaningful names to download your files. Naming your own files will also help you avoid the idiosyncratic ways the PDPC names its own downloads.

Note that some of the files are not PDF downloads but instead are short texts in web pages. Using the earlier strategies, you can figure out what information you need. This time, I used BeautifulSoup to get the information. I did not want to use selenium to do any unnecessary navigation. Treat PDFs and web pages differently.

def downloadfile(item, filedate, filerespondent): url = item.getproperty('href') print(“Downloading a File: “, url) print(“Date of Decision: “, filedate) print(“Respondent: “, filerespondent) if url[-3:] == 'pdf': dest = SOURCEFILEPATH + filedate + ' ' + filerespondent + '.pdf' wget.download(url, out=dest) else: with open(SOURCEFILEPATH + filedate + ' ' + filerespondent + '.txt', “w”) as f: from bs4 import BeautifulSoup from urllib.request import urlopen soup = BeautifulSoup(urlopen(url), 'html5lib') text = soup.find('div', class_='rte').getText() lines = re.split(r”ns+“, text) f.writelines([line + 'n' for line in lines if line != “”])

Steps 3 to 5: Download every item on every page

The next steps follow a simple idiom — for every page and for every item on each page, download a file.

for pagecount in range(len(pages)): pages[pagecount].click() print(“Now at Page “, pagecount) pages = refreshpages(driver) judgements = driver.findelementsbyclassname('press-item') for judgement in judgements: date = getdate(judgement) link = judgement.findelementbytagname('a') respondent = getrespondent(link) download_file(link, date, respondent)

Unfortunately, once selenium changes a page, it needs to be refreshed. We are going to need a new group__pages and page-number in order to continue accessing the page. I wrote a function to “refresh” the variables I am using to access these sections.

def refreshpages(webdriver: Chrome): grouppages = webdriver.findelementbyclassname('group_pages') return grouppages.findelementsbyclassname('page-number') . . . pages = refresh_pages(driver)

Conclusion

Once you got your web driver to be thorough, you are done! In my last pass, 115 decisions were downloaded in 34 seconds. The best part is that you can repeat this any time there are new decisions. Data acquisition made easy! At least until the PDPC breaks its website.

Postscript: Is this… Illegal?

I’m listening…

Web scraping has always been quite controversial and the stakes can be quite high. Copyright infringement, Misuse of Computer Act and trespass, to name a few. Funnily enough, manually downloading may be less illegal than using a computer. The PDPC’s own terms of use is not on point at this.

( Update 15 Mar 2021 : OK I think I am being fairly obtuse about this. There is a paragraph that states you can’t use robots or spiders to monitor their website. That might make sense in the past when data transfers were expensive, but I don't think that this kind of activity at my scale can crash a server.)

Personally, I feel this particular activity is fairly harmless — this is considered “own personal, non-commercial use” to me. I would likely continue with this for as long as I would like my own collection of decisions. Or until they provide better programmatic access to their resources.

Ready to mine free online legal materials in Singapore? Not so fast!Amendments to Copyright Act might support better access to free online legal materials in Singapore by robots. I survey government websites to find out how friendly they are to this.Love.Law.Robots.HoufuIn 2021, the Copyright Act in Singapore was amended to support data analysis, like web scraping? I wrote this follow-up post.

#PDPC-Decisions #Programming #Python #tutorial #Updated

Author Portrait Love.Law.Robots. – A blog by Ang Hou Fu