The Power To Serve: Setting Up FreeBSD
Most would agree that IT and Computer geeks have an intense passion for Open Source Software and quality code. Due to this, Linux is a staple in the tech community... But is it the only option? Enter FreeBSD, an Operating System whose roots trace all the way back to the original UNIX. Buckle up, and prepare for an introduction to FreeBSD and setting it up yourself.
Wait, Slow Down. What's FreeBSD?
Back in the 1970s and 1980s, AT&T Bell Labs invented UNIX and would go on to sell commercial copies of said Operating System to various colleges. The awesome thing was that AT&T shipped source code bundled right in! One of these places was the University of California at Berkeley, who aptly wrote more tools for UNIX such as vi and the original Berkeley Fast Filesystem (what most Linux/UNIX Filesystems are based on nowadays). Eventually UC Berkeley went on to redistribute their own variant of UNIX called BSD, setting up a hotline at 1-800-ITS-UNIX. This ROYALLY pissed off AT&T and they sued for copyright infringement. For reference, around this time Linus Torvalds was beginning the Linux Kernel development.
Needless to say, UC Berkeley won the case almost totally- so much so that AT&T only kept copyright to 3-4 files of the entire UNIX system. This enabled the release of i386BSD, which spawned the FreeBSD, NetBSD and OpenBSD projects. Their licenses are all very close to the original license of the code which is extremely permissive and allows the user to do almost anything except take credit for the work, sue the developer and remove the license.
Cool! Let's Install It!
Awesome! At this time of writing, the latest stable version of FreeBSD is 12.1. If you browse to the FreeBSD Site, you'll notice a big “Download Now” button. For this series of blog posts, we'll install 12.1 because stability matters for a daily-driver laptop. Pick the correct CPU architecture and you'll be taken to a web open directory. There are multiple images available for download, generally DVD1 and memstick images have all installation files embedded into the image so no network connection is needed to install the system.
Now that the image is downloaded, pick an installation medium. For usb, you would insert a thumb drive and type sudo dd if=/path/to/FREEBSDIMAGE of=/dev/sdX status=progress, where the “if” argument is the location of your downloaded FreeBSD installer image and the “of” argument is the name of your drive under Linux.
After this is done, let's yank out our computer and boot into the installer! On most laptops, there is a key combination to enter the BIOS, like spamming F12 or delete on boot. Once you've done this, allow USB booting, disable secure boot, and configure your flash drive to boot first. With the flash drive plugged in, you should be greeted by a FreeBSD bootloader, waiting a moment will take you to a graphical menu that looks like this:
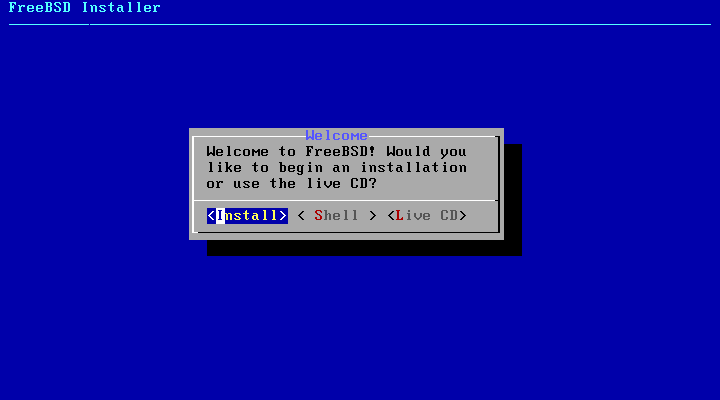 The FreeBSD Installer
Select your responses with the arrow keys, and press enter to continue.
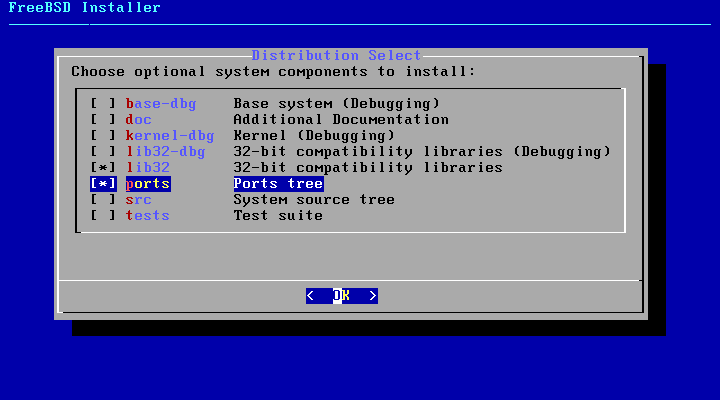 In prompts like this one, you'll need to use the space bar to alter selections.
The menu is very simple and easy to go through... Once you arrive at what disk format to use, the most common option FreeBSD users select is entire-disk ZFS.
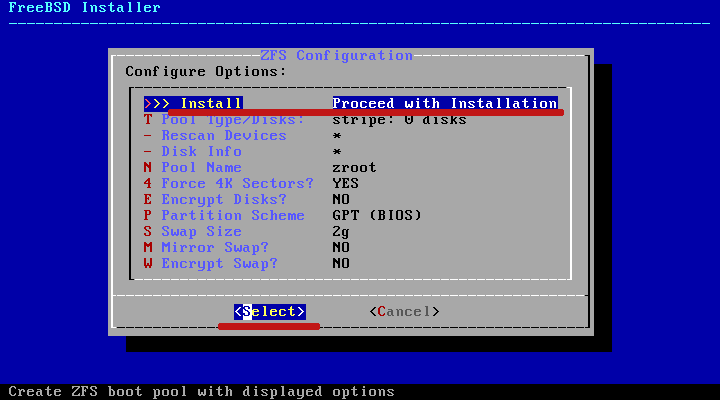
Remember to select your disks in the ZFS Pool! The original option is stripe/0 disks, but you still need to go into it's submenu and select a disk even if you don't want to use the mirroring abilities of ZFS. There is an option to enable encryption, enabling it will provide a prompt later for your disk encryption password. If you're content with the settings, continue on.
After this, you'll be greeted by a menu of what packages you'd like to install, selectable by spacebar and arrow keys. Pressing enter will allow you to continue to the installation. Once complete, the interface will drop to a shell for you to set the root user password. Once that's done, the installer will take you back to the UI and offer to create a user account (DO THIS!), where you drop back to the shell to create it. Lastly, there will be system hardening options that you can optionally check. If you're concerned with privacy, it is recommended to enable all of them. Finally, it will provide an option to exit the installer and reboot.
Welcome To FreeBSD!
On fresh installation, FreeBSD is extremely plain and doesn't even have a desktop. Our first priority is to connect to the internet, so we can update our system. Running the ifconfig command will list all devices that are recognized by FreeBSD. If your network card isn't recognized, you will want to search to see if it's supported. If so, there's probably a kernel module that hasn't been loaded for it. To remedy this, a simple kldload xxx (where xxx is the name of the kernel module corresponding to your device driver) will enable your hardware. If this works, you can make this change permanent by editing /etc/rc.conf. FreeBSD makes use of wpa_supplicant and ifconfig to connect- more comprehensive guides on getting connected can be found here:
Wireless Networking in FreeBSD Networking in FreeBSD
Once connected, updating the system and fetching a few apps to get started with configuration is critical. There's three ways a user can install software on FreeBSD: compiling from source by hand, compiling from source through the ports collection (automatically), or using the pkg package manager which feels very much like apt.
Set up the FreeBSD ports tree by running portsnap fetch extract. If you ever wish to use it, cd into /usr/ports and find the proper directory of the application you wish to install. Then type make clean install.
As for pkg, let's update, upgrade and install vim:
pkg update
pkg upgrade
pkg install vim
Once all the software required for a desktop or whatever use case is necessary, setup is just like any *nix-based system.
So What Makes FreeBSD Different???
FreeBSD has a bunch of unique development tools, such as dtrace, for programming and understanding how the Operating System works and programming good, solid code. On top of that, it comes with pf instead of iptables, which is the de-facto standard on many enterprise networking devices such as Cisco or Palo Alto (they actually ship with FreeBSD installed). The entire Operating System source code can be found in /usr/src, and you can recompile the entire OS with a one-line terminal command. FreeBSD and similar systems are known for having the best TCP/IP networking stack in the world, so much so that even Microsoft still uses FreeBSD code for driving the internet on Windows to this very day.
Be sure to stick around for the next post, where we'll compile a custom kernel on FreeBSD!
Liked This Content? Check Out Our Discord Community and Become an email subscriber!