 I'm Coding a Game – Part 11

Well, well, well... Part 11 huh? I don't think I've done 11 installments of anything in my life! The closest I got was a mutli-book series titled, “NickelNDime is a Space Knight and he's Going to Chop up the Bad Guys!” but if I'm being honest, large parts of it I took from the Star Wars saga. In this installment I added Dying, Signs, Mouse Menus, and Enemy Movement.
Dying
It's part of every game, but nobody wants to talk about it. Some people focus on the finality of it, while others will look back to happier times they had with their character. Me, well I just click on, “New Game” and play again. I'm not some weirdo for god's sake.
If truth be told, up until this point, my character couldn't die, and it really bothered me. It felt like the game was broken, incomplete, or glitched out.
This wasn't such a hard task to code because if you recall, I've already coded the enemies dying, so most of the code had already been written. So I created a new sprite with two images. The first, the main character getting knocked back, and the second the main character lying on the floor.

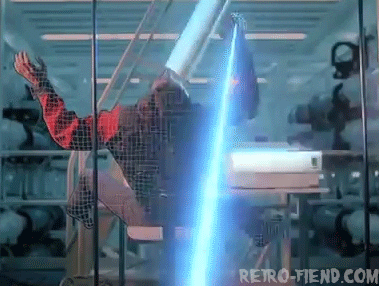
This is Chester flying through the air...

...and this is him dead.
Next I created a new object and titled it, oDPlayer. A lot of the variables I just cut and pasted from the original oDead which was the enemy's death sequence, with some minor differences. When the character dies, I wanted the game to slow down, the character to get knocked back, and the screen to shake. To accomplish this, I changed the grv(gravity) to .2 to make the character lighter. For the screen shake, I used the SceenShake function again. To slow the game down, I used a built in function called game_set_speed. This function in GameMakerStudio 2 allows the programmer to change the game speed when certain events happen.

Create Event
The next bit of code I entered was in the step event, and used a new event called Alarm. In the vertical collision, when the character finally touches the ground the alarm[0] gets set to 60. This in turn triggers the alarm event. The alarm event then sets the game back to 60 fps and uses the Slide Transition to restart the level.

Step Event

Alarm[0] Event
With the death sequence created, I added a collision event so when an enemy hit the character, the death sequence would initiate. I created a collision event and entered this code:

What this states is when the character collides with the enemy, destroy the gun, and change the instance from oPlayer to oPDead. This starts the death sequence.
When all that code gets put together, we have this:

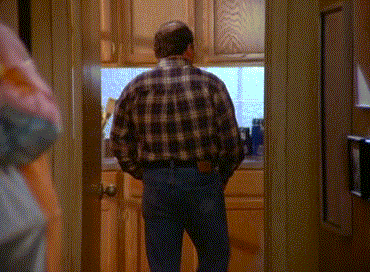
Building Signposts
Have you ever been playing a game, and in the game you walk up to a sign, click on it, and a box appears above the character to display what was on the sign? This was a lot harder and more complex than I realized! This lesson I had to go over a couple of times before I was able to follow the logic of what was actually going on.
First I coded a new object, oText and made a create event:

- spd stands for speed or the rate the characters are drawn. 1 would equal 1 character per frame.
- letters stands for how many letters are currently being drawn
- text stands for the actual text to be drawn. \n signals line change.
- length takes the entire size of text. This includes all characters and spaces.
- text_current is a blank text box to be updated as it's being drawn on the screen.
- w is the width of the text
- h is the hieght of the text
- border is the border
Next I created a step event for oText:

So this code makes the text appear as if it's being typed out when the player clicks on the sign. On every frame, spd gets added to letters. text_current copies what is in text so it will gradually type out the characters. After it's typed out, a destroy routine clears the text, and the text box.
Next I had to create a draw event to actually draw what all the previous code was doing. I created a draw event and entered the following:

This code will create a black text box with white lettering. With the lettering I created a script like so:

This way the //draw text routine can pull from this script rather than programming all of it in the sub-routine. A coder could do it that way, but this is an easier way to organize all of it.
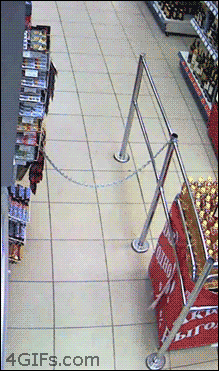
Now that the code for the text was created, I still needed to make a sprite and object that we could attach this code to. I created a new sprite and tried my darndest to make it look like a street sign.

It's probably best if I don't disclose how much time this took me to create.
Next, I created an object called oSign and imported this sprite. Here is the code for oSign:

This code states when the character is close to the sign and right clicks the mouse button, the oText code will initiate. At last I could finally place my sign in the room. What's great about the way all this was coded, is that each instance of the sign can have it's own individual message! That makes it a lot more easier if I would like to put multiple signs in the game.
When it's put all together, it looks something like this:

Mouse Menus
If we backtrack a little, you'll recall I made a menu screen in one of the previous installments. Before adding the mouse feature, a player would have to use the arrow keys to select one of the options of the menu.
First I went to the create event in oMenu and added a new variable:

Next I went to the Step event of the oMenu to enter code so that when the mouse hovers over an option, the option will highlight:

This code is entered in with the keyboard menu selections so now both the keyboard and mouse can be used to select the menu options. Now when I fire up the game I can use the mouse to select an option on the menu screen!

Enemy Movements
I have a confession about the enemies I originally coded, ready? They are not very bright. There I said it. The reason I said this is because when I coded their movement, it was very basic. An enemy will go in one direction until it hits a wall, then it will go the other way. This is all fine and well, but they will roll off ledges. If you haven't noticed yet, in my game all the building tops have walls built up so the enemies don't run off the ledge!
I needed to change this, so the first step I did was open the variable box of oEnemy and add two new variables:

The two new variables were afraidofheights, and grounded. These are known as, “Boolean” variables. That means the variables can either be, “True” or “False.” I set afraidofheights to, “True” and grounded to, “False.”
Next I opened the Step event in oEnemy and entered this:

It states that if the enemy gets to a ledge, reverse the direction. Now when an enemy gets to a ledge, it will do this:

Well, that pretty much covers everything I did. I'll see you guys in the next installment!
NickelNDime Out!
Subscribe to Coil so you can read below this line. It's so cool, you don't even know! Or better yet, become a writer on Coil's platform!


