Raspberry Pi – Python Coding

Coding, Hollywood movies love to depict coders as wizards of electrickery. They're not wrong, a dark art to many, coding is the back-bone of almost everything we use daily. However, I'm here to tell you anyone can learn the basics of coding. With our lives becoming ever more digital, now is as great a time as any to rip the band-aid and recognise that it is a language like any other.
There is a saying, “Once you understand, you know and once you know, you never forget.”
It is easy to copy-and-paste code, but just like using Google Translate to convey an idea in another language, sometimes you should UNDERSTAND and KNOW what you're saying so there aren't any misunderstandings. In coding a mistake or forgotten line can have odd results.
Don't let that deter you, simpler code is safer code.
As part of my Raspberry Pi (RPi) computing series of articles, I'd like to teach the basics of one coding language – Python. A general purpose, high-level programming language, created by Dutch programmer Guido Van Rossum and first released in 1991. It is one of many programming languages; you may have also heard of “Java”, “C++”, “JavaScript” to name a few. Being general purpose,
Python can be used for many tasks whilst the term 'High-level' just means the wording is often human-readable with the machine aspects being removed.
You can use Python on any computer but as this is a Raspberry Pi series, I will be describing the specifics of use on Raspbian OS.
If you'd like to know more about RPi computers, please view the first part of this series here:
This tutorial will require your Raspberry Pi being setup already. If you haven't used your RPi until today you may want to read the second part of this series, a setup walk-through:
The Journey Begins Here...
We'll begin this tutorial at the desktop of your RPi, open the application menu by clicking the Raspberry icon in the top left, then “Programming”, before clicking on “Thonny Python IDE”.
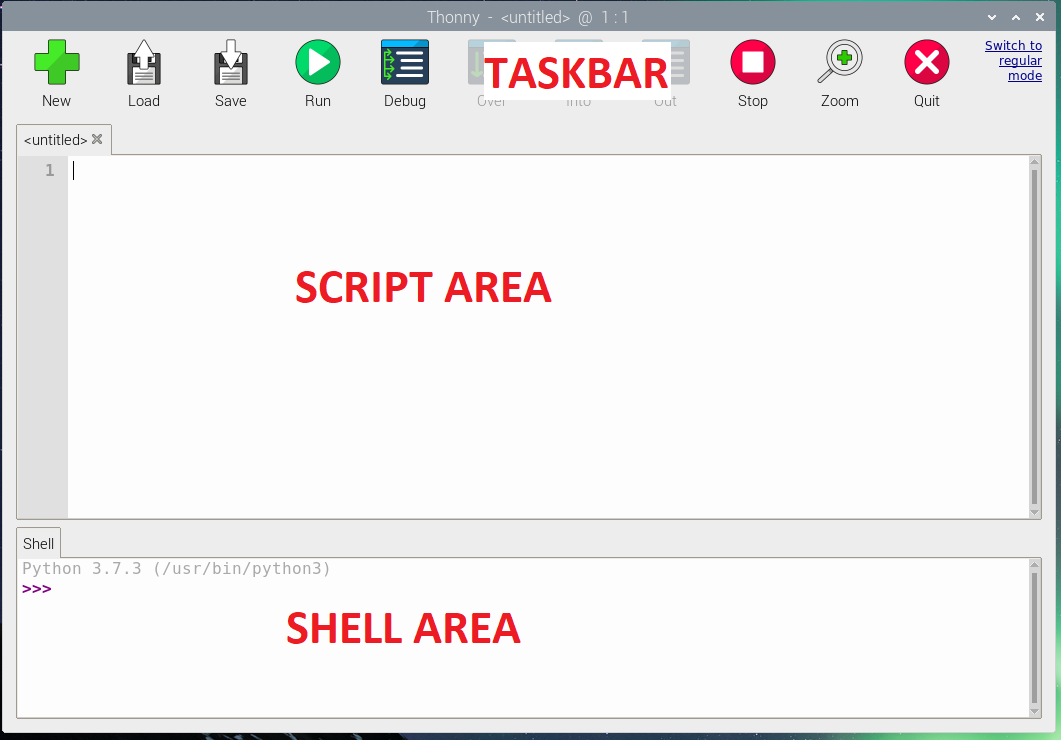
Once opened you'll find a toolbar at the top, the Script Area below this and at the bottom is the “Shell” area. You may also have a box to the right. This box is usually for “Variables” which will be explained later.
The 'Script Area' is where you will be writing your code (or Script), as you type you'll notice to the left that it keeps count of how many lines have been wrote.
The 'Shell Area' is where you can input instructions when your script is running. It will also show you the progress of the script, whether it has errors.
Let's begin with what has now become a tradition in coding, “Hello World”. It is important to remember that Python is case-sensitive, use of capital and lowercase letters is important so please pay special attention to that.
Hello World!
In the Script Area, please type the following: print("Hello World")

You will notice the word 'print' will appear in purple. In Thonny this represents a “Function”, a piece of code that performs a task. Functions should always appear with parenthesis “( )” after them. Inside the parenthesis we include information, which we call an “Argument”, in Thonny these are green. When put together in our first line of code, our function and argument will tell your RPi to show “Hello World!”.
After writing your script: Go to the taskbar –> Click Save –> A pop-up will appear, to the right click the icon to add a new folder –> I'll name mine “PythonScript”.

It is good practice to avoid spaces when naming folders or files. Inside your new folder –> click the “Name” box and give your script a name, mine will be “HelloWorld.py”. As Raspbian is a Linux based OS you MUST tell it what type of file you're saving and what purpose it will serve. This is why we MUST add the suffix “.py” so that your RPi will run your script as a Python program.
The same is true for text docs, which would require the suffix “.txt”.
Once saved you will be returned to Thonny. Click the green “Play” button in the taskbar and watch your script run in the Shell Area.
If your script was correct you will now see “Hello World” displayed.

What if you typed your script incorrectly? Well, if you forgot one or both quotation marks you will see a 'Traceback' in red, showing you where Thonny believes the error is. It will also tell you that this was a 'Syntax Error', or to put it simply, you forgot a special symbol (The quotation marks)

Regardless whether correct or not, the script will still be running, so select the red “Stop” Button in the taskbar. Fix errors if there are any, then save again.
As I mentioned before you can also add instructions to the Shell Area, let's go full Ainsley Harriott and have your RPi print “Why Hello, Jill!”.

In the Shell Area, please type the following: print("Why hello, Jill!")
Then hit the “Enter” button to see the results.

Even more ways to Function,
There are many built-in functions, but you can also create new functions that perform tasks you want when requested by using the 'def' keyword.

Back in your Script area, please type the following:
def new_function():
print("Did I just make a new function?")
By using “def” you are telling the python program that what follows is a custom function. I've named mine “new_function()” but it can be almost anything with some exceptions, like numbers or special characters aren't allowed. You CAN NOT define a function like this “def 1():“
A function must include the parenthesis “( )” and when defining this new function we include a colon “:”. This colon tells the python program that we are making a block of code to follow. The keen eyed amongst you may have noticed the next line is indented, this is important to note. When creating blocks of code you may need to do add this manually by pressing the “TAB” button on your keyboard or pressing the space-bar four(4) times. This helps indicate which block of code a statement belongs to and will affect how your code behaves.
Right... Back to your new function...
If you have saved this, you can now press the “Play” button. Notice that “Did I just make a new function?” doesn't appear. This is because so far you have defined the function but not requested that it be performed. To do this return to your Script Area, make a new line and type the following: new_function()

Be sure that any indentation on this line is removed so that the python program knows it isn't part of the last block.
Your entire script so far should look like this:
print("Hello World!")
def new_function():
print("Did I just make a new function?")
new function()
Save your script, then press the “Play” button once more. Your Shell Area should now include new text.

Why not take this time to try defining your own functions by having Python print a different sentence or another sentence as well.
Remember to use correct syntax like parenthesis, quotation marks, colons and indentations.
My next post, Python script for Raspberry Pi “Sense Hat” add-on, can be found here:
If you'd like, you can follow me on Twitter at the link below:
https://twitter.com/SASchofield52
Disclaimer: Images are my own, opinions are my own... Except Ainsley Harriott, his greetings and GIFs are all his own. The bloke probably also makes a delicious Spaghetti Bolognaise.