davepolaschek

dovetails

Originally written May 2, 2018

I couldn't find anyone describing how to cut dovetails for non-square corners, so I decided to write this up. This trick will work for any angle dovetails, but you'll have to change up the workholding jigs.

This is a description of how to cut dovetails for a 135 degree corner. This is the angle used on an octagonal box (if all the angles are equal). They're not perfect, and there's probably a better way to do it, but this is the best I found.

My first try cutting 135 degree dovetails used no special workholding. I just threw the pieces in the vise and started cutting. I cut tails first and I cut them pretty much as normal, except with the end of the board at a 45 degree angle, so they were pretty easy.

Tails cut on a board with the end cut at 135 degrees

The pins were fairly straight too. This is feeling easy!

Pins marked on a board with a 135 degree angled end

But the fit left something to be desired.

First attempt at a 135 degree dovetailed corner, showing a fairly loose fit

So I sat and thought for a bit and decided that maybe I could use a square piece in the corner, all tails, and put pins on the edge pieces that would go into it, and then cut the 45 degree angle afterwards. It couldn't be any worse than the previous attempt, could it?

A corner piece with tails cut into it from two directions at 90 degrees to each other

Cutting long pins into the end of a board

Boards with long pins inserted into the board with two sets of tails cut into it

The assembled corner, with the corner sanded off, leaving the pin boards almost meeting

Well, that worked okay, and I might end up trying that method again, but I'll have to think harder about the grain direction in that corner piece when I do.

So I tried again. Third time's the charm, right?

I cut the tails square this time, just like you would on a normal dovetail. I even gang-cut them two at a time.

Gang-cutting tails on two boards, as I typically do for dovetails

Then I cut the pins on a board with the end angled 45 degrees using a jig I made for the purpose. I made the 45 degree end on the board using a miter jack before cutting.

One corner together with the pin-board fitting into the tails

Two adjacent corners fit together, with a mirror behind so the inside of the joint is visible too

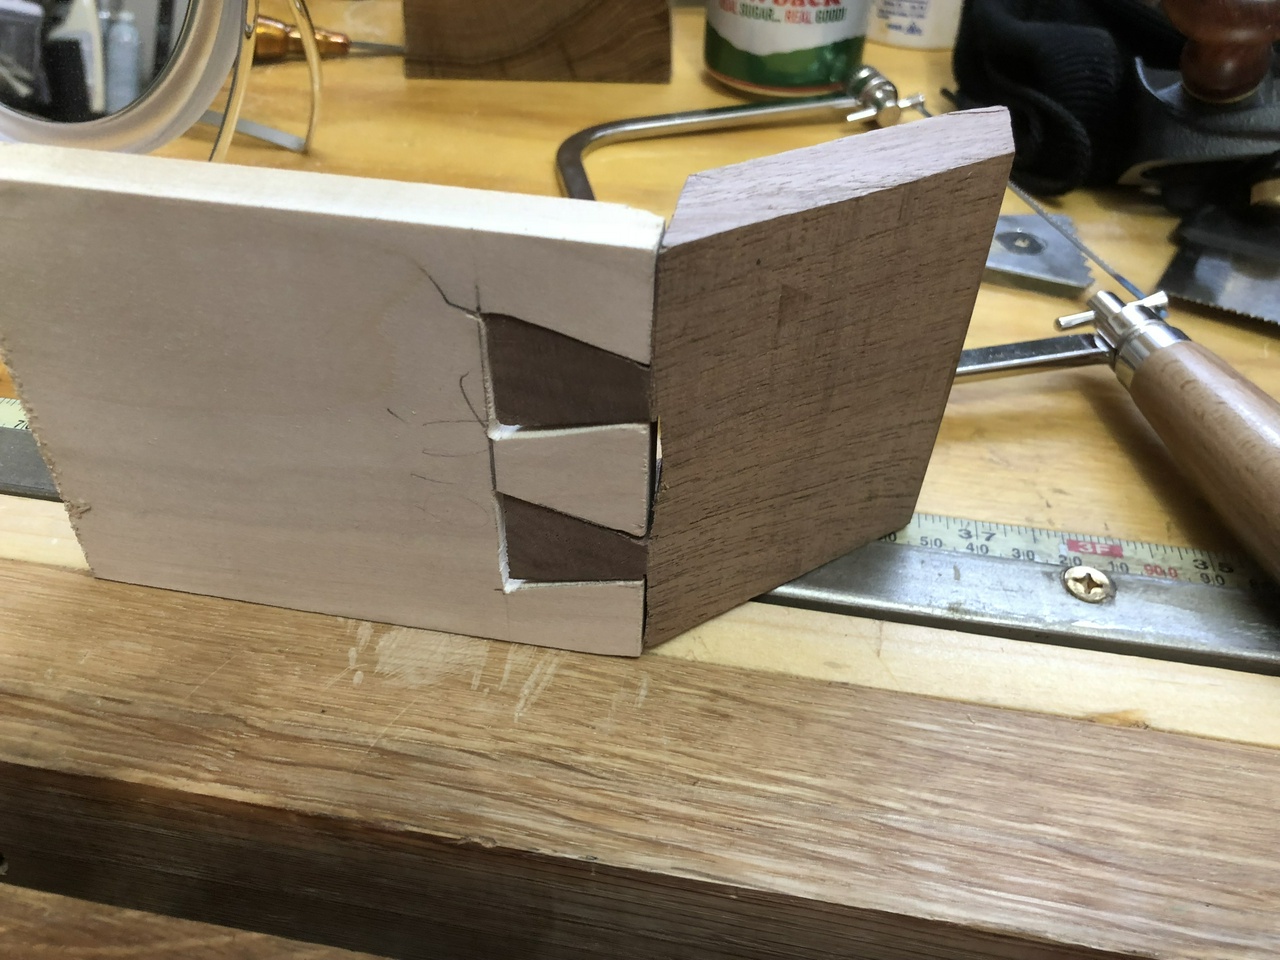
Those came out pretty good I think. They're a little gappy where I went astray with the coping saw while cutting out the waste, but they glued up solid.

Hopefully someone else will learn from this and find it useful. To get the boards to look good in the corner, just make the corner piece (the walnut in the above photo) 0.7 times as thick as the edge piece (the ash). The example I show has the walnut thicker, and the corner looks kinda goofy to my eye.

#technique #woodworking #dovetails

Discuss... Reply to this in the fediverse: @davepolaschek@writing.exchange

Originally written August 2, 2020 – Note that this is long, and covers how I cut #dovetails in what might be excruciating detail if you already know how to hand-cut dovetails. I won't be offended if you skip ahead.

For this style of bookcase, there is a plinth, which serves as a base, supporting the stack of boxes. Since the plinths are mostly hidden, and the weight is mostly carried by the four glue blocks in the corners, I figured they were a good place to start. Half of the dovetails will be hidden, and only one of the four boards is very visible.

Here's my checklist for building the plinths, along with some pictures of the intermediate steps:

  1. Cut all the boards to length. There are three different lengths of pine 1×4 and two lengths of ash 1×1 glue blocks. Two 1×4×12, two 1×4×31, one 1×4×29½, two 1×1×3⅜, and two 1×1×2⅝.
  2. Mark out and cut tails on side boards (no miters yet). Using a template to mark where the dovetails should be Making small marks for the dovetails Marking line across the board Lines marked on the end of the board Marking the thickness of the pin board Pin board thickness marked Marking the angles for the tails (1:4) Mark waste and rabbet position Saw the edges of the tails With the edges sawn, begin removing waste with turning saw Waste removed from rightmost tail Work left to right, removing remaining waste from each tail Use a rasp to flatten the bottom of each tail
  3. Cut rabbets on side boards, using my kerfing plane with a fixed ⅜ inch fence, and clean them up with a chisel First (vertical) cut with kerfing plane Second (horizontal) cut with kerfing plane Clean up rabbet with chisel
  4. Mark and cut pins on front board, including miter. If you cut the miter on the tail board before marking this, you won't have a full tail to transfer the mark to the pin from, and you'll have to guess where the pin edge should be. That's not a killer, but it'll make for a sloppy joint. Pins marked on pin board, along with double-X marking for where the mitered corner will be Cutting out waste between pins Angled cut for miter
  5. Cut miter on matching corner of side (pin) board.
  6. Test fit. Test fit of first corner
  7. Cut other corner pins on front board, including miter.
  8. Cut miter on matching corner of side board.
  9. Test fit and adjust.
  10. Cut rabbet on front board.
  11. Cut curved cutout on front board. Cutting curved cutout using a turning saw
  12. Smooth cutout with knife and spokeshave. Trimming the end-grain of the cutout with a knife Smoothing the long-grain of the cutout using a spokeshave
  13. Cut pins on rear board, including miter.
  14. Cut miter on matching corner.
  15. Test fit and adjust.
  16. Cut pins on final corner, plus miter.
  17. Cut miter on final corner of side (pin) board.
  18. Test fit and adjust.
  19. Check for square.
  20. Glue up, making sure to glue the front cross-brace to the front board before clamping. The cross-brace's purpose is to reinforce the front board, which has material removed for decorative purposes. It's probably not necessary, as I made a smaller cutout than Schwarz did in his version, but it won't hurt anything, and it helps me ensure that the plinth remains square when clamped up. Plus, as I'm going to be stacking the cases 6 high at a minimum, there will be a fair amount of weight. I'd rather not find out I under built in the middle of some night as books and lumber come crashing to the floor. Thus, the brace. Clamp cross-brace to front board, and clamp plinth together
  21. Double-check for square.
  22. Unclamp after the glue has dried overnight.
  23. Glue ash glue-blocks into corners, short ones underneath the cross-brace board. Note the spacers set in the rabbets so that the glue blocks will be flush with the rabbets, giving good support to the cases. Clamp glue-blocks into corners of plinth, note blocks beneath plinth to help set glue-blocks to the correct height
  24. Plane smooth with a smoother plane, and chamfer the top-outside corners of the boards with a block-plane such that the chamfer is 3/16 inch wide. This should make the top edges more durable as they inevitably get dinged by the cases being set into them. Chamfer top edges of plinth
  25. Three coats of shellac, brushed on. I'm using a 1½ pound cut of blonde shellac.
  26. Sand lightly with 320 grit sandpaper to remove raised grain, dust nibs, etc.
  27. Apply final coat of shellac.

Here's a stack of three of the finished plinths. The middle one is my prototype and doesn't have the mitered dovetails, so doesn't look as nice as the others. I'll hide it in the corner or something.

Stack of three plinths, with prototype version in the middle

And note that while I'm working, I keep all the pieces on my benchtop laid out in order so I can more easily keep track of where I am.

Plinth-parts partway through the procedure, laid out so I can see which part is which

And here's a photo of a completed plinth with the first case sitting on it.

Completed box and plinth


Jefferson Bookcases Contents #woodworking #bookcases #plinth #cutList

Discuss... Reply to this in the fediverse: @davepolaschek@writing.exchange