davepolaschek

tools

I got an Ixion eggbeater drill. It was in slightly rough shape, with everything working, but some surface rust, and the original finish mostly chipped off. Also, the wooden handle on the crank was gone, and the metal shaft that held the crank was nasty with rust.

Disassembled eggbeater drill

Crank shaft of eggbeater drill, very rusty

So I gave it a good bath in citrus degreaser, then cleaned it up. Turned a new handle on the lathe from a scrap of apple wood I had left from another project, and used an 8d wire nail as a new shaft for the handle. Primed the metal that originally had enamel on it, then gave it four coats of shiny new enamel, and a little oil on the moving parts. I figure the bright yellow finish (instead of the original black) will help me find it on my messy bench. The main gear appears to have been red from the factory.

Repainted and reassembled Ixion eggbeater drill

Ixion was, near as I can tell, a small manufacturer in Hamburg between the two World Wars. And a manufacturer of bigger fancier machines more recently.

Ixion 1931 advertisement

Badge from a larger Ixion machine

I initially thought this drill would spend most of its life with a countersink bit in it, but instead it carries a 3/64” drill bit for drilling pilot holes for number 2 through 4 wood screws.


Contents

#woodworking #tools

Discuss... Reply to this in the fediverse: @davepolaschek@writing.exchange

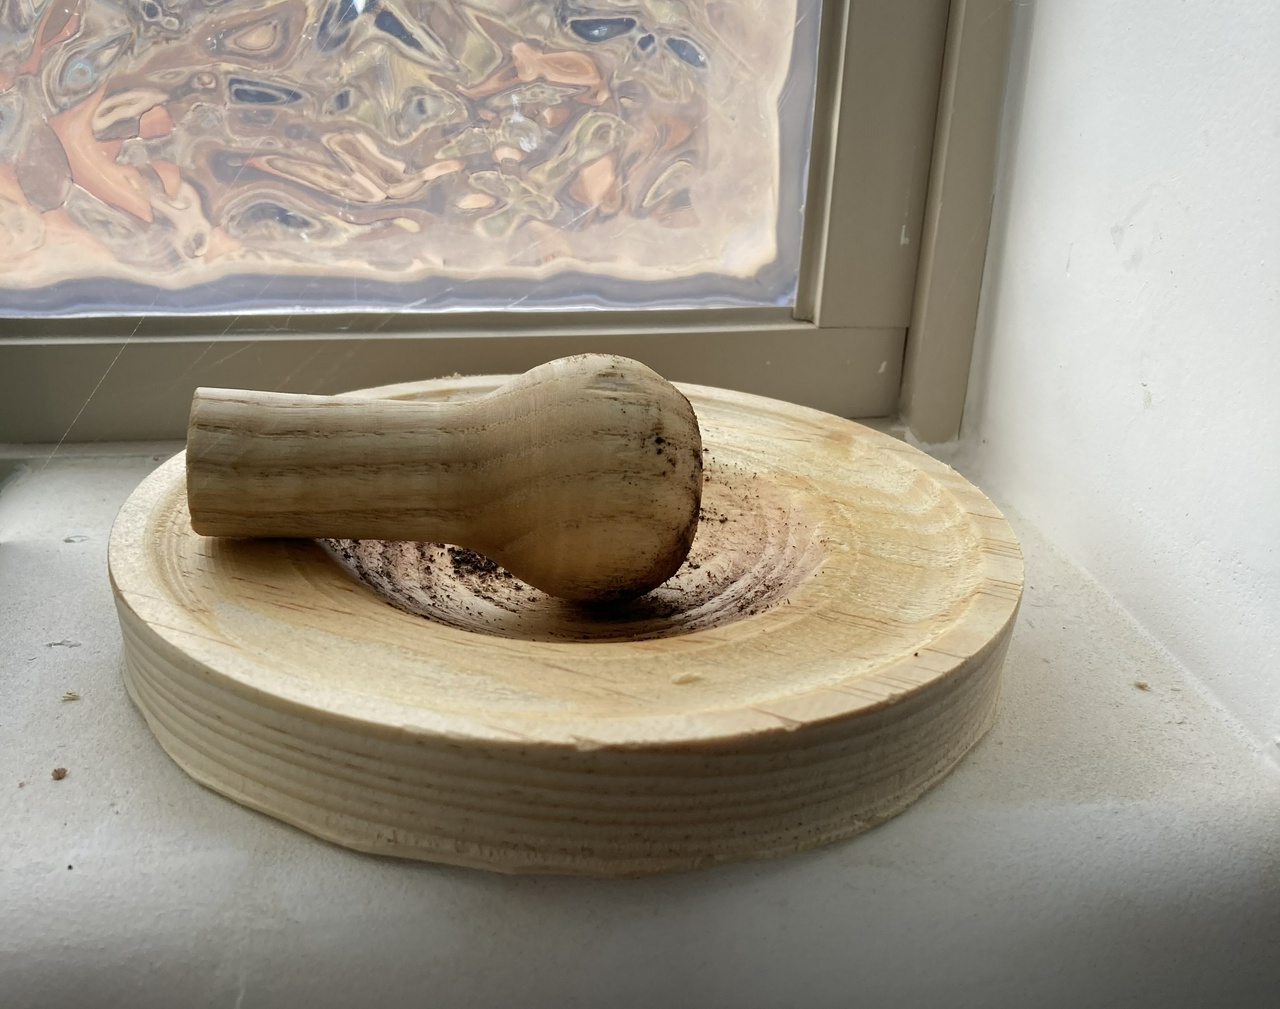
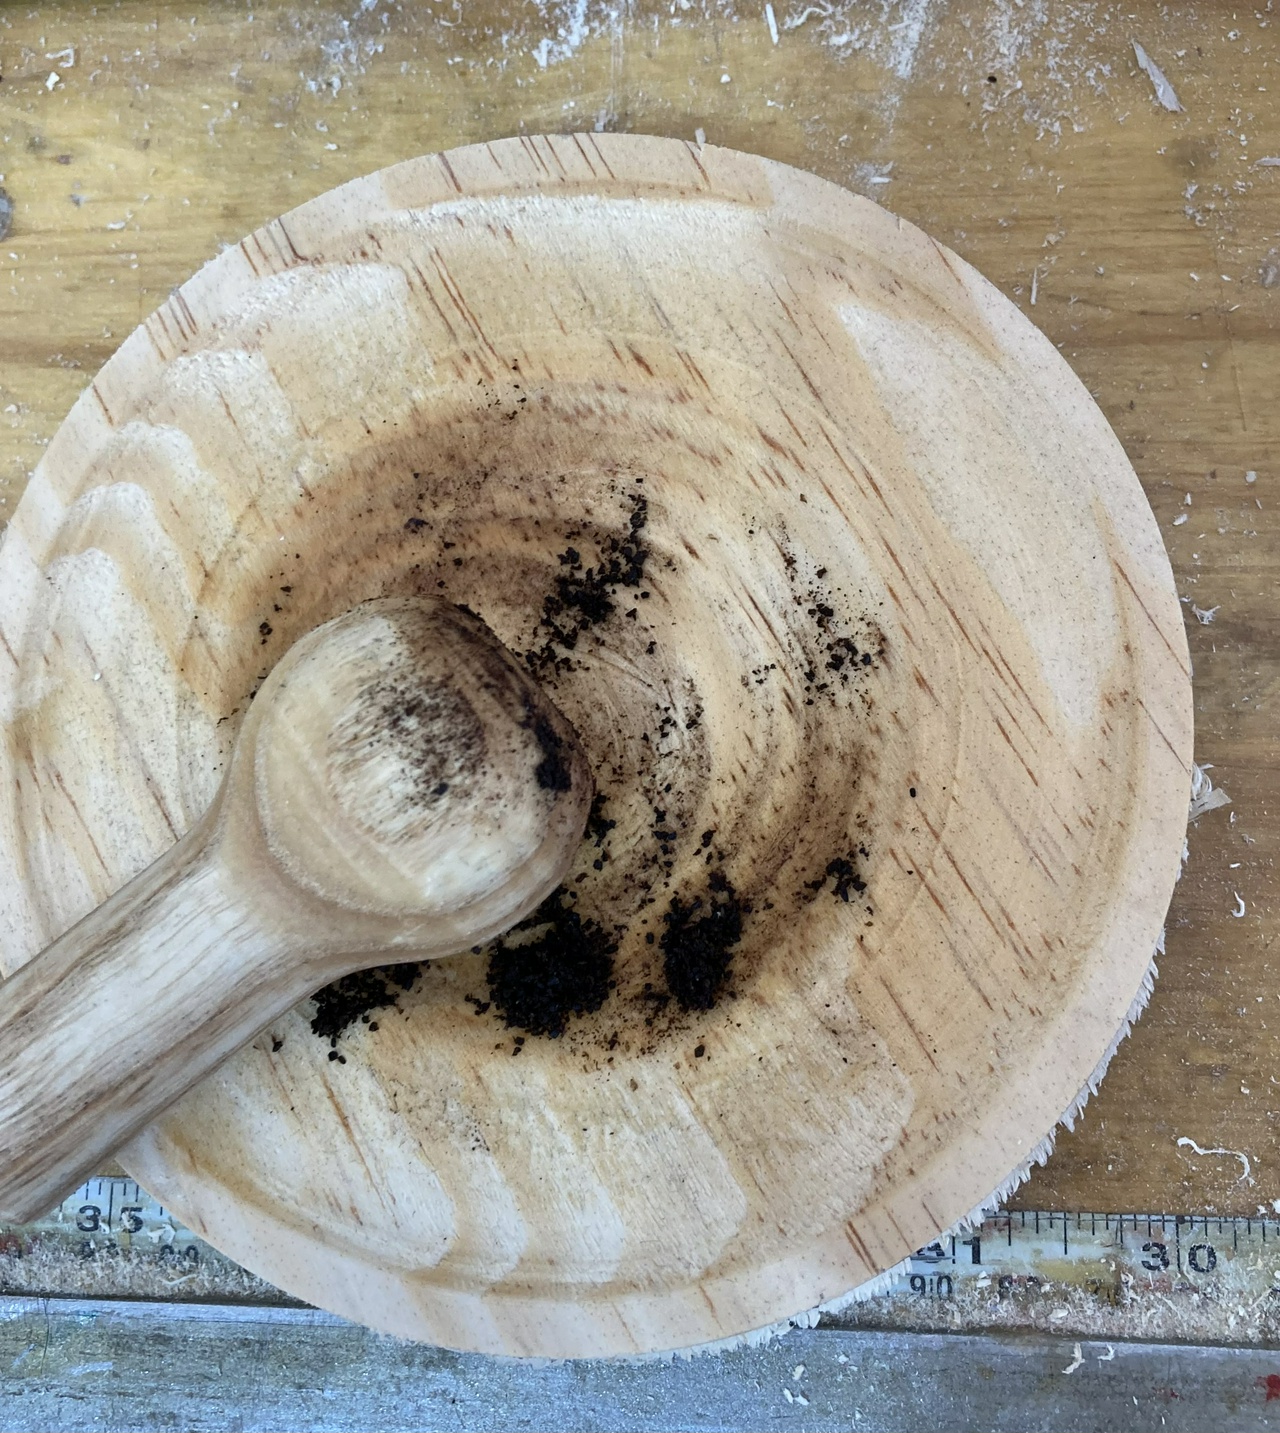
I wanted to do some kolrosing (or kohlrosing) on my baby bow saw but the coffee grounds I got from my sweetie were far too coarse. So I whipped up this quick mortar and pestle from a piece of ash and a pine board. The pine board is awfully soft for a mortar, but it did the trick today. The pestle works pretty well, and I expect the end grain to get awfully brown since I'll only be using it to grind coffee grounds to powder.

wooden mortar and pestle, viewed from the side, in front of a window

wooden mortar and pestle, viewed from above

It's pretty handy having a lathe around to knock out other tools like these when I need them.


Contents

#woodworking #tools

Discuss... Reply to this in the fediverse: @davepolaschek@writing.exchange

Simple, but for every bookcase I built, I needed to cut a dozen 3/8” wide & deep rabbets. Which means marking two dozen lines 3/8” from the edge of a board. And I made a total of 70 bookcases to hold all my books.

I was initially using my fixed fence kerfing plane, but then I broke that by knocking it off my bench, which gave me an opportunity to rethink things.

Since I've been practicing turning things with my lathe, I've got a bunch of round things. I took one of them, put a fence on it (another scrap) and then put a brass brad through it 3/8” from the fence.

Fixed fence marking gauge

Now I've got a marking gauge that won't get accidentally set to some other distance, and it fits in my pocket, rather than sitting on the bench where I might damage it. And since I resaw a lot of ¾” boards into two pieces, I'll probably continue needing a 3/8” marking gauge enough to keep it around (I did – it still gets used often enough that it's not buried in the other stuff on my bench).

Another note: about every hundred lines or so (8-10 cases), the brad will get a little dull and bend. Glad I didn't glue it in, so I can relatively easily replace it with a new brad. I probably should have used hardened steel, but I have a couple hundred brass brads around, so when it gets dull, I'll file it sharp again, and when it bends, I'll replace it.

I also got asked by a woodworking buddy what kind of a tip on my marking gauge is my favorite. I replied:

the round discs that are on my fancy marking gauges seem to be the best for all-around marking. Next is a pin. And when marking end-grain for dovetails, I will either use a spear-point marking knife or a pencil. For my pine bookcases, I'm marking all the dovetails with a pencil, and getting reasonably good results.


Contents

#woodworking #tools

Discuss... Reply to this in the fediverse: @davepolaschek@writing.exchange

Found a guy on eBay who was selling a bunch of maroon #3 Stanley “Global” planes for $37.50 each. They were $31 in early 2019 when I bought one to try it out. At the time, I flattened the sole, decided it was a cheap plane and if I wanted to improve it, I'd probably need to buy a Hock plane blade at minimum. (Note: I later did this with another of the #3s I bought, and with the Hock blade, it's a decent performer, but still not great)

Today I decided I was going to repurpose it as a scrub plane. I pulled the blade and walked over to the grinder. I freehand ground something between a 4” and 6” radius on the end of the blade. Between ten or fifteen minutes elapsed. It's not exactly circular, maybe more parabolic from the look of it. Then I spent ten or fifteen minutes sharpening the blade on my coarse sharpening stone and called it good.

I adjusted the frog back a little to open up the mouth on the plane, and popped the blade back in the plane. Took it to the fir 6×6 I'm turning into a post for my post drill, and it does a pretty good job. For a shaving between ½ and ⅝ inch (yes, I'm only using between a half and a third of the blade, but it's easy work this way), it's around 1/16 thick, which is how I have my other scrub plane adjusted. It's small enough that I can take off shavings like that for almost an hour before I need to take a break, and on the post, that translated to knocking one of the corners of the post down by ¼ inch, tapering to nothing at the other end of the 8' long 6×6.

Not bad for about $30 and less than an hour's time. And a lot cheaper than buying a Lie-Nielsen 40½ scrub plane for $175. Well, unless my time is worth more than $140/hour.

Sole of the global #3 after starting to flatten it

side view of the global #3

top view of Stanley global #3


Contents

#woodworking #tools

Discuss... Reply to this in the fediverse: @davepolaschek@writing.exchange

I moved in 2019, and it was going to be spring of 2020 before I had a shop, so I decided to build a shave-horse / bowl horse as a way to keep busy and be able to do some woodworking.

The first step was building the horse itself. A couple 4×4s, a 2×8, and a couple 2×4s. I bought the fake redwood pressure-treated stuff at Homer Depot because it was the straightest of the various tubas they had. Course it was basically saturated with water, so it's interesting watching it move as it dries out in the desert air here.

Anyway, I sandwiched the front leg between the two 4×4s, with a piece of 2×4 on either side of it. Pounded some 5/8” dowel into 5/8” holes drilled in the wet wood with an auger bit, and as the wood dried, the holes tightened down around the dowels nicely. No glue or fasteners on that joint.

Next was using my branch saw and a chisel to make mortises for the rear legs. I eyeballed the angles. They feel about right. The legs are screwed on with deck screws.

Finally, I shimmed the bench level, and then trimmed the legs a given height from the floor. Ended up taking a couple inches off every leg, but got the bench sitting level. Then I made a seat.

Base of the bowl horse

Then it was time to build the bowl head. I took a couple pieces of 2×8, and sandwiched pieces of 2×4 vertically between the ends of them, and screwed them together with more deck screws. Then I drilled a hole in each 2×4 just below where it stuck out below the bottom of the bench, and carved a wedge by hand to fit in that hole. With both wedges in place, the bowl head is locked to the horse very securely.

I screwed a couple chunks of 2×4 to the back of the bowl head. This forms the stationary part of the clamping mechanism. I'll probably tweak the shape later, but the deck screws come out pretty easy, too.

Then I made the clamp. It's a 2×4, shaved down a little so it will fit freely between the sides. I made a platform for the bottom of it by cutting a 2×4 mortise into a piece of 2×8 and putting in a 9/16 hole. A half-inch carriage bolt slides through to hold the platform on. Then I set the clamp in place and drilled a hole through everything so it could pivot. When I determined that my hole was the right height, I added a couple more holes so I can work on different sized parts.

And there it is. I didn't carve any bowls on it, but it was handy for holding all kinds of projects before the shop got built.


Contents

#woodworking #tools

Discuss... Reply to this in the fediverse: @davepolaschek@writing.exchange

After a few times going to the resort, or driving down the road and seeing a piece of tree that might be useful, I decided to set up a small kit of hand tools that I would keep in my pickup so I would always have them with me.

This week, I ended up putting that kit to the test, and added a few things to make it a nearly complete (if minimal) woodworking shop on wheels.

Here's part of it:

"truck kit" of tools, including hand screw, pencil, folding branch saw with orange handle, carving knife, and a 32tpi gents saw

From top to bottom: a hand screw, because work-holding is the most important thing with hand tools; a pencil; a Big Boy folding branch saw, which is handy for rough cross-cutting; one of the birch-bark handled carving knives I made, with the sheath from MaFe; and a fine (32tpi) gents saw, which is nice for finer cuts.

Not pictured (yet) are a block plane, a hatchet, and a knock-down frame saw.

I'm moving across the country, and the movers picked up the bulk of my stuff the other day, so I didn't have a shop left. And then I noticed that there was a soft spot on the threshold of my side door. When I poked at it with the knife, there was some pretty serious rot. Apparently a boot-heel had chipped the paint at some point, letting water into the wood, and bad things happened.

So I used the folding saw to rough out a scrap of wood. Used the gents saw and knife to fine-tune it, and the knife to clean up the hole. Once I had a pretty good fit, I glued the patch into place and “clamped” it with a couple drywall screws. Split the patch, because I hadn't drilled a pilot hole, because I don't have a drill (will add one soon). Filled the gaps with wood filler, then used the block plane to match the profiles.

Partially repaired threshold of a door

Three coats of shellac (wiped on with a rag) later, it's ready for paint. I'm happy I had a set of tools in the truck, and I feel better about being able to do useful work without a full shop. It's not the best repair, but with a fresh coat of paint on it, it'll at least keep the problem from getting any worse.

painted repaired threshold - good for another 90 years


Contents

#woodworking #tools

Discuss... Reply to this in the fediverse: @davepolaschek@writing.exchange

I've been making stacked birch bark knife handles lately, and found a couple tools that made the process much easier.

Note that the basic tools needed are something to cut the birch bark to size (unless you're buying stacks from Russia, which are a pretty good deal, but a little short to do a complete job), and something to scrape the papery bits and any fungus off the outside of the bark. A card scraper will do just fine for the latter. You'll also need something to put holes in the bark. I use a leather punch. It works pretty good, but about every three or four pieces of bark I need to clear it out, since the bark doesn't fall out the way leather does.

As you're stacking the bark pieces on the handle, you want the holes to be big enough that you're not splitting the bark, but tight enough that the bark stays in place. Near the blade, this means punching three overlapping holes using the middle size on my punch, then two overlapping holes using the middle size on my punch, then finally a single hole using the next smaller size on the punch.

I put a handle on a piece of 7/16” tubing so I wouldn't beat up my mallet when hitting it. It also got a screw-eye so I can hang it up when I'm not using it.

Tool for compressing layers of stacked knife handle material

tool in use, pushing down a layer of birch bark

Every dozen or so pieces of bark, I'll slide the tube over the knife tang, then give it a good whack with the mallet to push everything down tightly. It gets me a tighter stack, which means less fiddling around later.

Partway through building the stack, I'll take a break to thread the end of the knife tang. For the mora 120 knife blanks I will use a 10-32 die, followed by a 8-32 die, and I thread the last ¼ inch of the tang. That seems to be plenty. I use a stack of a ¼” washer, followed by a ¼” copper washer, then a #8 washer, followed by an 8-32 nut.

After I have built the stack, but before I put on the washers and nut, I will press the stack, and bake it for 2 hours at 225F (110C). I use a couple pieces of scrap wood with some all-thread and washers and wing nuts as a press. Baking the bark will soften up any birch pitch in the bark and glue the stack together a little. It'll make for a nicer handle later.

stacked handle on a knife blank, compressed in a shop-made vise

stack birch-bark handle, with washers and nut threaded onto the tang of the knife blade to hold everything together

Then it's time to shape. I use a bandsaw followed by a belt sander.

Two birch-bark knife handles after rough shaping on the bandsaw


Contents

#woodworking #tools

Discuss... Reply to this in the fediverse: @davepolaschek@writing.exchange

I got a post drill in mid-2018. Traded a woodworking buddy in Minnesota a spare laser engraver and some pictures of dead presidents for it. If you don't know, a post drill is basically a hand-powered drill press, and I've had a few projects where such a thing would be handy, especially since I haven't managed to find a completely straight 3/16 or 4/16 auger bit yet.

Anyway, yesterday morning I headed up to Siwek Lumber bright and early and came home with four “stud grade” 2×6x104” studs. Screwed one of them to the wall of the garage, resting on the sill plate, and with a half-dozen deck screws going into the stud in the wall. Then screwed two more to that, so I have a rectangular post firmly attached to the wall of the shop.

Then I got my neighbor's son to come over and help mark where the holes for the post drill needed to go, and after I drilled two pilot holes, he helped hold it in place while I got the screws in. Once the top two were in, I drilled the holes for the other four and popped in the bolts and it's ready to go.

Post drill viewed head-on

Post drill side-view

I needed to pull out one of the set screws in the handle which is stripped and drill and re-tap that, but that was a relatively quick job.


Contents

#woodworking #tools

Discuss... Reply to this in the fediverse: @davepolaschek@writing.exchange

While building my octagonal box for the swap, I wanted to put some banding around the top of the box. This would mean cutting the ends of the banding at 67.5 degrees (90 – 22.5), and I figured I was unlikely to get that uniform with a saw (at least not without a nice miter box, which wasn't in the budget at the time), so I built a guillotine for cutting that angle. I used a couple scraps from around the shop, a hinge from the hardware store, and the blade from a utility knife.

Octagonal guillotine, closed, showing the mounting for the utility blade knife

Octagonal guillotine, opened, showing the stop block to get the correct angle in the edge banding

The results were good enough that I used them on the top of my box straight off the guillotine.

Three scrap pieces of edge-banding, cut to make an octagonal corner

It's a useful tool, and now hangs on the wall, waiting for my next octagonal project. I've since made a similar guillotine for cutting edge-banding for a hexagonal box. For some reason, I haven't yet made one for plain-old rectangular corners, though. Huh!


Contents

#woodworking #tools

Discuss... Reply to this in the fediverse: @davepolaschek@writing.exchange

45 degree jig

45 degree jig, side view

I used this shop-made jig while cutting dovetails for 135 degree corners (for making an octagonal box). It's just a piece of 2×4 cut on the diagonal, then glued back together. The piece on the left above slides onto the piece on the right, and then the whole thing goes into a vise to hold the piece you're working on at a 45 degree angle so you can saw on the level while cutting 45 degree angles in things.

45 degree jig holding a piece of walnut

I started using it “head-on” but quickly realized it was useful in other directions too.

side view of the 45 degree jig holding a piece of walnut

Not much to it, but as I've discovered in my first couple years of woodworking, 90% of hand tool woodworking is figuring out the work-holding. If you can hold the piece you're working on steady, everything else gets a lot easier, and so it was with this jig.

Thanks for looking!

45 degree jig holding a piece of walnut in a different orientation


Contents

#woodworking #tools

Discuss... Reply to this in the fediverse: @davepolaschek@writing.exchange