davepolaschek

Woodworking

Saw till with saws

Been organizing my shop, and I no longer needed my old chisel till so I knocked out the existing rack within it, added a bar at the bottom and a board at the top, et voilá.

Detail of the scraps I used to hold the rod which holds the saw handles

Some day I’ll clean up those square corners and get a coat of oil on the new parts, but for now, my dovetail saws are off the bench.

#woodworking #project #shopFurniture

Discuss... Reply to this in the fediverse: @davepolaschek@writing.exchange

Completed chisel and gouge till

Over the past few weeks I built a till to hold all of my chisels and gouges, and here it is. It had a total of five rows of tools, and each tool sits in a one inch diameter hollow, with the sharp end of the tool held to the panel behind it by a 3mm x 6mm rare earth magnet.

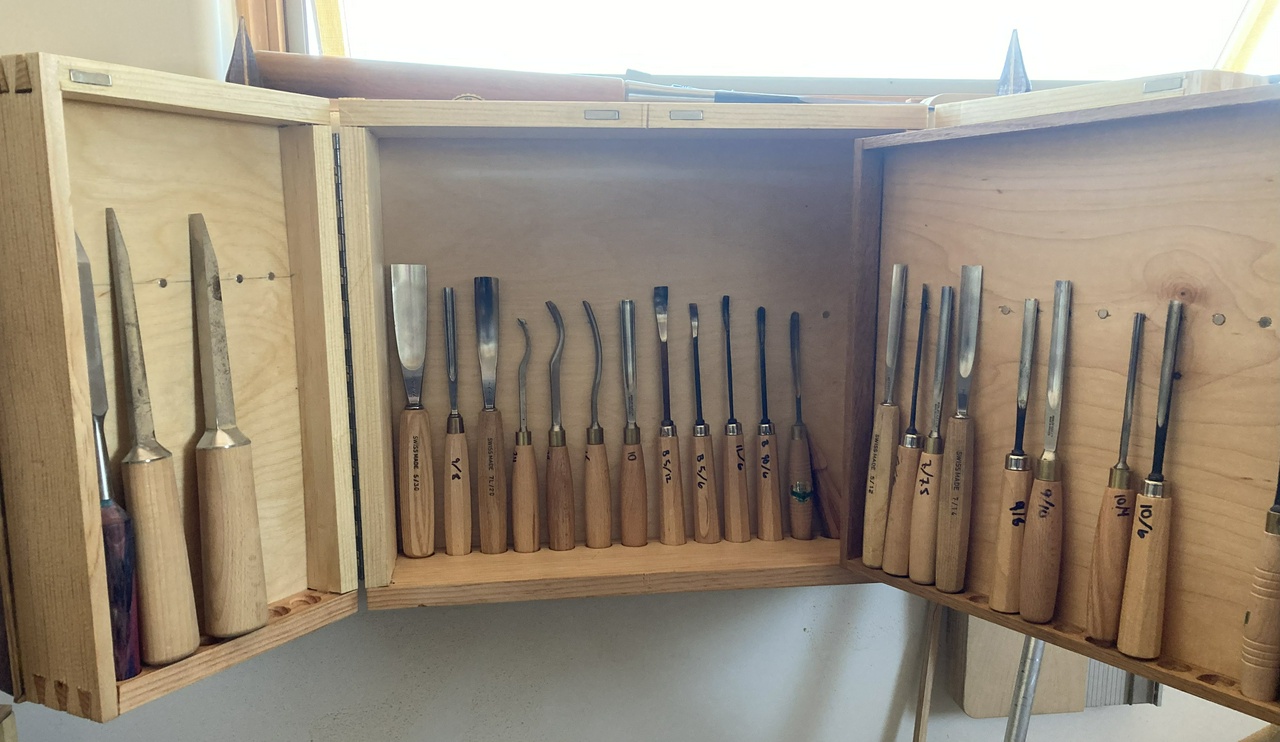
Innermost storage of the chisel and gouge till

The back row (farthest inside) holds my bent gouges and spoon gouges. They’re not used very often, so hiding them deep inside is fine. Opposite them are straight gouges in higher curvatures. I use them pretty often, so this isn’t ideal, but I’ll get things sorted better over time.

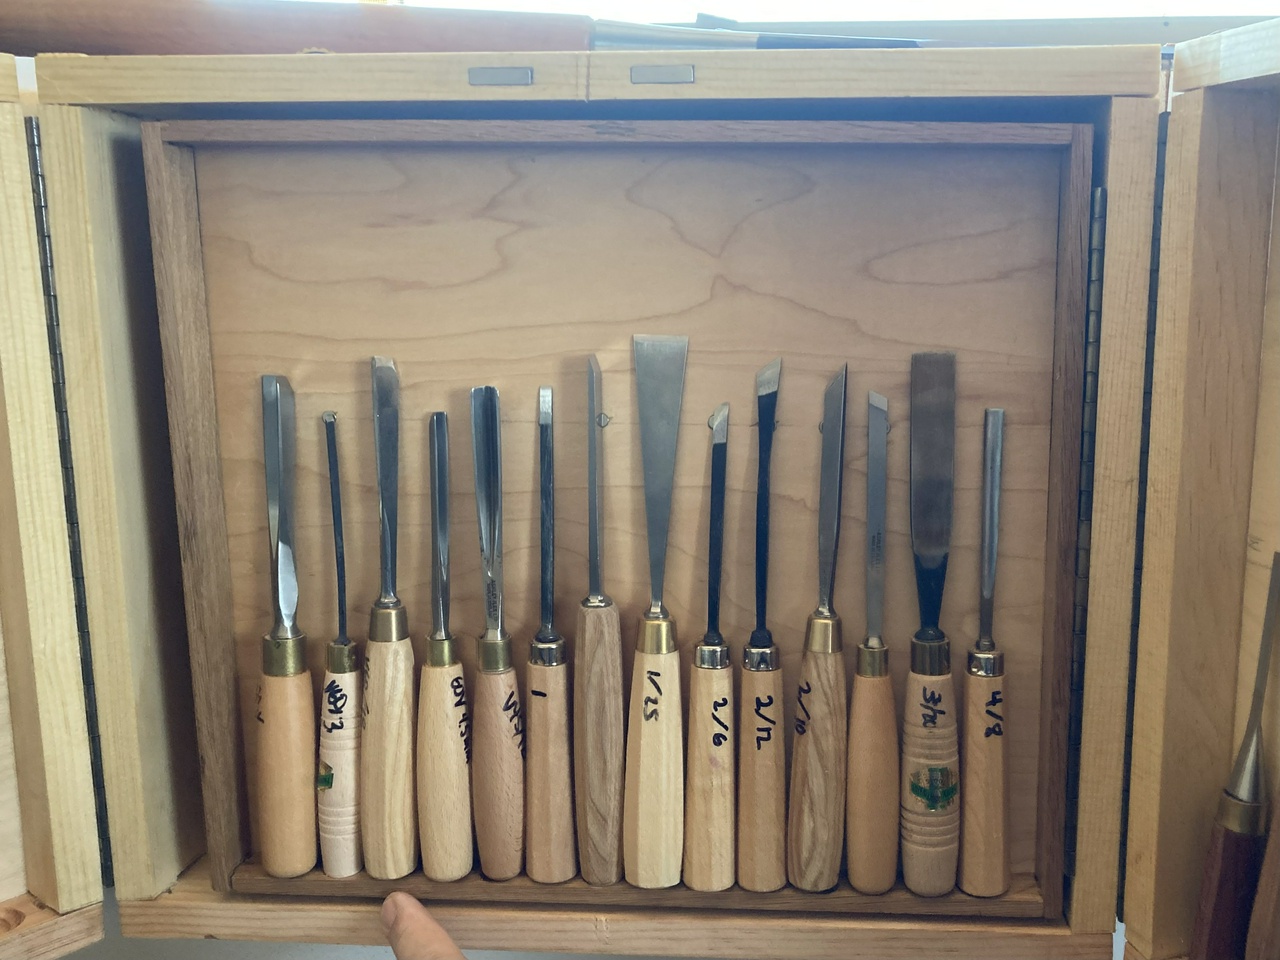
Outside of the inner door of storage

On the outside of the inner door of the storage are the straight gouges and lesser curves. Also the V gouges are here, as I use them fairly often.

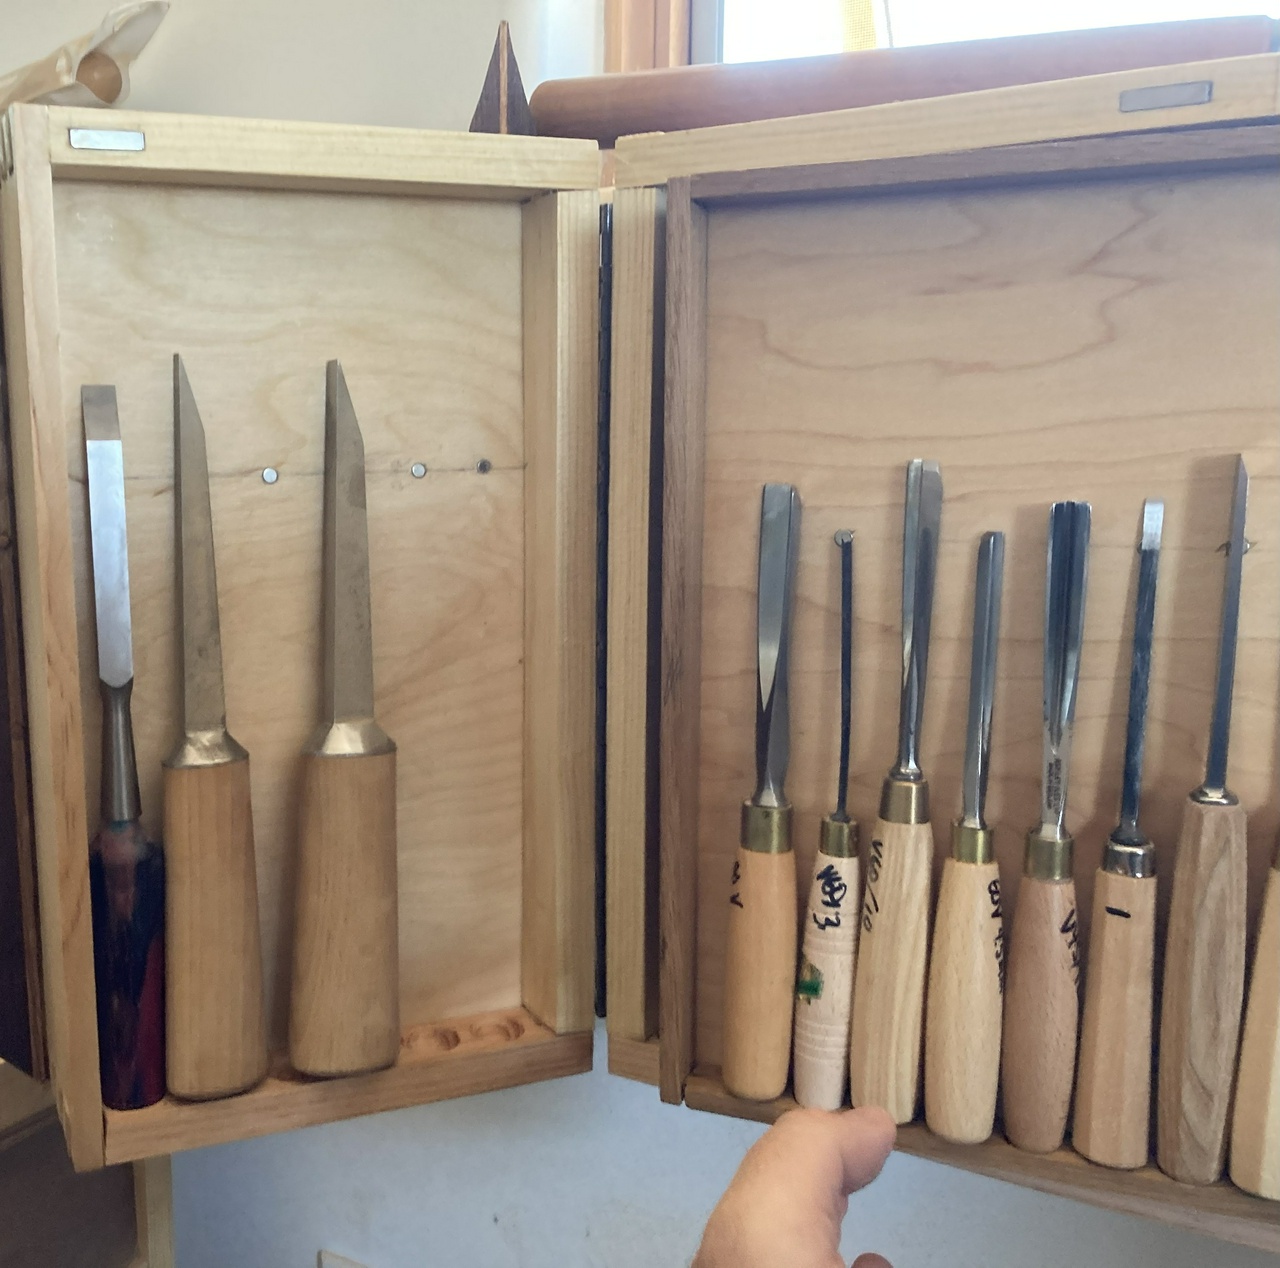
Inside left door

On the inside of the left door are my mortise chisels. Again, not frequently used, and probably these should move to the inside of the inner door.

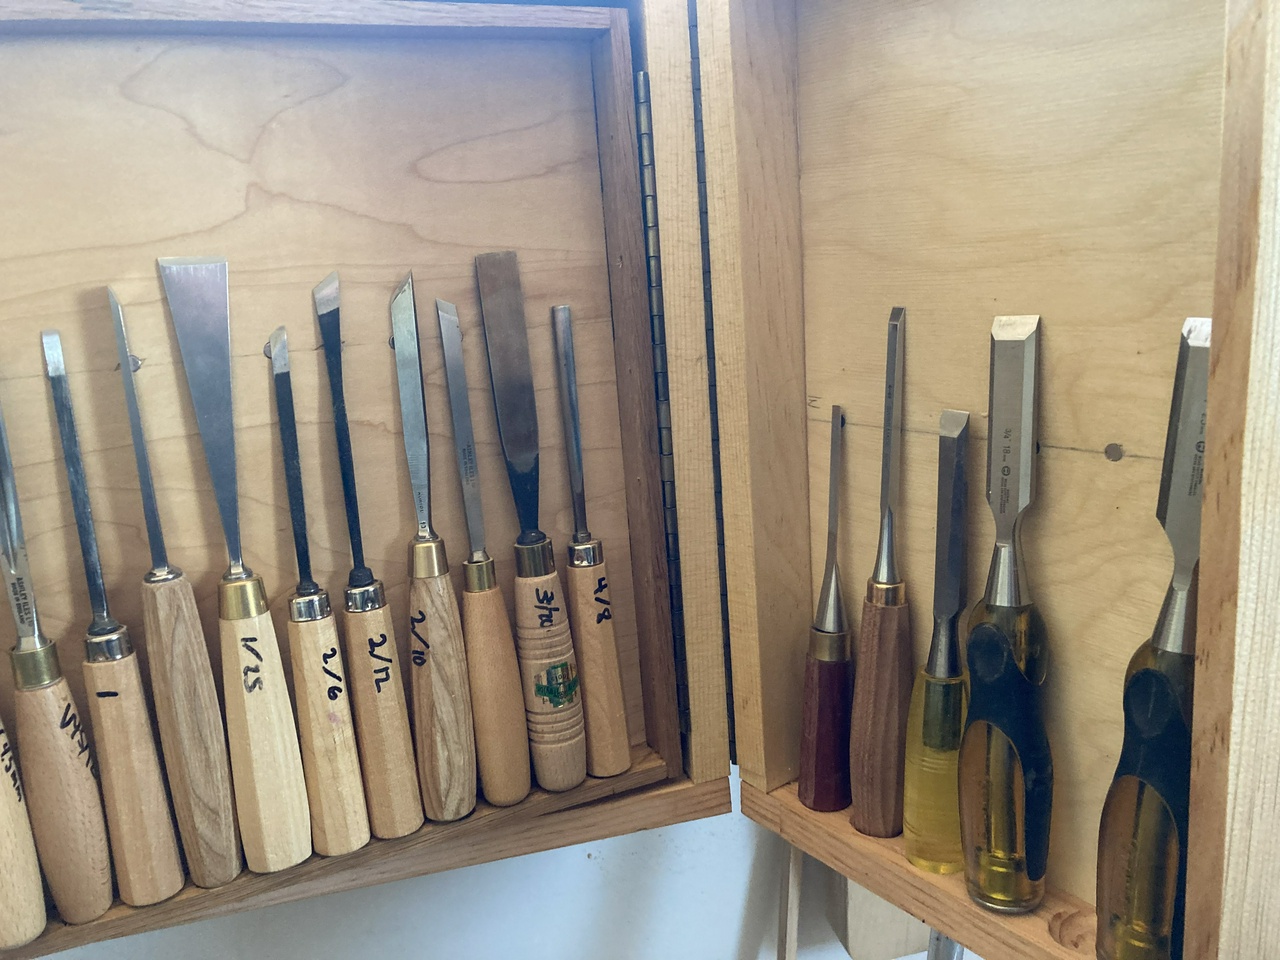
Inside right door

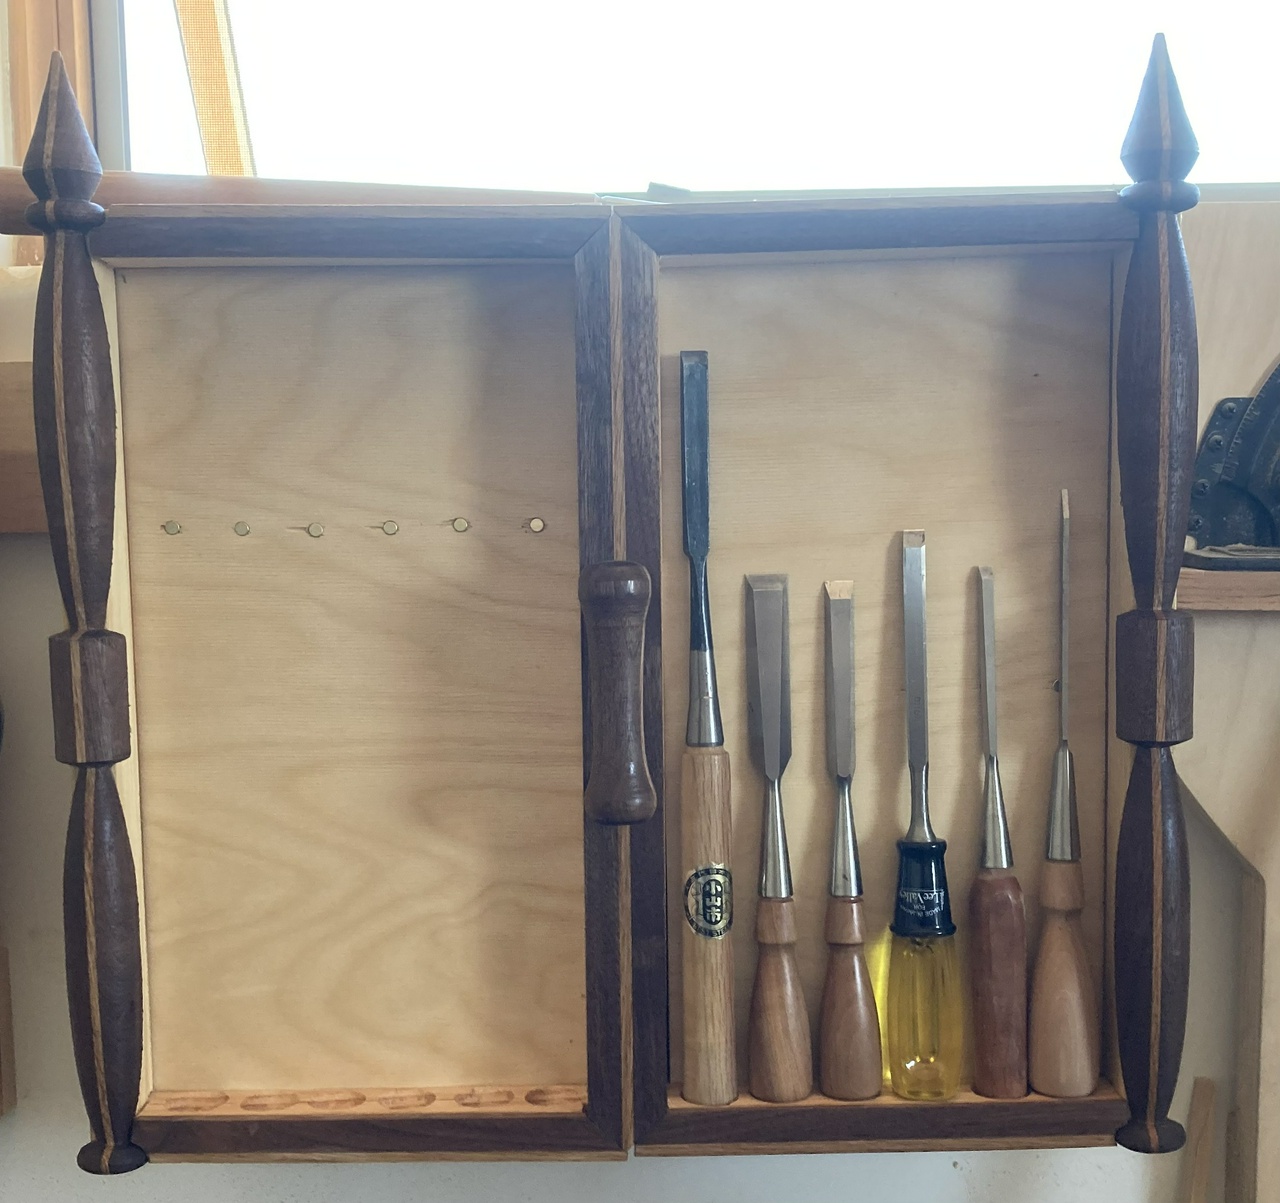
On the inside of the right door, I have seldom-used chisels. These are spares, and again could move farther in.

Front doors of the chisel and gouge till

And finally the outsides of the doors hold the normal bench chisels which I use most often.

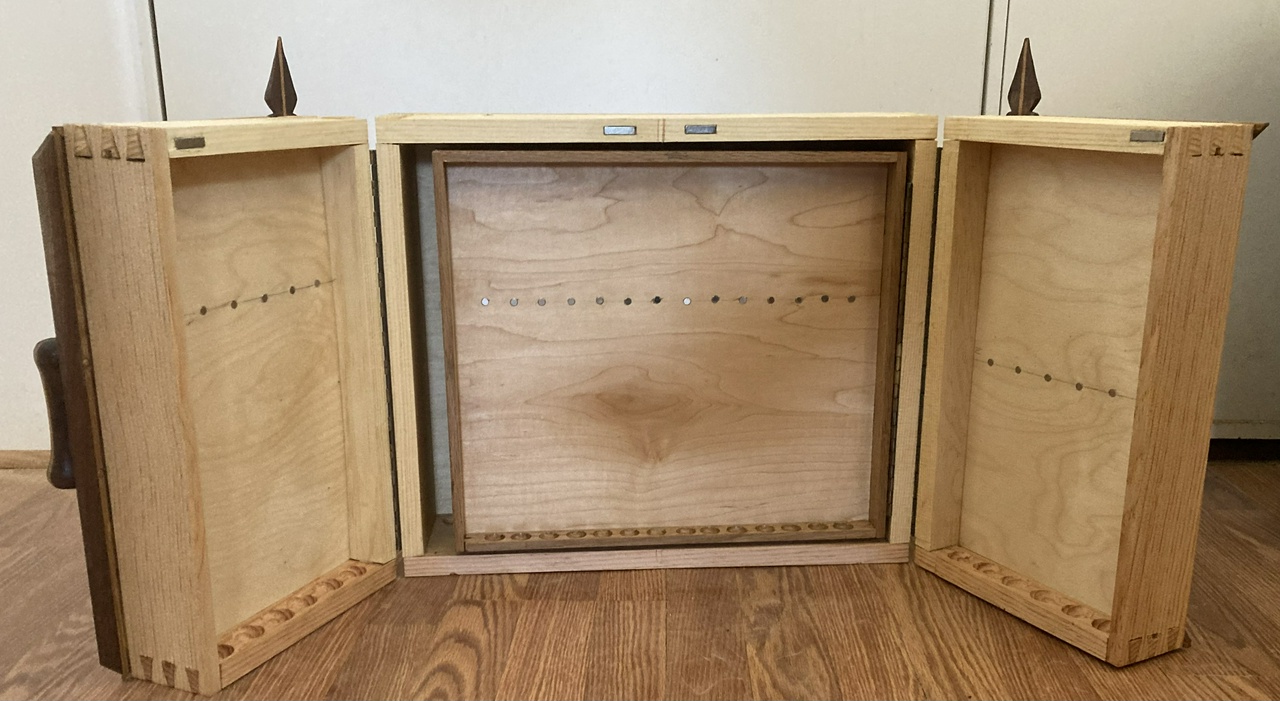
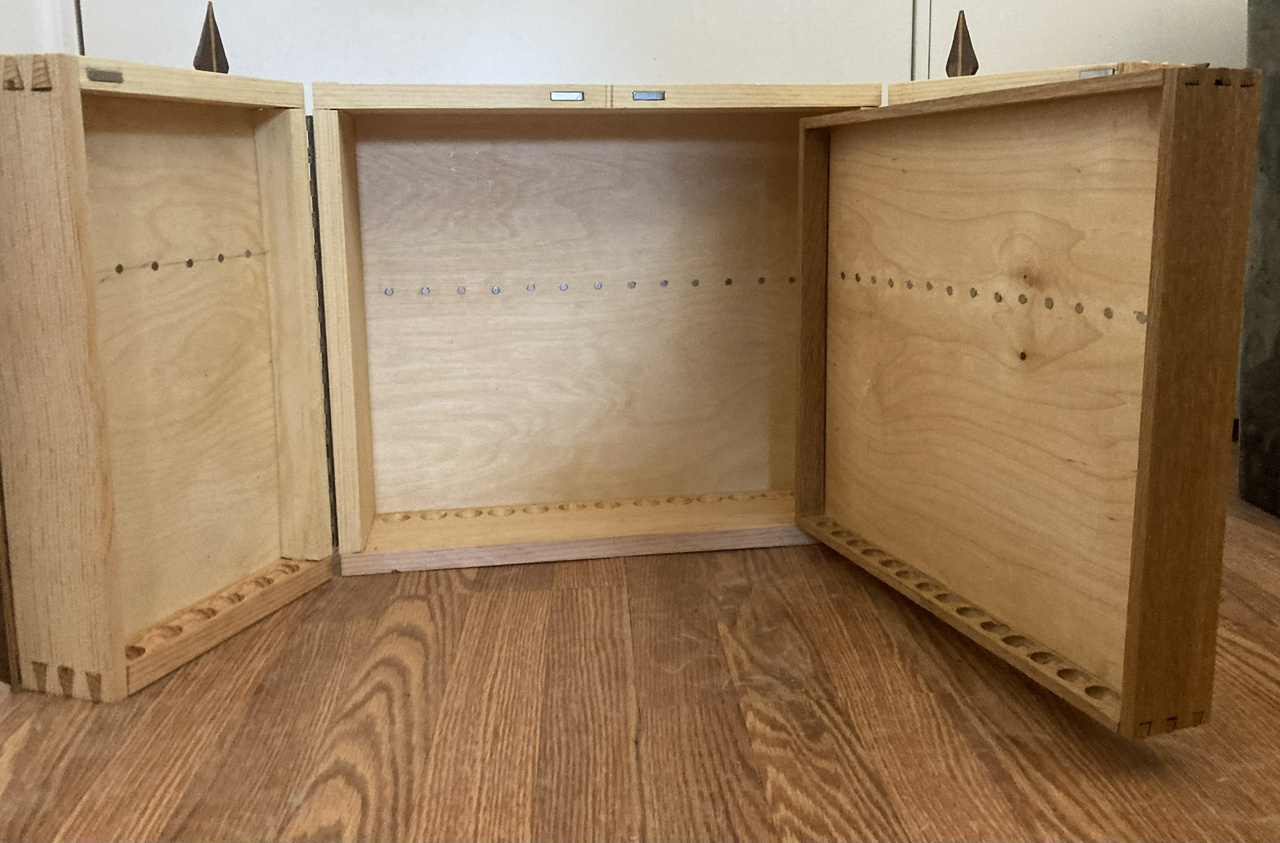
Inside of the empty till

Construction of the carcasse is pine with Baltic birch panels.

Inside of the empty till with the inner door open

The inner door is white oak, also with a Baltic birch panel.

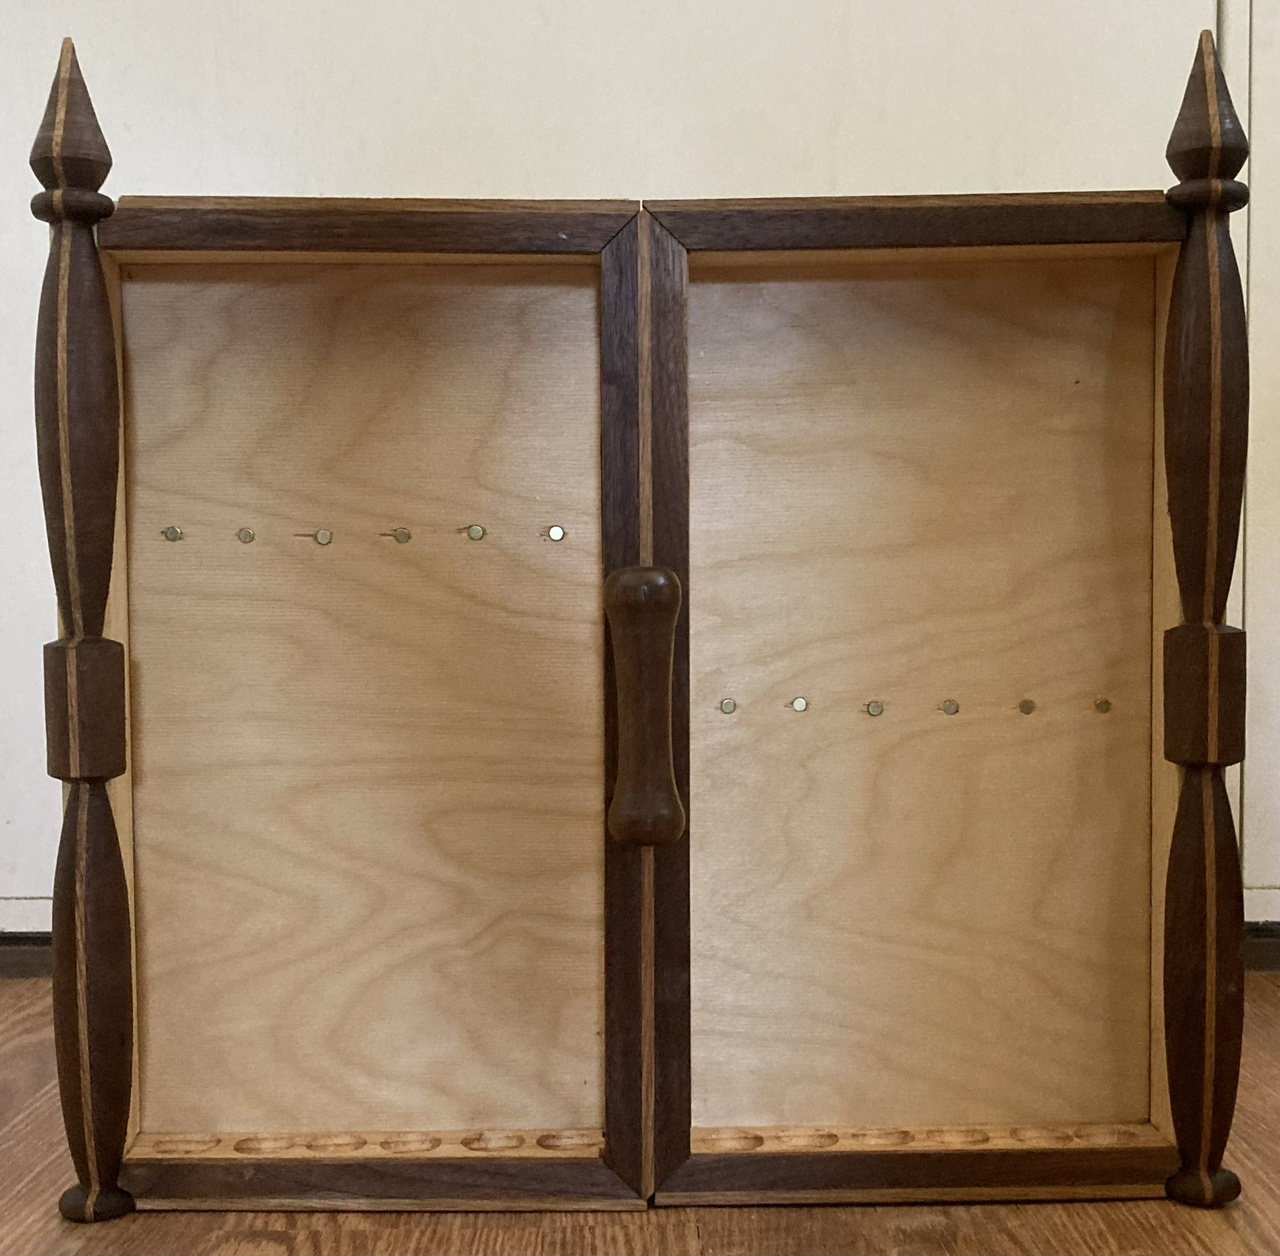
View of the outer doors

The outer doors have decorative bits made from walnut and oak, partly to make the till a little prettier, but also so I could practice turning the decorative turnings and mitering the flat bits. Shop furniture is a great way to practice my skills.

The carcasse was built first, then sawed open to remove the doors. Then I drilled holes for the piano hinge for the inner door. I then sawed the two doors apart and aligned and mounted the piano hinges for the inner door, then the outer doors. I applied the trim, cleat on the back, and then coated everything with a coat of tung oil.

#woodworking #projects

Discuss... Reply to this in the fediverse: @davepolaschek@writing.exchange

This is a small box I made to resemble a Dutch Tool Chest. It was designed to hold a smoothing plane I had refurbished and was sending to another guy on Lumberjocks as part of our Hand Planes of Your Dreams Secret Santa exchange for 2022.

Nothing too special about the box. It’s a dovetailed box with a slanted top. The top has two small strap hinges and a black latch. It’s hard to find black iron screws in the small sizes.

The box is about 4 x 6 x 9 inches. The box is made of ½ inch pine, with some ¼ inch sapele for the lid. The battens on the lid are ash, and the skirt on the bottom of the box is white oak.

The box was painted with three colors of Real Milk Paint. Black Iron first (three coats if I remember right), followed by two coats of Terra Cotta, and finishing with a coat of Persimmon. Then I brushed the paint with a brass brush, selectively removing some of the paint and letting the colors underneath show through.

Once I had that done, I coated it with a few (four or five, maybe?) coats of tung oil. This should waterproof it and lock in the paint.

Overall, it was a fun project, and I learned about distressing milk paint to get an aged look. I need to work on burnishing a piece next to apply more lessons from The Belligerent Finisher but it’s fun trying out new techniques.

#woodworking #milkpaint #finishing #project

Discuss... Reply to this in the fediverse: @davepolaschek@writing.exchange

Female bluebird sitting on the birdhouse

The birdhouse I built for our yard last year was sized for house finches. This year, I wanted to build a birdhouse for the bluebirds that are already trying to nest.

Gluing up the pallet wood to make wide enough pieces

As before, I used pallet wood, but the pieces I had on hand this year were smaller, so I needed to glue them up into wider boards.

Once the glue had dried, I picked one edge and planed that smooth and flat. Then I used that as a reference to mark the other three sides before cutting the pieces to size, and then finally planing the surfaces flat. I also drilled a hole in the front, and cut the corners off the bottom and left and right sides to provide ventilation.

Here are the measurements I used.

Then I glued and screwed everything together. I used a fancy hinge I had on hand. A friend pointed out that I could just as easily hinge one of the sides with a couple screws going into oversized holes. Next year!

Built birdhouse, in the shop

Then I dug a hole in the yard, put in a post, and mounted the birdhouse to it.

Birdhouse on post

I think it looks pretty good, and we can see it from our dining room table.

Birdhouse on post, front view

This morning, while we were eating breakfast, there was already a pair of bluebirds checking it out.

Female bluebird sitting on the birdhouse

#birb #woodworking

Discuss... Reply to this in the fediverse: @davepolaschek@writing.exchange

A bowl turned from birch.

This is the third bowl I turned, and the second made of birch. I managed to get the sides a little thinner, and the bottom thinner as well. I almost avoided tear-out on the end-grain sides of the bowl, only using the bowl gouge, but there was a little, so I sanded to clean things up.

The bottom of my third turned bowl

Turned this one in a single session in the shop. Maybe three hours total, including cutting it octagonal on the bandsaw, mounting it on the plate, cutting it free, and using the belt-sander to take off the last nubbin on the bottom.

It’s a little over 5 inches in diameter, and about 1-¼ inches tall.

Side view of my third turned bowl

Six coats of shellac, with some light sanding with 400 grit between the fourth and fifth coats. I’m trying to decide if I should pull out my French polishing kit and try to really put a nice finish on it, or whether this is good enough.

Thanks for looking!

#woodworking #woodturning #bowl

Discuss... Reply to this in the fediverse: @davepolaschek@writing.exchange

Turned birch bowl, side view

I made a second bowl today, mostly concentrating on making the bottom of the bowl thinner, as well as the sides.

Turned birch bowl, top view

The bowl is about 5 inches in diameter, and about 1¼ inches tall. The bottom is between ¼ and ⅜ inch thick, and the sides are slightly less than ¼ inch thick at their thinnest.

Turned birch bowl, bottom view

It’s not perfect, but I feel like I’m getting better every day, which is a nice feeling.

#woodworking #woodturning

Discuss... Reply to this in the fediverse: @davepolaschek@writing.exchange

A turned ash bowl

I got a lathe last month, and have been playing around, teaching myself to turn. This is the first bowl I finished, and while it’s far from perfect, I’m pretty darned happy with it.

Side view of the turned ash bowl

There are a few rough spots where I have what I would call tear-out if I was working with a plane. I may go after them with a spokeshave or sandpaper, or I may just leave them be. I haven’t decided yet.

Looking down into my first turned ash bowl

But the piece of ash I picked had some great grain, so I’ll be saving this bowl no matter how I decide to finish it. It was a great learning experience, and I hope the next one off the lathe will be even better.

The bottom of the bowl

I’ve been told I shouldn’t use a skew when turning a bowl. I did. Almost all of this was done with a ¾” bowl gouge and a ¾” skew. Mostly I was taking light enough cuts and using slow enough RPMs that I don’t think there was too much danger, but I’ve ordered a smaller bowl gouge (a ¼”) and a ½” round-nose scraper so I can finish off the surface more safely.

But I think I’m going to be back to spindle turning for a while anyhow. I need to make four legs for my forge table next, and I’d like to turn those round myself, so I’ll be practicing on short pieces for a while before tackling an almost three-foot long table leg. And I’ll probably need to take a break to sharpen my tools, too. Learning by trial and error is hard on the edges.

Turned ash bowl with scalloped rim

Update: I took a file and scalloped the rim to hide the worst of the tear-out. I think it looks a lot better now.

#woodworking #woodturning

Discuss... Reply to this in the fediverse: @davepolaschek@writing.exchange

A wall of bookcases, slightly more than half completed

I’ve been working on other projects, like my lathe, lately, but I’ve also been slowly building more bookcases. I think with this most recent batch, I’ve passed the halfway point in the construction.

It’s nice to be able to unpack more of my books, but it’s always a slow process, since almost every box of books contains at least one book that I want to peek inside before I put it on the shelves.

Ah well. As long as I keep making progress, my sweetie is okay with me dawdling a bit.

As for the progress pictures, this is likely to be the view for all of them in the future. My iPhone’s camera can just barely capture them all if I stand with my back against the opposite wall.

#woodworking #HomeImprovement

Discuss... Reply to this in the fediverse: @davepolaschek@writing.exchange
A bench-top bungie (and foot) driven reciprocating lathe

I built a bench-top lathe over the past week. Well, mostly yesterday and this morning.

Nothing too fancy. A couple pieces of tubafor, a couple clamps, some paracord. Lathes are pretty simple machines, turns out.

I put up a video of it running if you’re super-curious.

I’ll probably post more after I’ve actually turned something, but my gouge and skew don’t get here until tomorrow.

#woodworking

Discuss... Reply to this in the fediverse: @davepolaschek@writing.exchange
Jefferson Bookcases, with books

One of my ongoing projects is building bookcases to hold all my books. I’ve now built 3 XL cases, 12 large cases, and 5 medium cases. I’ve got another dozen medium and a “whole bunch” of small cases to build yet, but it’s nice getting books unpacked and organized.

I expect I’ve got another month or two of building cases remaining, plus at least one more trip to town for lumber, but over half of the boxes are unpacked, and it feels good to know that the end is in sight.

Once the bookcases are done, I’ve got more shop furniture to build. I have a brace till (for holding bit braces) which needs seven drawers built to hold the various drill bits I have. I want to make a 50-drawer hardware cabinet, and have some wormy chestnut arriving this week for the drawer fronts for that. Plus I need another bench to hold the forge and associated equipment.

No worries of being bored in retirement just yet!

#woodworking #HomeImprovement

Discuss... Reply to this in the fediverse: @davepolaschek@writing.exchange