davepolaschek

Woodworking

[Originally written by Bob Summerfield in February of 2019]

I should probably say a little about sharpening this type of saw for anyone who may come along later and wonder. I researched the topic as best I could with the scant information available. One nationally prominent saw sharpener, whom I respect a lot, documented his approach. He sharpened the saw with “peg teeth”, that is with an equal rake angle on the front and back edges of the teeth. That would equate to a 30 degree rake angle, which would normally be thought of as extreme. The rationale was that the saw would then cut equally well on the push and pull strokes. That is true, but equally well doesn't translate to efficiently. It wouldn't cut great on either the push or pull stroke. He also put no set in the saw, so that it wouldn't scrape the miter jack. That might work fine in thin stock, but it seems the saw would bind in thicker stock.

If you think about a miter box saw, they could be filed to cut on both the push and pull stroke, but they are not. There's a reason for that – to cut more efficiently on the push stroke. They also have a light set.

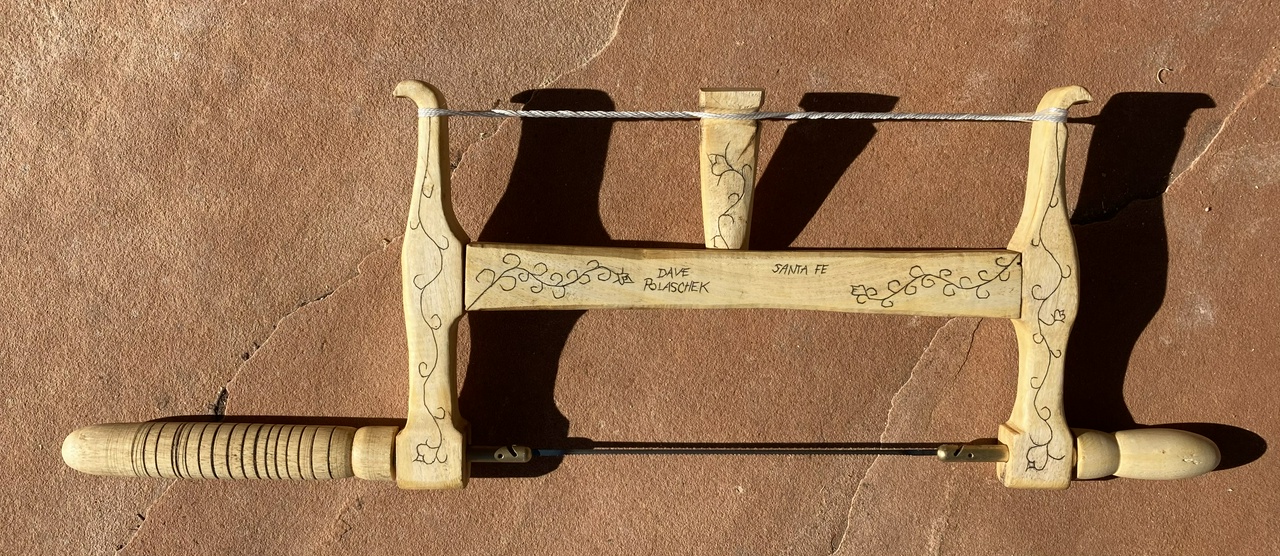
In examining Kevin's saw, it was quite dull, but the teeth were very well sharpened (equal size and spacing). I doubt the saw had ever been resharpened since it was made. In looking down on the saw with the toothline pointed up, the teeth were pointed right to left with what appeared to be a “normal” rake angle for a crosscut saw of around 12 to 15 degrees. I would call this configuration suitable for a right hand push stroke. That is, if you grasp the handle in the right hand, with the toothline pointed to the right, the teeth are shaped to cut best if the saw is pushed away from you. Kevin's saw also had a very slight set.

I looked at as many pictures of this type of saw as I could find on the internet. You could see the teeth on several of them, and they were all shaped just like Kevin's saw. Based on these observations, I concluded that a standard crosscut sharpening with very light set is what these saws were supposed to have. All that I saw were sharpened for right hand use. But what if you were a left handed sawyer? Then you would either have to use the saw on the pull stroke or have a left handed saw made for you.

I hope that is helpful information for anyone who may have a need to sharpen a French miter jack saw, or scie à recaler.

To further illustrate the above, I'll use this picture from the Lee Valley website. If you were standing on the left side of the picture, you would be using a right handed grip (though both hands may be on the saw) and a push stroke. If you were on the right side, you would be using a left handed grip and a pull stroke.

Use of a scie à recaler from Lee Valley Tools


Contents

#woodworking #tools

Discuss... Reply to this in the fediverse: @davepolaschek@writing.exchange

In late 2017, I bought a miter jack, thinking that I would need to be making some 45 degree miters for the box swap in early 2018. Since then, I've changed my plans for what I'm going to build (I got better at dovetails, mostly) and might not be doing miters, but figured that I would play with my miter jack a little before I get started on the box construction for the swap. After all, who doesn't enjoy a little procrastination?

For those who aren't familiar, a miter jack is basically a vise with angled jaws. I've read of ones that have both 45 and 60 degree angles, but the one I found on eBay just had 45 and 90. That's probably just as well. I don't plan on making hexagonal boxes. And the 90 will mean I don't have to dig out my shooting board as often.

Workbench with miter jack, plane, back-saw, holdfasts, and a mitered corner

While waiting for oil to dry on another project in February 2018, I set it up and took it for a spin. I clamped a piece of ½”x6” poplar in the jaws, got out my jack plane (pretty sure the jacks aren't related) and started removing wood.

Jack plane on miter jack, planing a miter

It works pretty well. One thing I need to watch out for is some spelching if I don't chamfer the far end, but that mostly gets trimmed away when I get down to level with the jaws. The other is that if I'm not paying attention, I can end up planing off a bit of the miter jack, which might change the angle from a perfect 45°︎ over time. Shouldn't be too tough to avoid though, and I can see where previous owners have dinged up the jaws a little.

Mitered end on a board

But if I do my part, it looks like creating near-perfect miters is pretty easy. Here are my two test pieces of poplar, just standing up next to each other on the bench. That's a good enough miter that I should be able to make a nice box corner with almost no extra tuning. And while it's basically just another configuration of shooting board, having it be a vise means that I don't need a bunch of extra hands to hold the piece I'm working on.

Mitered corner

Finally, my square says that's 90 degrees. It's just the photograph that looks a little off because of the extreme close-up.

Bob Summerfield wrote a good post on sharpening a saw for use with a miter jack.


Contents

#woodworking #tools

Discuss... Reply to this in the fediverse: @davepolaschek@writing.exchange

Once the saw was “done” I still wasn't quite happy with it. I decided it needed decoration. With the light yellow of the citrus wood, the dark brown of coffee grounds made a very pretty contrast. Kolrosing (or kohlrosing) it is!

I decided to do a more linear pattern on one side, and a more curvy, or floral pattern on the other, mostly to get more experience and figure out what I like better. I started with the lines.

Front view of the pieces of the bow saw after kolrosing

That was yesterday morning. This morning, I made curves.

Reverse view of the pieces of the bow saw after kolrosing

In both cases, after carving the lines, I rubbed finely ground coffee grounds into the lines, then lightly sanded the surface to remove my pencil marks and coffee that wasn't in the lines, then coated the wood with tung oil, which should lock everything into place.

So there it is. Fin.

Front of bow saw, assembled

Reverse of bow saw, assembled


Contents

#woodworking

Discuss... Reply to this in the fediverse: @davepolaschek@writing.exchange

So at the urging of a few people who wanted to know how the saw would cut, I put it together this morning and cut a curve in some ¾ pine. Nothing tricky, but the kind of thing I end up doing a lot.

Bow saw and a piece of pine with an arc drawn on it

I put in a new Pegas Coping Skip 6.5” 18tpi blade, and tightened it up. I took it to about an A#, just above A440Hz. That's an octave below the tension I normally have in the metal-framed coping saw, but it feels more solid. I'll tighten it up further after I re-tie the string a little tighter. Currently it took over a dozen turns to get to this tension because the string is fairly loose when straight.

First cut with the bow saw, slightly ragged, but not horrible

The saw cuts reasonably well, and while I didn't hit any places where I was turning so sharply it would bind, the tension in the blade would've kept that from happening.

The offcut from my test piece

The two things I noticed were that it has a shallower throat (not surprising, that's how I built it) so I had to approach the cut differently, and the wood flexes less, which makes it feel more solid in use.

metal-framed coping saw, hanging in a cabinet

I'll keep the metal framed coping saw around, probably with a coarse blade for wasting away wood in a hurry, but I suspect this one will get a lot of use in the future.


Contents

#woodworking

Discuss... Reply to this in the fediverse: @davepolaschek@writing.exchange

I decided I didn't like the little spots of tear-out and places where the grain left me with a rippled surface, so I spent an hour today going after the pieces of the saw with a card scraper.

Smoothing one of the arms of the bow saw with a card scraper

Bow saw after smoothing the surfaces with a card scraper

I also cleaned up the shoulder on one of the tenons on the cross-piece. That makes the arms of the saw sit more in-line with each other so the saw blade won't be stressed more than it needs to be.

The citrus looks a nice yellow with the tung oil on it, but I've decided the frame of this saw is going to get decorated because it really looks nice with the coffee colored lines on the yellow, so I started sketching ideas. Have a few, but nothing I'm willing to commit to the surface of the wood yet. Built a couple bookcases, and I'm out of pine 1×6s now, so I phoned the lumber yard to get more, which I'll pick up in the morning, then unload, and then I'll start finishing the three built cases that are sitting in my shop. Probably be Wednesday before I even get back to sketching design ideas for this.


Contents

#woodworking

Discuss... Reply to this in the fediverse: @davepolaschek@writing.exchange

I got the bow saw completed today. I still want to decorate it, but it's together and functional now.

First on today's menu was getting the arms shaped. They don't really need to be thinner, but making them a little thinner will make the saw more comfortable to use. I used a drawknife to get the other dimension thinned down and smoothed.

Shaping the arm of the bow saw with a drawknife

Both arms of the bow saw, with a very used-up pencil top of frame

With that done, I mixed up some epoxy and glued the pins into the handles.

Pins and handles in yellow clamps

Then some quick chamfering on the corners of the arms, mostly for comfort, but also to clean up a couple spots of tear-out where the grain wasn't cooperating with me.

Chamfering the arm with a carving knife

Then a coat of tung oil on the parts I had done.

The parts of the bow saw just after their first coat of tung oil

And I disassembled a paracord boot-lace to get one of the strands of nylon string out of it. That'll be the cord that tensions my bow-saw. And yes, I'll need to tie a knot better than a square knot.

Testing the string for tensioning the saw

Then I cut a toggle out of one of the citrus offcuts left over from turning the handles, and put a groove in it so the string wouldn't slip off it.

Filing a groove into the toggle

And I tried a little kolrosing on the side of the toggle. It looked pretty good, but my carving skills still need work.

Toggle with kolrosed design, with coffee grounds pretty much everywhere

And that sorta finishes the saw. Everything needs to cure, and I want to decorate the arms and cross-piece, but that'll be another day.

Assembled bow saw

Reverse view of assembled bow saw


Contents

#woodworking

Discuss... Reply to this in the fediverse: @davepolaschek@writing.exchange

My next shop session was spent shaping the cross-piece and the arms. First up, taking a spokeshave to the cross piece to thin it slightly in the middle, and make the ends match the arms nicely. It's not going to be a huge taper, but just a little bit looks a lot better than none. Plus I get to smooth out the surface now. I don't think I'll be doing any sanding on this saw, so I want to fix any little spots of tear-out from cutting and planing the pieces.

Using a spokeshave to shape the cross-piece

Cross-piece of baby bow-saw

Reverse side of cross-piece

Then I used the spokeshave and a knife to chamfer the corners, giving the piece a slight octagonal shape. Again, lots of grain-reading, as there are some funky reversals in this wood.

Next up were the arms. It's time to round over the ends where the pins for the saw will go. I basically mark an equal amount on the top and side, then use a rasp to round over, removing my pencil marks. If it doesn't look right, I'll add more marks and remove a little more.

One arm of the bow-saw with marks for where to remove wood

The same arm, after removing the marked wood

End-on view of the arm with the wood removed

Then I took a knife and chamfered the corners on the part of the arms which will hold the string. I didn't want to do too much, as I also need to shape the lower parts of the arms, but that's a job for tomorrow.

String end of the arm, with the corners chamfered

And that's it for today. I've got a day and a half in, and other than sharp corners on the lower parts of the arms, the saw is usable and not looking half-bad,


Contents

#woodworking

Discuss... Reply to this in the fediverse: @davepolaschek@writing.exchange

I decided I don't like the metal-frame coping saws. I find that the far end of the saw will often twist when I don't want it to, and I'll end up cutting a curve when I don't want to, or cutting a straight line when I want a curve. So I decided I'd make a bow saw that uses the standard coping saw blades to complement my bigger turning saws ( 1 and 2).

First I cut the arms out of a piece of citrus I got from AZWoody a couple years back. Then I drilled holes in the arms for the pins (from Gramercy Tools) and inserted the pins with one of the coping saw blades I want to be able to use in this saw. This let me figure out the length of the cross-piece. The important thing is to remember to leave material for the tenons that will stick into the mortises in the arms (DAMHIKT).

Measuring the cross-piece of the bow-saw

With that done, it's time to chop the mortises in the arms.

Preparing to chop a mortise

Just chisel work with a ¼” chisel. Aim for about ⅜” deep, because I'm working with ¾” stock.

Then it was time for a little break, so I fired up the lathe to make the handles. The citrus turns pretty well, I think.

Bow saw handles, fresh off the lathe

Time for some tenons. Cut them to match the mortise, then pare with a chisel to make them fit. They can be a little loose – the shoulders carry all the load.

Marking the tenon on the cross-piece

First cut for the tenon

Completed tenon

Do a test fit and mark the pieces for orientation.

Test fit of the arms and cross-piece of the bow-saw

Then it's time to start shaping the arms. I do one dimension at a time, roughing with a coping saw, then a spokeshave, then a knife, and eventually maybe a rasp (if I can't get a nice finish with the knife).

Rough-shaping the arm with the coping saw

Smoothing the arm with the spokeshave

Further shaping the arm with a knife

One dimension of one cross-arm roughed in

Then it was time to take a break and get some food. Next up will be shaping the other arm (they don't have to match exactly, but they need to look good together) and the cross piece, then doing the same in the other dimension for all the pieces. Also need to epoxy the pins into the handles, find some string, and carve a toggle to tension the string.


Contents

#woodworking

Discuss... Reply to this in the fediverse: @davepolaschek@writing.exchange

This is a project I built in December of 2020. It's one of my most-used saws in the shop.

Front of bow saw, assembled Reverse of bow saw, assembled

#woodworking #contents #buildBlog #project

Discuss... Reply to this in the fediverse: @davepolaschek@writing.exchange